Your guide to setting up and using a VPN on Starlink


Starlink can connect you from places traditional internet can’t reach, but its network works differently from a typical home broadband setup. That difference matters if you want to use a virtual private network (VPN).
You can use a VPN with Starlink without much trouble in most cases. However, because most connections use Carrier-Grade NAT (CGNAT), some setups may require additional configuration.
Another practical limitation is that the standard Starlink router doesn’t support VPN clients. If you want to run a VPN across your entire network, you’ll need to set it up on each device or use a separate, VPN-capable router.
In this guide, we’ll walk you through how Starlink works with a VPN, what to consider before choosing a setup method, and the steps to help you get your Starlink VPN running smoothly.
How does a VPN work with Starlink?
Starlink usually uses CGNAT, which assigns a single shared public IP address to multiple users. This prevents direct inbound connections from the internet, making it difficult to host services or access devices on your home network remotely.
Outbound VPN connections on Starlink
For most users, VPN use is outbound, meaning your device initiates the connection to a VPN server. This works without special configuration on Starlink. Most modern VPNs support Network Address Translation (NAT) traversal, so they can establish connections without additional configuration, even behind CGNAT.
Inbound VPN connections on Starlink
If you want to host a VPN server or access your home network remotely, CGNAT becomes a limitation. Starlink’s default router also doesn’t support port forwarding, which adds another constraint.
To enable direct inbound connections, you’ll typically need a Starlink plan that offers a publicly routable IP address, along with a router that supports your VPN setup. In other cases, remote access may require VPN solutions that use relay servers or similar techniques instead of direct connections.
Benefits of using a VPN with Starlink
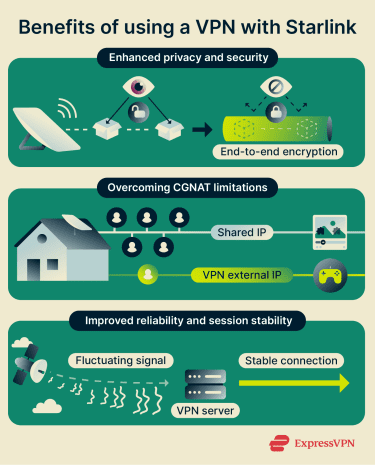
Enhanced privacy and security
Like any internet service provider (ISP), Starlink can see certain metadata about your traffic, such as the IP addresses you connect to. A VPN encrypts your data between your device and the VPN server, masking your IP address and reducing the visibility of your activity to network-level observers.
Overcoming CGNAT limitations
CGNAT’s shared public IP addresses can sometimes affect how websites respond, for example, by triggering rate limits, CAPTCHAs, or additional verification steps.
Since a VPN typically assigns you a different external IP address, it can help avoid some of these shared-IP side effects. This can be particularly useful for activities like logging into accounts or maintaining stable sessions.
Improved reliability and session stability
Starlink's satellite-based connection can fluctuate due to weather, satellite handovers (device connection changing from one satellite to another), or outages. Some VPN protocols are designed to help maintain an active session during short disruptions.
Challenges of using VPN with Starlink
Latency spikes during satellite handovers
Starlink satellites move rapidly across the sky in low Earth orbit (LEO). Your dish doesn’t connect to a single static point but tracks these satellites as they pass overhead. This means that your dish must hand off the signal from a departing satellite to an arriving one.
For most activities, these disruptions go unnoticed. However, VPNs maintain an active encrypted tunnel to a remote server, so short interruptions can occasionally cause the connection to pause or reconnect. If a VPN kill switch is enabled, internet access may be temporarily blocked until the connection is restored.
Indirect routing paths
Data doesn’t travel in a straight line from your dish to the VPN server. The signal goes up to a satellite, down to a ground station, and then to the internet. Your assigned ground station may be far from your physical location, can change over time, and its location isn’t something you can easily determine.
If you choose a VPN server near your location, but your traffic is routed through a ground station that isn’t nearby, it can create something known as a "trombone" effect. For instance, a user in rural Nevada might be routed through a ground station in Los Angeles. If that user connects to a Las Vegas VPN server, the data travels to space, lands in Los Angeles, and then has to backtrack to Las Vegas. This less direct route can add lag to your connection.
Router hardware limitations
The standard Wi-Fi routers included with Starlink offer basic functionality but don’t support VPN firmware. To use a VPN to protect your entire network, you typically need to use a third-party router connected to Starlink, which can result in a more complicated setup.
Things to consider before using a VPN with Starlink
Before you subscribe to a VPN, it helps to understand your specific Starlink hardware and service tier.
Starlink plan
Your specific service plan affects whether you can accept direct inbound connections, which matters if you want to host a VPN server or access your network remotely.
- Residential and Roam plans (Personal): These plans operate behind CGNAT, which means your connection doesn’t have a publicly routable IP address. For most users, this isn’t a problem, but it does limit some setups.
- Priority plans (Business): Some Priority plans offer the option to use a publicly routable Internet Protocol version 4 (IPv4) address. When enabled, this allows your network to accept direct inbound connections, which can support hosting a VPN server or accessing devices remotely.
Note: Starlink supports IPv6 across its network and routers, and devices may receive globally routable IPv6 addresses. In some cases, this can allow direct inbound connections. However, IPv6 support may vary across VPN services, routers, and applications, so it could require additional configuration.
Starlink kit
If you plan to install the VPN on a router, you need to connect a third-party router to your Starlink router. The method for this varies by the Starlink router generation and kit you use:
- Gen 1 (Standard Circular): Can be directly replaced by a third-party router.
- Gen 2 (Standard Actuated): Has no Ethernet ports. To use a third-party router, you must purchase the separate Starlink Ethernet Adapter from the Starlink shop.
- Gen 3 (Standard): Features two built-in Ethernet ports with a removable cover. You can connect your own router immediately.
- Starlink Mini: Includes one built-in latching Ethernet port, making it ready for third-party router connections out of the box.
Starlink bypass mode feature
Starlink bypass mode passes the Starlink connection to your third-party VPN router, allowing it to handle all traffic management. This is important because when you add a third-party router to run your VPN, you risk creating a double NAT (two routers performing NAT at the same time). This can cause lag or connection failures, so it’s worth enabling.
Features to look for in a Starlink VPN
Here are the main features to look for when you compare VPNs for Starlink.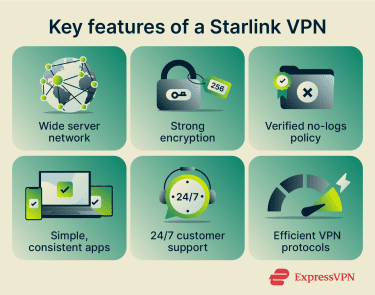
Wide network of high-speed servers
Look for a VPN with servers spread across as many regions as possible. A broad network helps avoid congestion and lets you choose nearby locations, which often keeps speeds steadier.
Strong encryption
Most leading VPNs use Advanced Encryption Standard with 256-bit keys (256-bit AES) for their main data channel. It’s a widely used and well-studied cipher used in many security protocols, including common VPN tunneling protocols. This helps protect against passive eavesdropping on the path between your device and the VPN server.
Verified no-logs policy
A VPN shifts trust from your internet provider to the VPN company. A no-logs policy means the service limits or avoids storing identifiable activity data. Look for a clear statement that explains what the provider excludes, backed by independent audits.
Simple, consistent apps
Starlink already gives you the Starlink app, dish controls, and router settings to consider. A good VPN shouldn’t add confusion. Prioritize providers with clean interfaces, a clear connect button, readable status indicators, and a consistent layout across Windows, macOS, iOS, and Android.
24/7 customer support
Starlink doesn’t provide troubleshooting help for VPN connections, so it’s a good idea to choose a VPN service that offers round-the-clock support, ideally with live chat and solid router setup guides.
Efficient VPN tunneling protocols
You should look for modern VPN protocols that work well with CGNAT. They often deliver higher throughput and lower overhead than older standards, helping maintain performance when latency is high. You should also verify that the provider offers alternative protocols like OpenVPN or Internet Key Exchange version 2 (IKEv2) in case the primary protocol has issues.
Recommended VPN protocols for Starlink
Modern VPNs are designed to handle NAT environments like CGNAT and adapt to changing network conditions without manual input.
Most VPN apps automatically select the optimal protocol for your connection. However, if you run into performance or stability issues, switching protocols manually can sometimes help. Understanding the available options can make troubleshooting easier.
In general, VPNs that use User Datagram Protocol (UDP) tend to perform better on Starlink because they have less overhead than Transmission Control Protocol (TCP)-based connections. TCP-based VPN configurations (such as OpenVPN over TCP) may result in slower speeds in some conditions due to additional error checking and retransmission.
- WireGuard: This open-source protocol is fast and uses UDP. WireGuard is the standard for many modern VPN providers.
- OpenVPN: OpenVPN is widely supported and flexible, but it can be slower than newer protocols, especially when configured to use TCP.
- ExpressVPN’s Lightway protocol: A lightweight protocol designed for fast connection times and efficient performance. It supports both TCP and UDP and is built to handle network changes smoothly.
How to set up a VPN on Starlink
To set up a VPN on Starlink, you'll need to use either device-level apps or a compatible third-party router to enable VPN functionality.
Method 1: Using a VPN app on a device
For outbound connections, like streaming or browsing, this is the simplest approach to protect individual devices without altering your network hardware.
What you need:
- Compatible device (e.g., Windows/Mac computer, Android/iOS smartphone or tablet)
- Active VPN subscription
- Access to the Starlink Wi-Fi network
Steps:
- Connect your device to the Starlink Wi-Fi network via the Starlink app on your phone or your device’s Wi-Fi settings.
- Open your VPN app, sign in with your account credentials, select a server location, and tap Connect to establish the VPN tunnel. Your device's traffic is now encrypted and routed through the VPN.
- Verify the connection by using an IP address checker to identify your IP. It should match the VPN server's location.
Repeat for each device you want to protect. Note that this method only secures the specific device, not the entire network.
Method 2: Using a third-party router
To protect all devices connected to your home setup, use a VPN-compatible router connected to Starlink.
What you need:
- Starlink kit and access to the Starlink mobile app
- Third-party router that supports VPN client configuration
- Ethernet cable (depending on your Starlink kit)
- Active VPN subscription with configuration files from your provider
Steps:
- Open the Starlink app on your mobile device, go to Settings > Advanced > Bypass Mode, and toggle it on. Note that this disables your Starlink router’s Wi-Fi features completely, and you’ll need to perform a factory reset to re-enable them.
- Connect your third-party router's wide area network (WAN) port to the Starlink Ethernet adapter or directly into the Starlink router using an Ethernet cable. The connection method might vary depending on the Starlink router model.
- Power on the third-party router and access its admin interface, usually by entering the router’s IP address (such as 192.168.1.1) in a web browser on a connected device.
- Go to the VPN section in the router's settings. Select or confirm your protocol, then upload the configuration file or manually enter the configuration details from your VPN provider (server address, username, password, certificates).
- Enable the VPN connection and apply the settings. The router will now route all network traffic through the VPN.
- Connect your devices to the third-party router's Wi-Fi and test the VPN by browsing or checking your IP address.
Common VPN issues with Starlink and how to fix them
As a Starlink user, you may face some connectivity challenges when using a VPN, but you can solve many of these issues with simple adjustments.
VPN won’t connect
Start with the basics. Turn the VPN off and confirm that normal sites load over Starlink. If they don’t, use the Starlink app to check for outages or obstructions, then reboot the dish and router.
If Starlink works fine, troubleshoot your specific setup:
- For VPN apps: Try a different server. You can also try switching the protocol in your app settings from UDP to TCP or contacting your VPN’s customer service.
- For router-based VPNs: Verify your configuration files and credentials in the router dashboard.
Frequent drops
Check the Starlink app for short outages and obstruction warnings, and move the dish if trees or buildings block the view of the sky.
You can also test the VPN-connected device on Ethernet rather than Wi-Fi to rule out weak local signals. If drops occur with high latency or packet loss, try another VPN server or protocol.
Slow speeds or high latency
Starlink’s help page warns that VPNs can affect performance, since VPNs can add extra overhead on top of satellite delay.
To improve Starlink VPN speed:
- Select a different server: Choose a nearby server, or one with better performance.
- Test a faster protocol: Switch to WireGuard, Lightway, or IKEv2 where available.
- Use a wired connection: Connect your device directly to the router via an Ethernet cable to eliminate Wi-Fi interference during bandwidth-heavy activities.
- Enable split tunneling: This feature divides your traffic. It sends specific apps through the encrypted VPN tunnel while allowing others to access the internet directly. You should use the direct connection for high-bandwidth activities to preserve speed.
Should you use a free VPN with Starlink?
Free VPNs can be a convenient option for light browsing or testing a service. But on satellite internet, you may find the standard limitations more noticeable. Common trade-offs include:
- Data caps and speed limits: Many free services restrict your monthly data allowance or throttle bandwidth, which can interrupt streaming or large downloads.
- Fewer server locations: You typically have access to a smaller server network. This makes it harder to find a location close to you.
- Restricted features: Advanced tools, such as router support or split tunneling, are often reserved for premium plans.
For occasional use, a free VPN may be sufficient. However, if you’re looking for more consistent performance or broader feature support on Starlink, a paid VPN service may be a better option.
FAQ: Common questions about Starlink VPN
Does Starlink have a built-in VPN?
Can I use a VPN with satellite internet?
Can I set up a VPN on a Starlink router?
What is the best VPN for Starlink?
Is Starlink Wi-Fi encrypted?
Does a VPN make Starlink slower?
Take the first step to protect yourself online. Try ExpressVPN risk-free.
Get ExpressVPN


Comments
Thanks for this blog. But given that we are on the ExpressVPN website, it would have been nice if you had taken an example of a router flashed with ExpressVPN firmware or, even better, your own router aircove. That being said, as reported by some users here: https://www.reddit.com/r/Starlink/comments/11zdux4/is_it_possible_to_use_starlink_with_a_vpn_router/ and also experienced by myself, the expressVPN router doesn't work with the Starlink router in bypass mode. For it to work, we have to keep the normal mode. This is not ideal since we have two Wi-Fis. I'm not an expert in this matter but maybe it works only on router configured with OpenVPN or wireguard, but not lightway Can you dig into it an maybe update the blog post with the results? That would be really appreciated. Thanks in advance
I am completely bypassing the starlink router (dishy plugged directly into my router) I have the router working without the VPN, but the VPN is failing with an error about link local: (not bound) is there something that's needed in terms of MTU trickery or similar to make it work?