What can you do with a Raspberry Pi? Real ideas that work


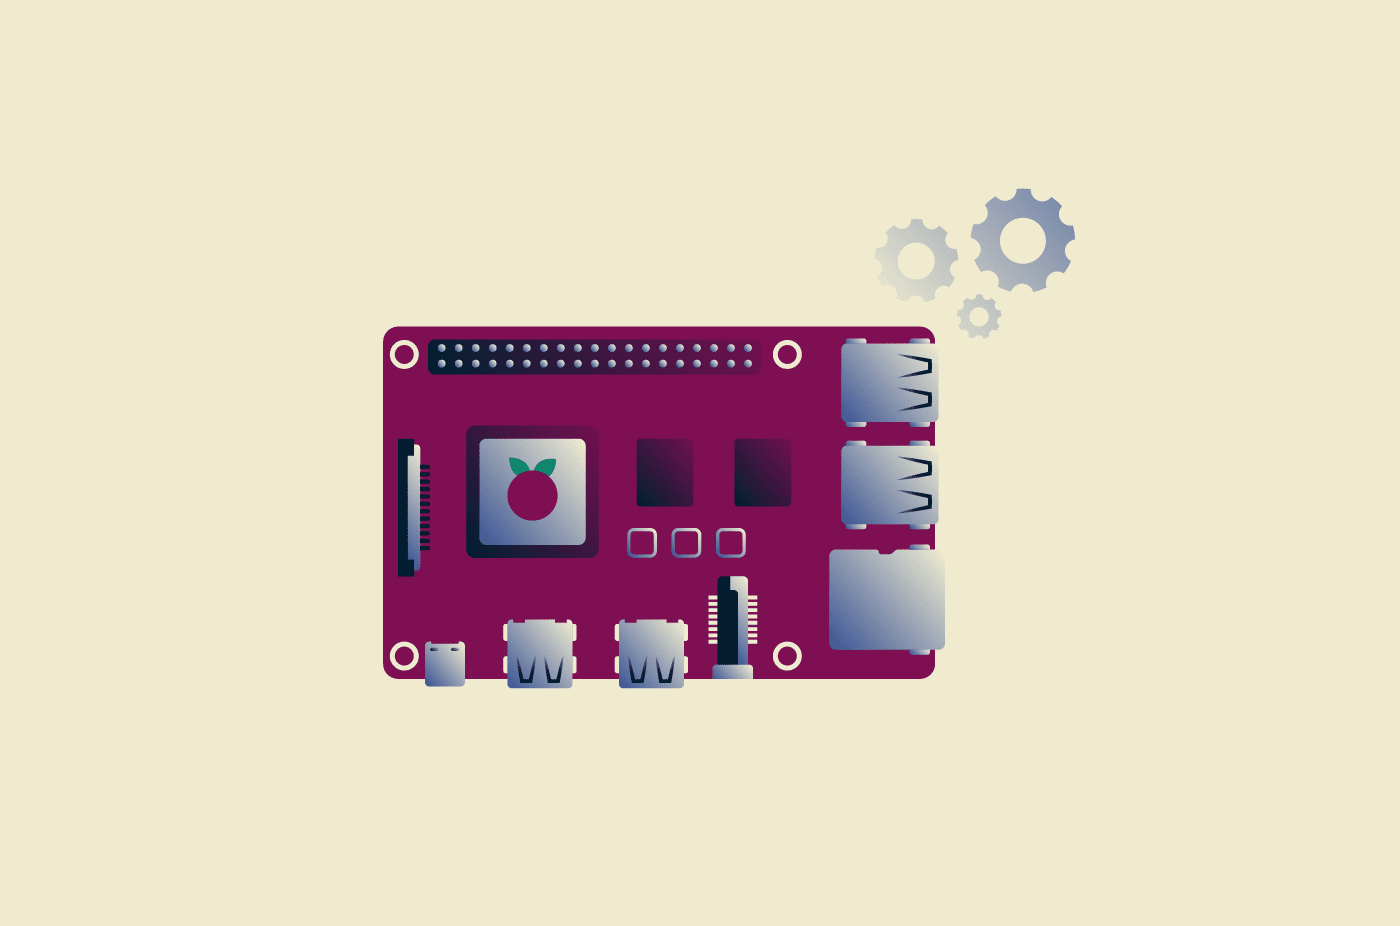
Whether you're a first-time tinkerer or a seasoned developer, a Raspberry Pi is one of the most genuinely useful little computers you can buy. You can turn it into a media center, retro gaming console, smart home hub, or even a mini server. The same low-cost board can be a child’s first computer on Monday and a weather station on Tuesday.
This guide walks through practical Raspberry Pi projects by skill level. Some you can finish in under an hour. Others can grow into full weekend builds. The goal is simple: help you pick something you’ll actually complete and learn from.
What is a Raspberry Pi?
A Raspberry Pi is a small, single-board computer (SBC) developed in the U.K. by the Raspberry Pi Foundation. It was initially created to make computing more accessible, driven in part by the decline in the number of people applying to study computer science. The Foundation wanted a low-cost, small, durable, and adaptable machine to put in classrooms. Those same factors quickly made it popular far beyond the classroom, and it’s now used by hobbyists, developers, and businesses.
Most Pis run Raspberry Pi OS, a version of Debian Linux tuned for the hardware. The boards have the standard ports you’d expect, like USB, HDMI, Ethernet, and general-purpose input/output (GPIO) pins along the edge. These pins let you wire sensors, motors, lights, and screens straight into the board and control them with code.
Raspberry Pi models (and which one to pick)
The Raspberry Pi family has grown significantly since 2012. Here’s how the main product lines break down:
- SBC: The classic Pi. Simply plug in a monitor, keyboard, and power, and boot up Linux. This is the Pi 3, Pi 4, and Pi 5.
- Pi Zero: Smaller, cheaper, lower-powered boards for always-on projects where you don’t need much horsepower.
- Pi 400 and Pi 500: A full Pi built into a keyboard chassis, like a Commodore 64. Plug in a monitor, and you’ve got a desktop.
- Pi Pico: A microcontroller, not a computer, and no operating system. You flash code directly to it. It's great for reading sensors, driving motors, or anything at the hardware level where Linux is overkill.
Here’s a comparison of the popular models from each family.
| Model | CPU | RAM | When to get |
| Raspberry Pi 5 | 2.4GHz quad-core Cortex-A76 | 1, 2, 4, 8, 16GB | Best for performance-heavy projects |
| Raspberry Pi 4 | 1.8GHz quad-core Cortex-A72 | 1, 2, 4, 8GB | Well-rounded solution for most use cases |
| Raspberry Pi 500 | 2.4GHz quad-core Cortex-A76 | 8GB | Best for an all-in-one desktop and project machine |
| Raspberry Pi Zero 2 W | 1GHz quad-core Cortex-A53 | 512MB | Good for low-power tasks that don’t require powerful hardware |
| Raspberry Pi Pico | 133MHz dual-core Cortex-M0+ | 264KB (SRAM) | Well-suited for microcontroller projects and electronics that don’t require a full computer |
If you’re unsure about which Raspberry Pi model to go with, the Pi 4 is a good starting point, offering well-rounded hardware that’ll handle all but the most performance-heavy projects.
Installing an OS onto your Raspberry Pi
Before you start any project, you’ll usually need to install an operating system on your Raspberry Pi. The OS itself can vary based on the project, but the fundamental process of installing one is largely the same.
The steps below cover how to install Raspberry Pi OS using the Raspberry Pi Imager.
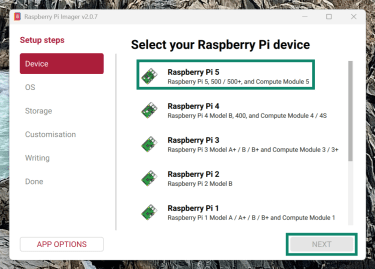
- Select Device and choose your Raspberry Pi model from the list. In this example, we'll use the Raspberry Pi 5. Then click Next.
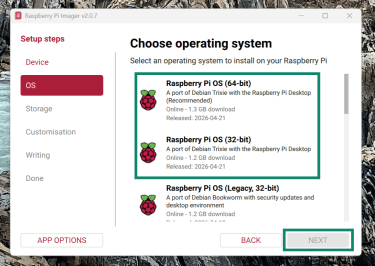
- Choose your operating system. If you’re installing Raspberry Pi OS, select the 64-bit version if your device has more than 4GB of RAM. Otherwise, use the 32-bit version.
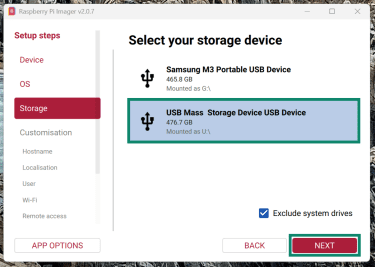
- Select your microSD card from the list of available storage devices and click Next.
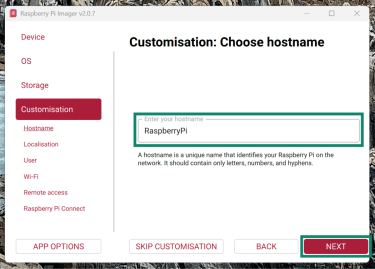
- Provide the hostname, which will be used to identify your Raspberry Pi on your network, then click Next.
- Select your time zone and keyboard layout and click Next.
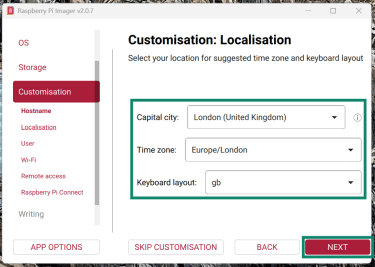
- Create a user account for your device (the user name must be lowercase and contain only letters, numbers, and hyphens). Click Next.
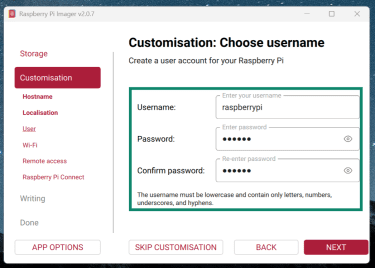
- Enter the network settings you want your Raspberry Pi to use. If you’re using home Wi-Fi, enter your SSID (Wi-Fi name) and its password. Then click Next.
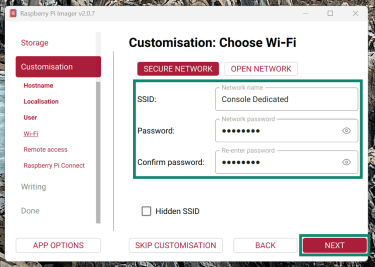
- Enable Secure Shell (SSH), choose your authentication method, and click Next. SSH lets you access and control your Raspberry Pi remotely from another computer.
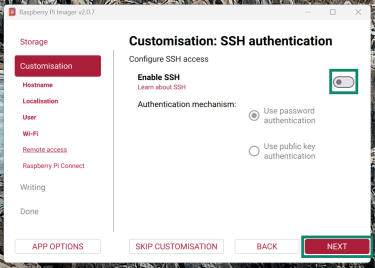
- As an optional step, enable Raspberry Pi Connect to remotely connect to your Raspberry Pi from anywhere in the world. Click Next.
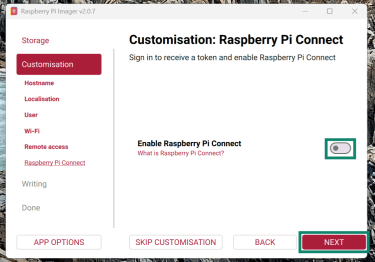
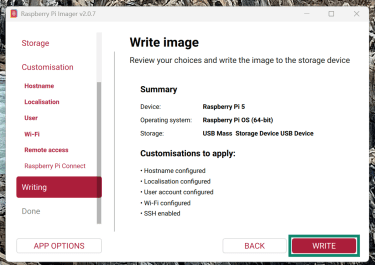
- Verify your chosen configuration and click Write to start the installation.
Beginner Raspberry Pi projects
You don’t need any advanced technical knowledge. These projects are straightforward, well-documented, and hard to mess up.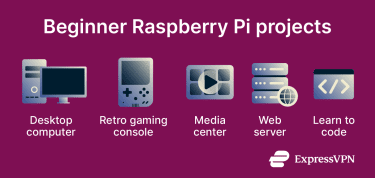
Desktop computer
The most obvious thing to do is to plug in a keyboard, mouse, and monitor and use the Raspberry Pi like a basic PC. It’s a decent experience on Pi 4 or Pi 5 and works well for web browsing, email, word processing, light photo editing, and learning Linux.
It’s not fast enough for heavy multitasking, video editing, or modern gaming, but a Pi 5 with 8GB RAM and a Non-Volatile Memory Express (NVMe) SSD attached via the Peripheral Component Interconnect Express (PCIe) header is surprisingly snappy.
The official getting-started guide walks you through flashing the operating system using Raspberry Pi Imager, connecting peripherals, and booting up.
Build a retro gaming console
With a case, a couple of USB controllers, and a RetroPie installation, you’ve got a machine that plays Nintendo, Super Nintendo, Mega Drive, PlayStation, Game Boy, and more from a single menu.
A quick note on the software: RetroPie has been the classic choice for years, but sentiment around it is split. Some like its high level of customization, while others prefer a more plug-and-play approach. Many people running a Pi 5 now use Batocera or Lakka instead, both of which are more actively maintained and handle the Pi 5 out of the box. On a Pi 4, RetroPie is still great.
The Pi 5 is strong enough to run most PS1, N64, and Dreamcast games well, though individual titles may vary. Anything 3D and graphically heavy will push it. A Pi 4 is plenty for everything up to and including PS1.
Turn it into a media center
Kodi, a free and open-source media player, is a popular option. It plays your local music and movie files, streams from network shares, and has add-ons for many streaming services (though support can vary).
You can either install Kodi on top of Raspberry Pi OS or flash a purpose-built distribution like LibreELEC that boots straight into Kodi. The second option is faster and simpler.
You’ll need at least a Pi 4 for smooth 4K playback. A Pi 3 will handle 1080p but will stutter on higher resolutions.
Run a simple web server
Using Apache on Pi is about as simple as web hosting gets. It’s useful for learning how web servers work, hosting internal tools, and testing websites locally. Two commands get you a working server:
- sudo apt install apache2
- sudo service apache2 start
Drop HTML files into /var/www/html/ and they’re served on port 80 to anyone on your network. That second step, getting files into /var/www/html/, is where many beginners get stuck because the folder is owned by root. The cleanest fix is to add your user to the appropriate group or change ownership with sudo chown -R $USER:$USER /var/www/html.
If you want to run more intricate websites with PHP and a database, install the LAMP stack (Linux, Apache, MySQL, PHP). The Raspberry Pi Projects site has a full walkthrough. If you want to expose the site to the public internet, you’ll need to deal with your router’s port forwarding.
Learn to code
If you’ve never written code, a Pi is a genuinely good first environment. Python comes pre-installed on Raspberry Pi OS Desktop, along with the Thonny Integrated Development Environment (IDE) for writing and running scripts. The Raspberry Pi Foundation also runs free Python courses.
Python is the most practical first language here because Pi has well-supported libraries for working with GPIO pins, sensors, and web requests. Start with simple scripts that print text and work up to controlling hardware. SparkFun’s Python guide for the Raspberry Pi is a well-structured beginner resource.
Intermediate Raspberry Pi projects
These projects take a bit more setup, but they’re where things start to feel useful in everyday life.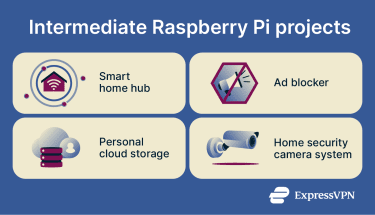
Create a smart home hub
If you own more than one smart home device, and they’re stuck in different apps that don’t talk to each other, installing Home Assistant fixes that. It’s the biggest open-source home automation platform, and the Raspberry Pi is its most popular host.
Home Assistant supports thousands of integrations, like lights, thermostats, cameras, solar inverters, door locks, and more. Most of the processing runs locally on your hardware, giving you full control over your data, though cloud-based options like Home Assist Cloud are also available, particularly for remote access.
The Home Assistant website has a thorough guide explaining how to set it up on a Raspberry Pi. Expect to spend an afternoon getting it installed and a few more weeks of happy tinkering to really make it yours, including how to secure your smart home.
Block ads on every device
Once you install Pi-hole, every device on your network, from phones to smart TVs and game consoles, stops seeing most ads. No browser extensions and no need to install blockers on every device. A Zero 2 W is more than enough for this. In fact, it can easily handle dozens of devices while drawing about a watt.
Pi-hole works as a Domain Name System (DNS) server. It forwards all requests to contact ad domains to a non-routable address, meaning the ad never loads. Standard websites get resolved normally.
That said, Pi-hole has a notable limitation: because it blocks at the DNS level, it can only block ads served from separate advertising domains. Ads embedded within the same domain as the content, such as many YouTube ads, will still get through.
Build your own personal cloud storage
A Pi with a couple of external hard drives and the right software can become a decent network-attached storage (NAS) box, accessible from every device in the house with no monthly fee. OpenMediaVault (OMV) is the go-to software. It gives you a browser-based interface for setting up shared folders, user permissions, and file sharing.
A few practical notes that will save you some time:
- Install on Raspberry Pi OS Lite, not the desktop version. OMV doesn’t play well with a full desktop environment.
- Current OpenMediaVault versions require 64-bit hardware for Raspberry Pi installs. Use a Raspberry Pi 3B or newer.
- Don’t rely on USB-attached drives for anything irreplaceable. USB is fine but not bulletproof, and the Pi’s USB controller can be a bottleneck. For proper storage, a dedicated NAS is still worth it.
- For a Pi 5 build, use the PCIe-to-NVMe HAT for the operating system and external drives for bulk storage.
Set up a home security camera system
Software like MotionEye turns any Pi with a camera (the official Raspberry Pi Camera Module, a USB webcam, or an IP camera feed) into a motion-detecting security system with a browser dashboard. When it detects movement, it can record a clip, send you an email alert, save the footage locally or to cloud storage, or trigger Home Assistant automation.
Two important things to keep in mind:
- Check your local laws: Recording audio without consent is illegal in many places, even on your own property. Consider disabling audio recording.
- Don’t expose the web interface to the internet: Put it on a private network, such as a virtual private network (VPN) or your local area network (LAN).
Advanced Raspberry Pi projects
These are more involved, but great if you want to build real skills. You’ll need to be comfortable with the Linux command line, networking, and probably Python for most of these.
Build a Kubernetes cluster
Running Kubernetes on a cluster of Raspberry Pis (three Pi 4s or 5s) is a great way to learn container orchestration without spending too much. A common approach uses K3s, a lightweight Kubernetes distribution specifically designed for ARM boards and low-memory environments. K3s ships as a single binary under 70MB and is dramatically less fiddly than running full upstream Kubernetes.
The standard setup is one Pi as the control plane and two more as worker nodes. Jeff Geerling’s Pi Dramble project is widely regarded as the canonical guide.
Run AI and machine learning
A base Pi 5 can do useful machine learning (ML), such as object detection, speech recognition, or small language models, but it’ll be slow.
If you’re serious, the Raspberry Pi AI HAT+ bolts a Hailo-8L accelerator onto the Pi 5 and gets you up to 13 tera-operations per second (TOPS) of inference, which is enough for real-time tasks like person or vehicle detection from a camera feed. ML frameworks like TensorFlow and PyTorch all run on it.
The Raspberry Pi AI Camera goes further by running inference directly on the camera sensor itself, which is great for battery-powered projects or where you don’t want the main CPU tied up.
Fun and creative Raspberry Pi ideas
Weather station
Wire up the BME280 digital sensor (to measure temperature, humidity, and pressure) and, optionally, an anemometer (for wind speed and direction) and a rain gauge. Put it all in a waterproof enclosure, and you’ve got a real little weather station. The Raspberry Pi Foundation's official weather station project guide walks through the hardware and code.
Add an LCD display, and you can glance at the conditions on your kitchen counter. Add Home Assistant, and your house can turn up the lights when a storm rolls in.
Voice assistant
A Pi 5 plus a USB microphone, a small speaker, and an API key for a large language model let you build a fully functional voice assistant that runs locally without relying heavily on cloud services.
The official Raspberry Pi guide using ElevenLabs is a good starting point, covering everything from the hardware you need to the Python code to set up the whole system. You could also swap in Anthropic or OpenAI.
Stop-motion animation rig
A Raspberry Pi combined with a camera module and a big button makes for a surprisingly good kids’ animation studio. Press the button, take a frame, move a Lego piece, and press the button again. The software then stitches it into a video of you building a Lego tower.
The Raspberry Pi Foundation has a tutorial for this, and it’s one of those rare tech projects that’s improved by having a seven-year-old help.
How to choose the right Raspberry Pi project
There are three things to think about honestly before you buy anything.
Skill level
Pick something too complex too early, and you’ll probably drop it. If you’re a total beginner, it might be worth setting up something like RetroPie or Kodi, as the hardest part is flashing an SD card.
If you’re comfortable following guides but not writing code, try Pi-hole or Home Assistant. They need a bit of networking knowledge but no programming. And if you want a proper challenge or already have a handle on the command line, networking, and Python, look into Kubernetes or AI-driven projects.
Budget
The Pi hardware itself is just the start. Once you start adding in the accessories, the cost can quickly ramp up.
- Power supply: Pi 5 needs a proper 27W USB-C PD supply. A cheap phone charger will cause odd undervoltage issues.
- MicroSD card: This will set you back $10–$20 for a decent one, at least 32GB, and ideally a high-endurance one (more on why this matters below).
- Case: It doesn’t have to be too expensive, but for the Pi 5, you’ll probably want one with a fan.
- Peripherals: Monitor, keyboard, mouse, and HDMI cable for desktop use.
- Project-specific bits: External drives for a NAS, camera module, sensors, the AI HAT, and so on.
Time commitment
Setting up Pi-hole for ad blocking could be done in under an hour, while configuring Home Assistant with basic automations could take an afternoon. On the other hand, a multi-camera security system or Kubernetes cluster can take a full weekend of configuration and troubleshooting.
Tips for success
A few habits will save you a lot of frustration with any Pi project. Here’s what’s worth knowing before you start.
Start simple
Start with one project and finish it before expanding. The most common failure mode is installing too many services on one Pi, running into conflicts, and abandoning everything. Projects like your own home server work best when components can talk to each other without conflicts.
Use a good SD card and always keep backups
SD cards can get corrupted unexpectedly, especially after things like a sudden power cut, which is why it’s worth having spares. Stick to reputable brands like Samsung, SanDisk, or Kingston and pick cards with U3/A2 labels for the best performance. High-endurance variants hold up far better under the constant small writes that services like Home Assistant and Pi-hole generate.
Keep a spare SD card with a clean OS image ready to go, and use something like rpi-clone to back up a working project setup before you make big adjustments. Labeling all your SD cards is also a good idea. You’ll have four or five of them within a month, and they all look identical.
Master SSH
Learning SSH lets you remotely access your Raspberry Pi and operate it with just a power cable and a network connection, removing the need to set up peripherals like a mouse or keyboard.
Learn to use the GPIO pins
The GPIO pins on a Raspberry Pi let you directly connect it to various electronic components, many of which can play an important role in advanced projects. Figuring out how to use these will open up a world of possibilities in terms of the projects you can make with your Pi.
There are also helpful resources like the GPIO Pinout website, which provides an interactive reference to all the GPIO pins on a Raspberry Pi.
Use community resources
The active community behind Raspberry Pi is among its greatest strengths. The Raspberry Pi forums, Reddit's r/raspberry_pi, and dedicated sites like Pi My Life Up have detailed tutorials and active communities for troubleshooting.
Experiment and iterate
Once you get a project working, it’s always worth trying new ways to extend it. For example, a basic weather station can start with just a temperature sensor, then grow to include humidity and pressure readings, then a web dashboard, then email alerts when conditions hit certain thresholds.
Each addition builds on what's already there without requiring you to start from scratch.
Use the correct power supply
Using the proper power supply with your Raspberry Pi ensures that the board can deliver its maximum performance. It also keeps things stable, meaning your SD storage card is less likely to be compromised due to unnecessary power fluctuations.
The safest option is an official Raspberry Pi power supply. The 27W USB-C version covers all modern boards, even the comparatively power-hungry Raspberry Pi 5.
FAQ: Common questions about Raspberry Pi uses
Is Raspberry Pi good for beginners?
Can a Raspberry Pi replace a desktop computer?
What is the best Raspberry Pi for projects?
Is Raspberry Pi better than Arduino for DIY projects?
Do you need coding skills for a Raspberry Pi?
Explore the web with greater privacy
Get ExpressVPNSign up today for a chance to win FIFA World Cup 2026™ tickets.