How to recover deleted files on Mac: Step-by-step guide


Deleted a file on your Mac and need it back? In many cases, you can restore it from Trash, Time Machine, iCloud, or another backup. But your chances depend on where the file was stored and how it was deleted.
If the file was permanently deleted from the internal drive of an Apple silicon Mac or an Intel Mac with a T2 chip, recovery without a backup is unlikely. Older Intel Macs and external drives may offer more recovery options, but it’s still best to act quickly.
This guide walks you through the best ways to recover deleted files on a Mac, starting with the quickest fixes before moving on to more advanced options.
What to do immediately after deleting on Mac
Before trying any recovery method, avoid doing anything that could make the file harder to restore. Don’t save new files, install recovery software, or copy large files to the same drive where the deleted file was stored.
Check where the file was stored
Where the file was saved affects your recovery options. A file deleted from iCloud Drive may still be available in iCloud’s Recently Deleted folder. A file deleted from an external drive may still appear in Trash, but only while that drive is connected. If the drive has been disconnected, reconnect it before checking.
Start by thinking about whether the file was saved on your Mac’s internal drive, an external drive, Desktop, Downloads, or iCloud Drive. This will help you choose the right recovery method.
Check whether it was permanently deleted
Before using more advanced recovery tools, check whether the file is still easy to restore.
Start with Trash. If the file is there, you can restore it in a few clicks. If you emptied Trash, used a permanent delete shortcut, or removed the file from a cloud service, recovery may still be possible, but it depends on where the file was stored and whether a backup or recovery option is available.
For files deleted from the internal drive of an Apple silicon Mac or an Intel Mac with a T2 chip, recovery without a backup is often unlikely. For external drives or older Intel Macs, acting quickly may improve your chances.
Where deleted files go on Mac
Depending on how and where it was stored, your deleted file may still exist in different places.
Moved to Trash vs. permanent deletion
Trash doesn’t mean your file is gone completely. You can easily recover files from Trash, as long as they’re still there.
If you’ve emptied Trash or used a shortcut to delete the file permanently, you won’t be able to restore it directly. However, the data may still be on your drive.
iCloud Drive sync and “Recently Deleted”
If you stored your file in iCloud Drive, you may still be able to recover it from the Recently Deleted section. This works separately from Trash and keeps deleted files for a limited time, typically up to 30 days.
iCloud syncs your files across devices, so changes you make apply everywhere. If you delete a file on one device, it’s removed from all synced devices. The longer it goes unnoticed, the harder it may be to recover, so it’s worth checking Recently Deleted as soon as possible.
File versions, snapshots, and backups
You may still be able to recover your file using iCloud Drive’s Recently Deleted folder, app version history, Time Machine, or another backup.
Time Machine creates system-wide backups so you can restore files from earlier. When Time Machine is enabled, macOS may also create local snapshots on APFS disks. These temporary snapshots can help you recover recent versions of files even when your backup disk isn’t connected.
Some apps and iCloud Drive may also store previous versions of files, especially for documents you’ve edited. You can often restore an earlier version directly within the app or through iCloud. For example, if you edited a document in Pages or saved a file in iCloud Drive, you may be able to go back to an earlier version.
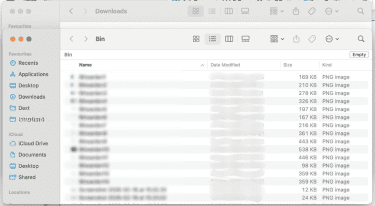
Recover deleted files from Trash
If the file is still in Trash, recovery is quick and straightforward. This is the easiest way to restore deleted files on a Mac:
- Open Trash from the Dock to see a list of files.
- Find the file you want to restore.
- Right-click the file, then select Put Back to restore it to its original location.
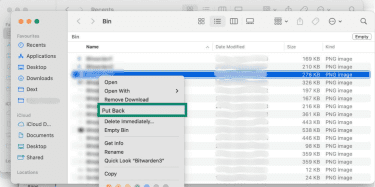
You can also drag the file out of Trash to a folder instead.
If your file isn’t in Trash, you’ll need to use other recovery methods. Start with backups like Time Machine or iCloud. If those aren’t available, you can try recovery software.
Recover deleted files with Time Machine
If you use Time Machine, you may be able to restore a deleted file from an earlier backup. Time Machine is Apple’s built-in backup feature, and it can help recover files after they’ve been deleted or changed.
Usually, Time Machine restores files from your backup drive or network backup location. But even if that backup isn’t currently connected, it’s still worth opening Time Machine. When automatic backups are enabled, your Mac may also keep temporary local snapshots on its internal drive. These snapshots can give you access to recent versions of files without needing the backup disk.
Local snapshots are only kept for a limited time, usually up to 24 hours or until your Mac needs the space, so this method is most useful soon after deletion.
To restore a file or folder with Time Machine:
- Open the folder where the deleted file used to be. For example, if the file was in Documents, open the Documents folder. If it was on your Desktop, you can stay on the Desktop.
- Open Time Machine. Press Command + Space, type “Time Machine,” and open it. You can also open it from the Time Machine icon in the menu bar (if it’s shown).
- Browse older backups. Use the arrows or timeline to go back to a date before the file was deleted.
- Select the file or folder you want to restore. You can restore a single file, multiple files, or an entire folder.
- Click Restore. Time Machine will return the item to its original location. For example, a file restored from Documents will go back to the Documents folder.
Recover deleted files from iCloud Drive
If your files are stored in iCloud Drive, you may still be able to recover them even after deletion. iCloud keeps recently deleted files and may also store older versions, depending on how the file was used.
Restore from iCloud Drive “Recently Deleted”
iCloud Drive keeps deleted files for a limited time before permanently removing them. To recover them:
- Go to iCloud.com and sign in.
- Select Drive.
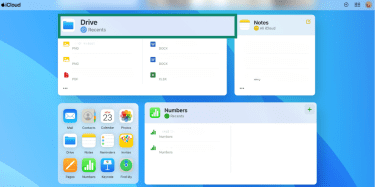
- Open the Recently Deleted folder.
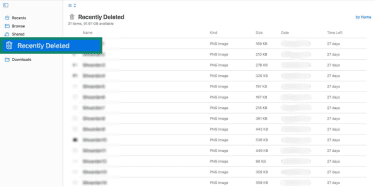
- Select the file you want to restore and click Recover.
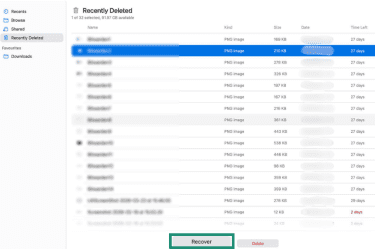
Note: iCloud keeps your files for up to 30 days before permanently deleting them, so check the Recently Deleted folder as soon as possible.
Restore older versions and shared files
iCloud may store previous versions of files for apps that support versioning (like Pages, Numbers, and some third-party apps), but not all file types or apps maintain version history, especially for documents you’ve edited over time. To restore them, you’ll need to open the file in a supported app or use iCloud’s version history options, then choose an earlier version to restore or download.
This works best for documents such as Pages or Numbers files, where the apps automatically save version history. You may also be able to restore earlier versions of shared files, but this depends on your permissions and whether the file keeps version history.
Recover files from a formatted drive on Mac
Formatting a drive can make it seem like your files are gone for good. You may still be able to recover them, but it’s important to act carefully to avoid permanent loss.
What formatting changes and what it doesn’t
When you format or erase a drive in Disk Utility, macOS resets the file system and removes the structure it uses to find files. Whether the old data can be recovered depends on the type of drive, the file system, and whether the drive was encrypted.
On an unencrypted external hard drive, a standard erase may not overwrite every part of the old data right away. In that case, recovery software may be able to find some files, especially if you stop using the drive immediately and no new data has been written to it.
However, this doesn’t apply to every Mac or every drive. On Apple silicon Macs and Intel Macs with a T2 Security Chip, APFS volumes are encrypted by default at the volume level, even when FileVault is off. This matters because erasing an encrypted volume can destroy the key needed to read the old data.
So if the drive was encrypted (through FileVault, APFS encryption, or Apple silicon/T2 hardware-backed encryption) and it has been erased, recovery is effectively impossible without a backup.
When to stop and use recovery software
If you can’t recover your files using Trash, Time Machine, or iCloud Drive, recovery software may be your next option. Although macOS no longer shows the file, its underlying data may still exist on the drive. Recovery tools scan the disk directly to find and restore that data.
However, success depends on whether the data has been overwritten. On modern Macs with SSDs, a feature called TRIM can permanently clear deleted blocks at the storage level. When TRIM runs, the SSD is instructed to wipe those blocks, which can make recovery impossible even if no new files have been written.
You can consider using recovery software if the drive is still accessible but the files are missing or if you don’t have any backups or snapshots to restore from.
However, before you do that, avoid installing recovery software on the affected drive, as this can overwrite your data. Also, be cautious about tools that promise guaranteed recovery, as it isn’t always possible. Stick to software from well-known, reputable developers.
Recover files from a corrupted or failing drive on Mac
If your drive is corrupted or starting to fail, it can be harder to recover your files.
Signs a drive is failing
A failing drive often shows warning signs before it stops working completely. Common signs include:
- Files take longer than usual to open or copy.
- Your Mac crashes or freezes when you try to access files.
- Files appear corrupted or won’t open.
- The drive doesn’t mount or disconnects unexpectedly.
- You hear unusual noises from an external drive, such as clicking or grinding.
Safe steps to avoid making corruption worse
If you suspect your drive is failing, limit its use, as continued use can worsen corruption or overwrite recoverable data.
Before taking further steps, you can use built-in tools like Disk Utility to check whether the drive is detected and run basic diagnostics, such as First Aid, which scans the drive for errors and attempts to fix them. If it finds and fixes issues, you may be able to access your files again. If not, you can move on to professional recovery options.
To reduce the risk:
- Stop writing new data to the drive.
- Avoid repeated restart attempts or forcing the drive to mount.
- Copy important files immediately if the drive is still accessible.
- Use a different drive to save recovered files.
- Disconnect external drives safely if they exhibit erratic behavior.
When professional recovery may be needed
Sometimes, software recovery isn’t enough, especially if the drive is physically damaged. You may need professional help if your drive isn’t detected at all, you hear unusual noises like clicking or grinding, or recovery software can’t access the data.
If the data matters, it’s often best to stop trying to fix the issue yourself and seek professional help early to improve your chances of recovery.
That said, remember that professional recovery services can be expensive, and success isn’t guaranteed. The process can also take time, depending on the condition of the drive.
How to choose recovery software for Mac
If built-in recovery options don’t work, file recovery software may help restore deleted data.
What to look for in recovery tools
Not all recovery tools are reliable, so choose carefully. Here are some factors to consider:
- Reputable developer: Choose software from established companies with clear websites and trustworthy reviews.
- Read-only scanning: The tool should scan your drive without modifying data.
- Offline recovery option: Choose tools that don’t require uploading files to external servers.
- No forced installs on the target drive: You should be able to install the software on a different drive, as installing it on the affected drive can overwrite the files you’re trying to recover.
- Transparent pricing: Avoid tools that hide costs behind scans or previews.
Privacy and security risks to consider
On modern versions of macOS, recovery tools typically require Full Disk Access to scan system and user directories, which grants broad visibility into files. Of course, this can introduce security and privacy risks if the tool isn’t trustworthy. Common risks to consider include:
- Fake recovery tools: Some apps are designed to distribute malware or run scams rather than recover files.
- Full disk access permissions: Many tools request access to all files on your Mac, including sensitive data.
- Data exfiltration risks: Some software may upload files or scan results to remote servers.
- Misleading “free” tools: Some tools show recoverable files but require payment to actually restore them.
To stay safe, download software only from official websites, avoid tools that request unnecessary permissions, and be cautious of apps that promise guaranteed recovery. On macOS, you can also look for apps that are properly signed and notarized by Apple, meaning they’ve passed automated security checks and haven’t been flagged for known malicious behavior.
Prevent future file loss on Mac
Recovering lost files isn’t always guaranteed, so setting up reliable backups is the best way to avoid data loss.
Use the 3-2-1 method
The 3-2-1 method is a widely used approach for improving MacBook security and reducing the risk of permanently losing your data.
It involves keeping three copies of your data, including the original and at least two backups.
Store them on two different storage devices, such as your Mac and an external drive, to avoid a single point of failure. You then keep 1 copy offsite, such as in cloud storage, in case your device is lost, stolen, or damaged.
For example, you might keep files on your Mac, back them up to an external drive using Time Machine, and store another copy in iCloud Drive. That way, even if one copy is deleted or corrupted, you still have other ways to recover your files.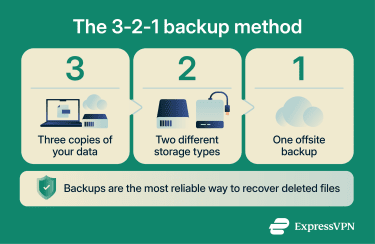
Turn on Time Machine and verify backups
Time Machine can automatically back up your Mac, but you need to set it up and check it regularly.
To turn it on:
- Connect an external drive.
- Open System Settings and select Time Machine.
- Choose your backup disk.
- Turn on automatic backups.
Once it’s set up, make sure your backups are working as expected. Check them periodically, make sure that recent backups are available, and that you can browse files in Time Machine.
Enable iCloud Drive and file versioning safely
iCloud Drive can help protect your files by syncing them across devices and keeping previous versions. To enable it:
- Open System Settings and select your Apple Account.
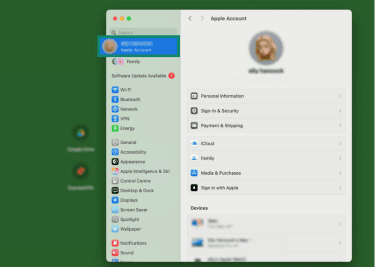
- Click iCloud.
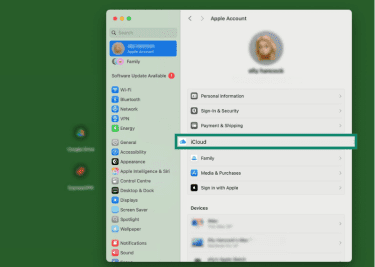
- Turn on iCloud Drive.
Once you’ve turned it on, you can access your files across devices, restore deleted files from Recently Deleted, and recover earlier versions of documents.
FAQ: Common questions about recovering files on Mac
How do I recover permanently deleted files on Mac?
Can I recover files after emptying Trash on Mac?
Can I recover files from a formatted drive on Mac?
Can I recover files from a corrupted external drive on Mac?
What is the safest file recovery software for Mac?
Why can’t I see local snapshots in Time Machine?
Can I check whether local snapshots exist?
Take the first step to protect yourself online. Try ExpressVPN risk-free.
Get ExpressVPN