“Kernel security check failure”: Troubleshooting made simple


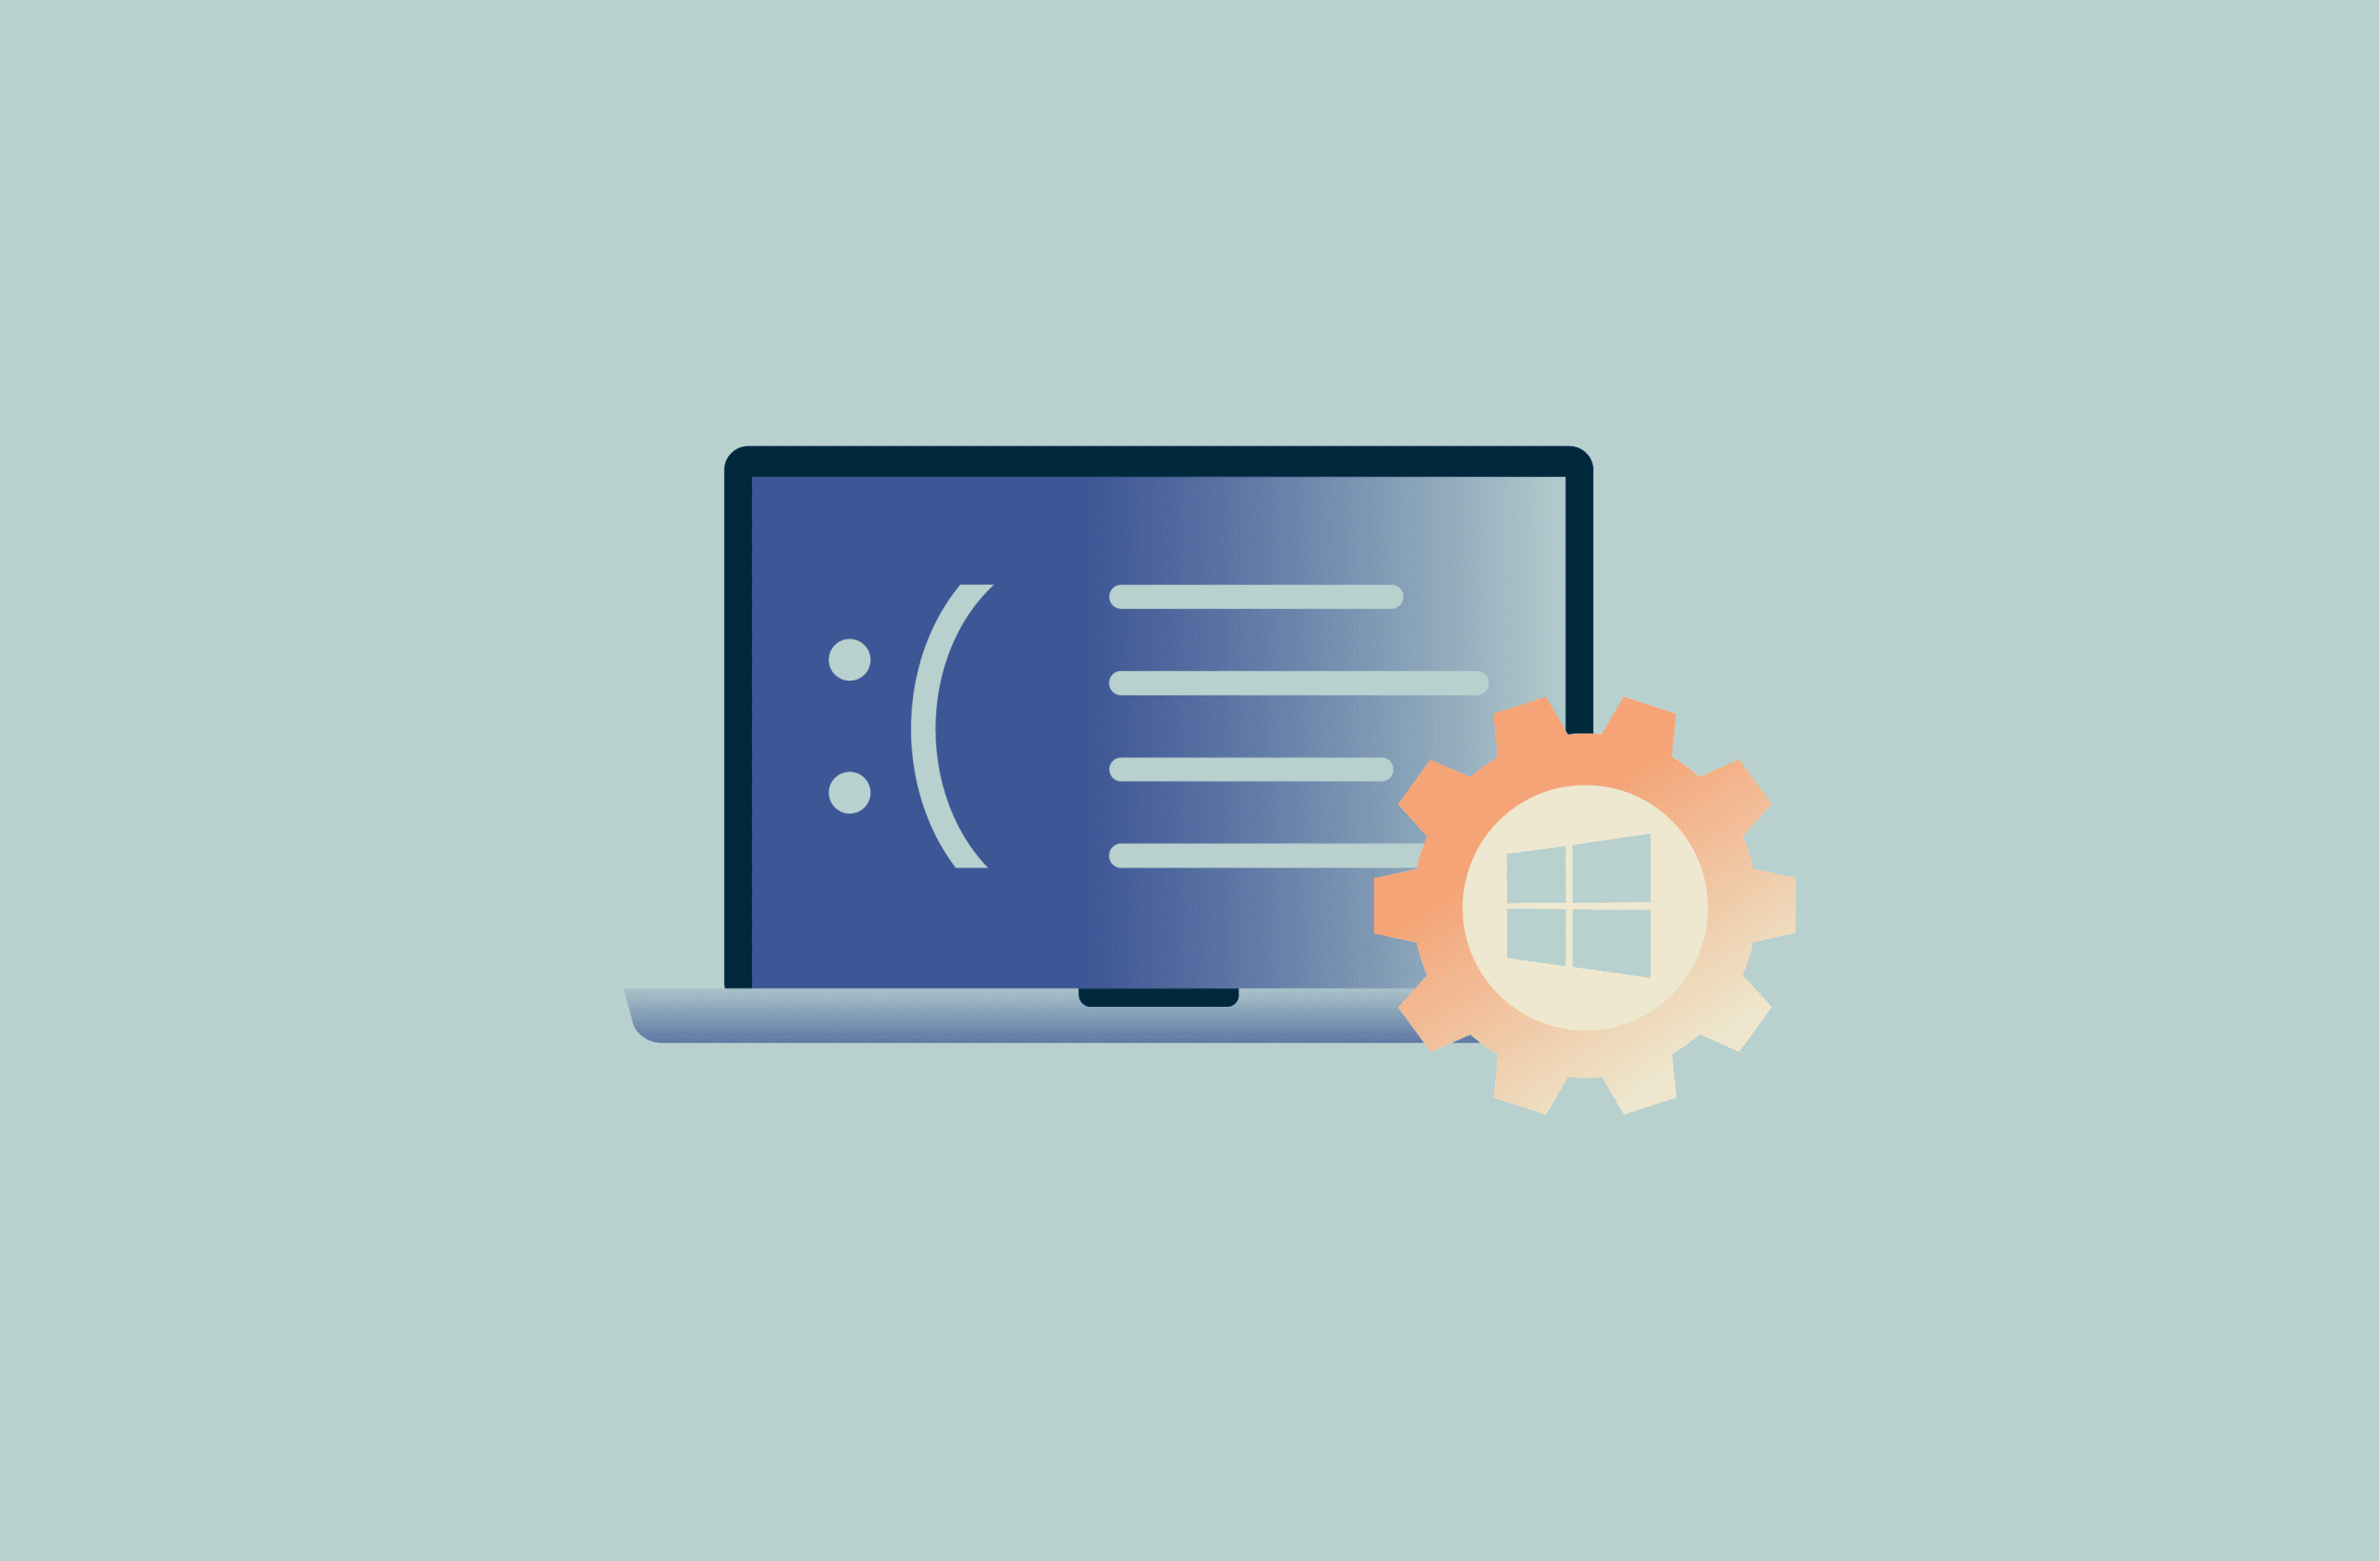
The “kernel security check failure” error on Windows can appear without warning. This error can be frustrating because it’s often unclear what caused it, and it can be tricky to troubleshoot.
This guide helps you understand the “kernel security check failure” error by explaining what it is and what commonly causes it. It also includes clear, step-by-step instructions for common fixes that may resolve these issues.
Understanding “kernel security check failure”
A “kernel security check failure” is a Windows stop code error (sometimes referred to as a bug check) that appears when the operating system detects corruption in critical system memory or internal data structures.
The “kernel” is the core component of Windows responsible for managing hardware, memory, and essential processes. As part of its normal operation, it continuously validates critical system data. If it detects corruption in important memory structures, it triggers a system bug check, causing Windows to halt to prevent further damage.
Is a "kernel security check failure" serious?
It depends on how often the error appears. If it happens once and goes away after a restart, it was likely a temporary issue and may not require further action.
However, if the problem keeps coming back after restarting, it may signal a deeper system issue. In that case, fixing it should be a priority, since the system won’t be able to operate normally. Ongoing problems can lead to repeated crashes, instability, and potential data loss.
What are the signs of "kernel security check failure"?
The most obvious sign of a "kernel security check failure" is a Blue Screen of Death (BSOD) displaying the message “KERNEL_SECURITY_CHECK_FAILURE.” In some cases, it appears alongside the stop code 0x139.
The BSOD is the crash screen that Windows shows after a critical system error forces the operating system to halt. On newer versions of Windows 11, particularly those running version 24H2 and later, the crash screen may appear black instead of blue.
In the case of a "kernel security check failure," the system usually briefly displays the BSOD with the error message and code before restarting. The BSOD stays visible while Windows gathers information about the error, and you can follow the process using the onscreen progress indicator.
Other related symptoms
While the stop code itself confirms the issue, you may notice related instability leading up to the crash, including:
- Repeated system crashes or unexpected restarts.
- Boot loops, where Windows repeatedly fails to load.
- Freezes that are followed by a blue (or black) screen.
What causes a "kernel security check failure"
This error can happen for many reasons, including outdated drivers, faulty operating system updates, corrupted system files, or memory-related problems. The sections below explain the possible causes in more detail.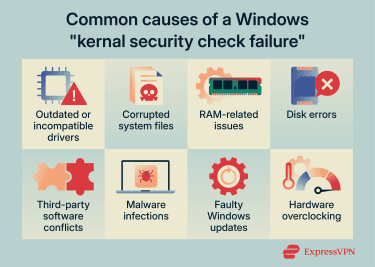
Outdated or incompatible drivers
Drivers act as a bridge between your operating system and your computer’s hardware. If a driver is outdated, faulty, or incompatible, it can trigger the “kernel security check failure” error by attempting to improperly access memory.
Corrupted system files
Your operating system depends on many system files to function properly. If any of these files become corrupted or damaged, they can cause errors that the Windows kernel treats as potential violations of internal integrity checks. This may lead to a "kernel security check failure," which can result in crashes and blue screen errors.
Memory problems (bad RAM)
Faulty memory can cause errors that the Windows kernel treats as integrity violations, which may lead to system instability. This can happen if RAM modules are damaged, not seated correctly in their slots, or incompatible with your motherboard’s specifications.
Disk errors (hard drive/SSD)
Hard disk drives (HDDs) or solid-state drives (SSDs) can experience errors that cause system files to become corrupted or prevent critical data from loading properly, which can lead to system crashes.
Third-party software conflicts
In some cases, software can conflict with your operating system. Incompatible or buggy programs may try to interact with the Windows kernel in ways that can trigger security check failures.
Faulty Windows update
Windows updates are important because they deliver essential fixes and security patches. However, if an update installs incorrectly, becomes corrupted, or doesn’t complete properly, it can cause driver problems or damage core system files.
Overclocking or unstable hardware settings
Overclocking means running components such as the processor, RAM, or graphics card beyond their intended speeds. While this can boost performance, incorrect settings can make the system unstable and cause memory-related errors.
Malware threats
Malware is malicious code that can infect operating systems and interfere with system files and processes by deleting, locking, or corrupting them. In rare cases, some malware strains specifically target the Windows kernel, which affects system stability and triggers BSODs.
Note: If you’re not sure if your computer is infected, be on the lookout for these common signs of malware.
How to fix "kernel security check failure"
The tips listed below may help you fix the Windows "kernel security check failure" error. However, before you start, do the following:
- Remove new hardware: If you added new hardware before the errors started, remove it and reconnect the previous hardware to see if the issue goes away. If it does, the new component may be faulty and need to be replaced.
- Check for sufficient space: Windows needs enough free storage to run properly. Without it, you may run into different errors. Make sure the drive where Windows is installed has at least 10–15% free space.
- Turn off overclocking: Revert your processor, graphics card, or RAM to their intended speeds to see if this solves the issue.
- Back up your data: Before trying the steps below, back up important files using cloud storage or an external device.
(Optional) Start Windows in Safe Mode
This step is only needed if you can’t log into Windows or use it normally, either because the system keeps crashing or gets stuck in a boot loop. Safe Mode starts Windows in a basic state that uses only a limited set of drivers and files. If the problems don’t appear in Safe Mode, it may suggest that a third-party service or driver is involved.
To enable Safe Mode, you have to access the Windows Recovery Environment page, which you can do using different methods. Once you’re on the Windows Recovery Environment page, you can turn on Safe Mode by doing the following:
- Head to Troubleshoot > Advanced options > Startup Settings > Restart.
- Click Restart, which will reboot your device.
- After your computer restarts, you’ll end up on the Startup Settings page. Once there, select the Enable Safe Mode option.
Note: If you couldn’t access Windows to back up your data before using Safe Mode, make sure to save important files and documents before trying the next tips.
Update Windows
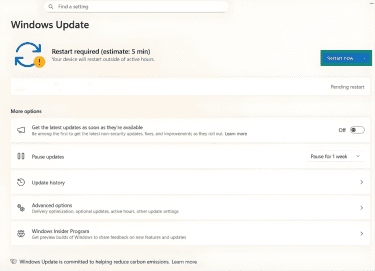
An outdated Windows version may lead to this error due to unpatched bugs or compatibility issues. To update your operating system, follow these steps:
- Open the Start menu.

- Select the Settings option.
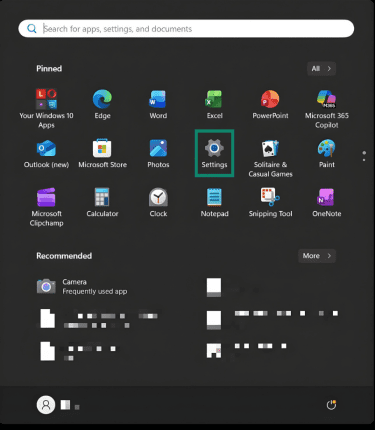
- Next, click Windows Update.
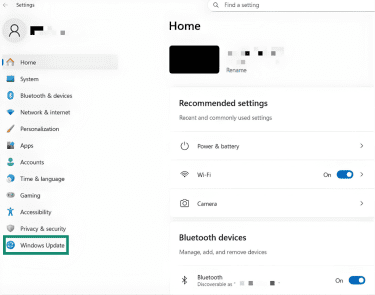
- Select Check for Windows updates, then install available upgrades. If an update is already downloaded, click Restart now to apply it.
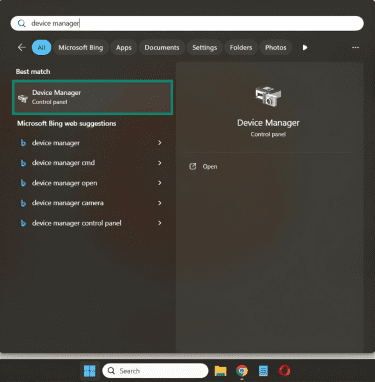
Update or roll back drivers
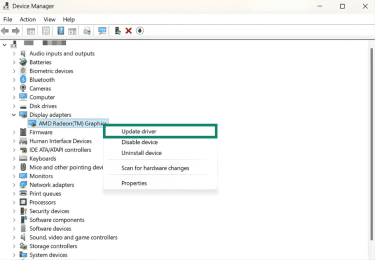
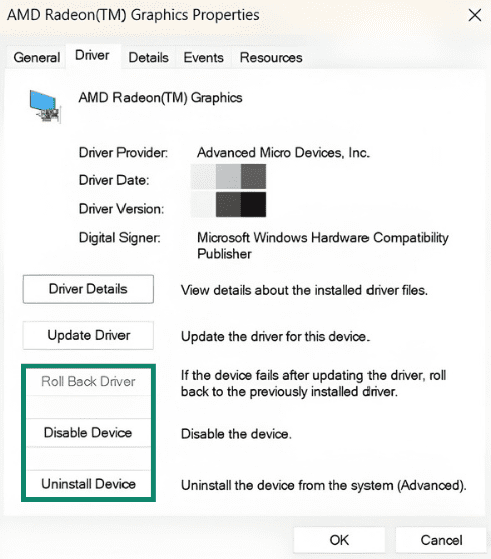
Outdated or recently installed drivers can also cause Windows kernel issues. To check for new updates or roll back drivers, you can use the Device Manager tool. Here’s how to do that:
- Go to Start, type in “device manager,” and click the utility.
- If any drivers have issues, Device Manager will flag them with an exclamation mark. In that case, right-click the driver and select Update driver.
- To roll back recent updates, double-click the appropriate driver, then select the Driver tab.
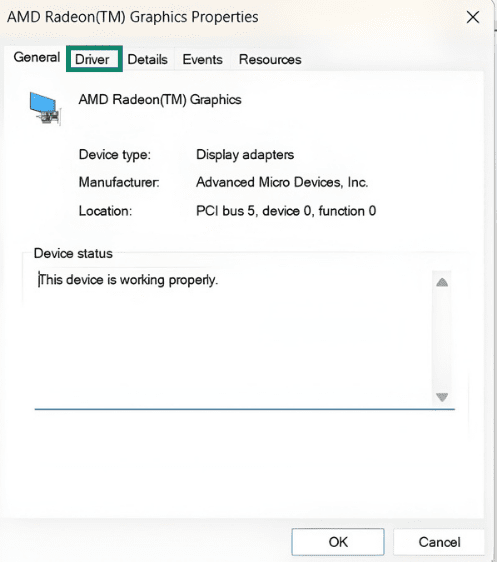
- Now, click the Roll Back Driver button. If the option is grayed out or doesn’t help, try the Disable Device or Uninstall Device options.
Scan and repair system files
Windows has built-in tools that scan system files for corruption and try to fix potential issues. These utilities are called System File Checker (SFC) and Deployment Image Servicing and Management (DISM). It’s generally recommended to run DISM first, as it fixes the Windows image that the SFC tool relies on. If the image is damaged, the SFC utility may fail or be unable to fix some files.
Before running these tools, install any pending Windows updates if available. After that, follow these steps:
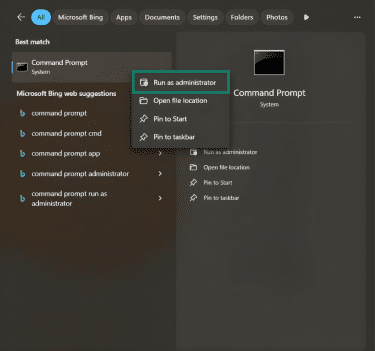
- Open the Command Prompt tool. To do this, type “command prompt” in the taskbar search box, then right-click the utility and select Run as administrator.
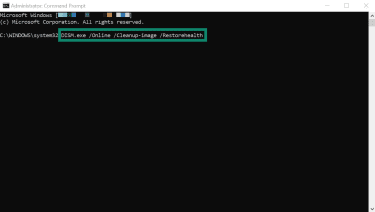
- Type DISM.exe /Online /Cleanup-image /Restorehealth and press Enter to repair the Windows system image, which might take 15 to 30 minutes.
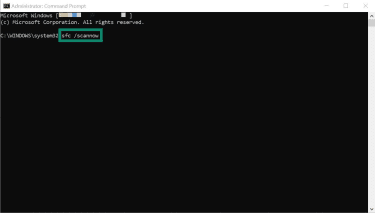
- When DISM finishes, type sfc /scannow and press Enter to run the SFC utility, which will attempt to find and fix corrupted files.
Note that the DISM utility might need online access to replace corrupt files using Windows Update. If internet access isn’t available, you need to provide a source, such as a mounted Windows installation ISO or recovery media.
After that, use the DISM.exe /Online /Cleanup-image /Restorehealth /Source:C:RepairSourceWindows /LimitAccess command. “C:RepairSourceWindows” is a placeholder that has to be replaced with the location of your repair source.
Run the Check Disk (CHKDSK) utility
CHKDSK is a built-in Windows tool that checks the file system and disk structure for errors. Besides scanning, you can configure it to fix problems it detects. Here’s how:
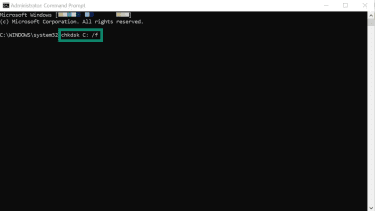
- Open the Command Prompt in administrator mode.
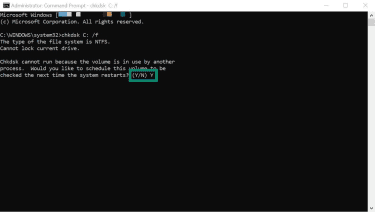
- Type chkdsk X: /f and replace “X” with the drive you want to scan. Then, press Enter.
- If you run the command on the operating system drive, Windows might ask you to schedule the scan for the next restart. In that case, type Y and reboot to allow the scan to run before Windows loads.
The process can take anywhere from a few minutes to a couple of hours to complete, depending on the size of your hard disk, how many errors CHKDSK must fix, and whether you use an HDD or SSD.
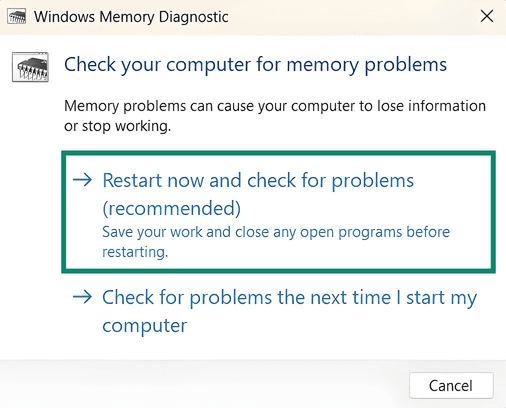
Check Windows memory issues (RAM test)
Follow the steps below to use the Windows Memory Diagnostic utility to check for RAM-related issues:
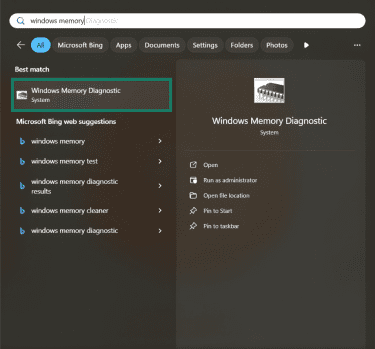
- Open the Start menu, type “windows memory,” and select the Windows Memory Diagnostic app.
- Click the Restart now and check for problems (recommended) option. The utility will reboot your computer and scan your RAM for issues. When the test finishes, your system will restart, and the test results will be shown in the notification area.
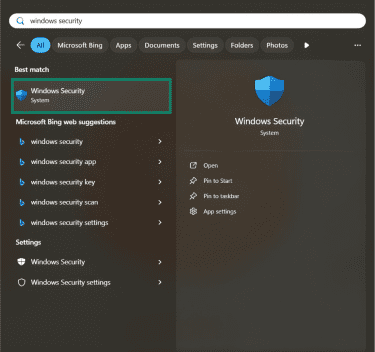
Scan for malware and unwanted apps
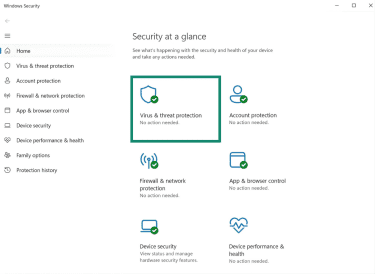
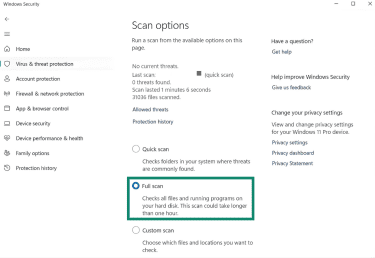
Windows offers built-in antivirus protection through the Windows Security app. You can use it to scan for malicious software by doing the following:
- Type “windows security” in the Start menu search bar and open the app.
- Select the Virus & threat protection option.
- Click Scan options.
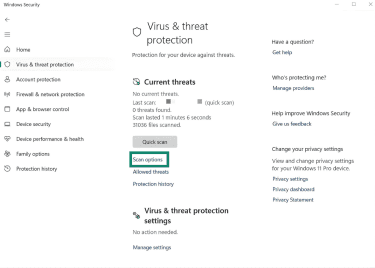
- Choose the Full scan option to make sure the security app checks all system files.
Temporarily disable or uninstall third-party antivirus software
If you use a third-party security program instead of Windows Security, turn it off for a short time and check whether the system problems continue. If they do, run a full malware scan with Windows Security before turning your third-party antivirus back on.
Note: Make sure you use a reputable third-party antivirus program. Downloading unknown tools could lead to fake antivirus software, which may harm your system instead of protecting it.
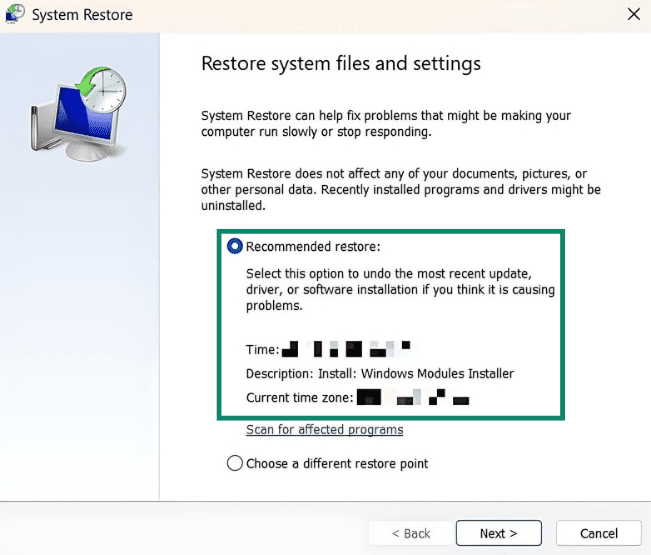
Use System Restore
System Restore is a built-in Windows feature that lets you return your operating system to an earlier state. If you think kernel-level errors started after recent changes, use System Restore to go back to a restore point created before those changes. Here’s how to do that:
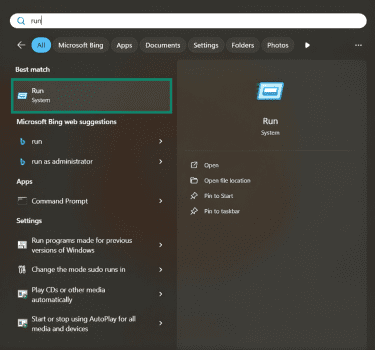
- Open the Start menu, type run, and open the Run utility.
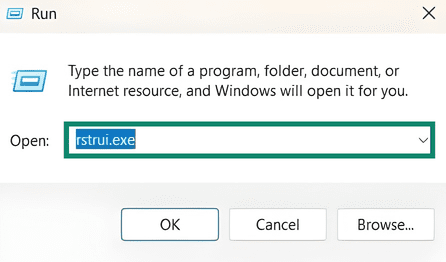
- Type rstrui.exe in the Run tool and click OK.
- Select the recommended restore point, click Next, and follow the on-screen instructions. To use other restore points, select the Choose a different restore point option.
Reinstall Windows (last resort)
If none of the previous tips helped, the system may be too damaged to repair easily. In that case, reinstalling Windows might be your only option. A clean installation can remove corrupted system files and potentially fix the issue.
Note: If you plan to sell or recycle your PC and install Windows on a new device, make sure you completely wipe the computer beforehand to protect your privacy.
How to prevent "kernel security check failure" in the future
You can help prevent this error by following several best practices, such as:
- Update your operating system and drivers to ensure you’re using the latest versions.
- Avoid installing unnecessary software so that you don’t clutter your system.
- Use Windows Security or a reputable third-party antivirus to run regular malware scans.
- Don’t overclock your hardware because it could cause system instability.
- Don’t make changes to core system settings or files unless you know what you’re doing.
- Verify all hardware components are compatible with each other before installing.
FAQ: Common questions about "kernel security check failure"
How do I fix "kernel security check failure"?
Common fixes for this kernel error include updating Windows, updating or rolling back drivers, scanning for corrupted system files and repairing them, using the Check Disk (CHKDSK) tool to fix disk errors, and running Windows Memory Diagnostic to look for RAM issues. You can also run a malware scan, temporarily disable third-party antivirus software, and try System Restore. If none of these steps work, you may need to reinstall Windows.
Can bad RAM cause "kernel security check failure"?
Yes, RAM-related problems may cause kernel-level errors. This can happen if the RAM is damaged, if you didn’t properly insert the memory stick into its slot, or if the RAM you bought is incompatible with your motherboard’s specifications.
What are the common causes of "kernel security check failure"?
Common causes of this kernel error can include outdated Windows versions, faulty operating system updates, outdated or incompatible drivers, and corrupted system files. Kernel-level problems can also happen due to RAM-related issues, disk errors, overclocking, malware infections, or incompatible third-party software.
Is "kernel security check failure" serious?
This depends on how often you see the error. If it happens once and disappears after a restart, it might have been a temporary issue, and Windows resolved it. But if your device crashes frequently and you keep seeing kernel-level error messages, it can point to a more serious system problem.
What is the stop code KERNEL_SECURITY_CHECK_FAILURE?
The KERNEL_SECURITY_CHECK_FAILURE, also bug check 0x139, indicates that the Windows kernel, which is the operating system’s core component, detected corruption in a critical system data structure. This triggered a security check, which failed, causing the system to crash because it couldn’t continue running safely.
Why do I get "kernel security check failure" when gaming?
Common reasons for these errors while gaming may include outdated or incompatible graphics or audio drivers, faulty RAM, or disk errors. You might also see these errors if you’re overclocking your hardware, which can cause it to fail under load.
When should I seek professional help for this error?
You may want professional help if you’ve already tried troubleshooting kernel errors and the problem still isn’t resolved. If your device is still under warranty, contact the vendor you purchased it from. Otherwise, consider taking it to a computer repair shop that specializes in diagnosing and fixing PC hardware and system issues.
Take the first step to protect yourself online. Try ExpressVPN risk-free.
Get ExpressVPN