How to change DNS settings on any device


By default, your device uses the DNS servers provided by your internet service provider (ISP), but it’s not your only option. Switching to a different DNS server could improve website load times, enhance your privacy, and or include features like malware blocking or content filtering.
In this guide, you’ll learn how DNS works and find step-by-step instructions for changing DNS settings on Windows, macOS, Linux, Android, iOS, ChromeOS, and even your home router. We’ll also provide troubleshooting steps and recommendations for reputable DNS providers.
Understanding DNS and why it matters
When you type a website name into your browser, your device doesn’t actually understand names like expressvpn.com. It needs an IP address (a string of numbers) to know where to connect. The job of the Domain Name System (DNS) is to find the correct IP address for that website and return it to your device so the connection can be made.
How DNS works
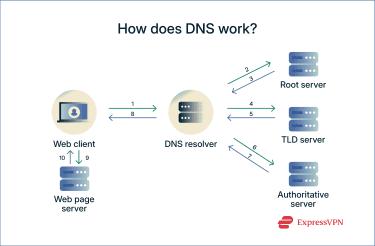
DNS works by checking with a series of DNS servers until it finds the correct IP address that matches the website name you entered. Here’s what happens in the background:
- You enter a website address into your browser.
- Your device sends a request to a DNS resolver, a server that acts as the middleman between your device and the rest of the DNS system. If it’s recently handled the same request, it replies immediately from its cache.
- If not, the DNS resolver works through a chain of servers to find the answer:
- The root nameserver: Directs the query toward the appropriate top-level domain.
- The TLD nameserver: Handles the domain extension (such as .com, .org, or .net) and points to the correct authoritative server.
- The authoritative nameserver: Holds the official IP address for the specific website.
- The authoritative nameserver returns the correct IP address to the resolver.
- Your device connects to that IP address and loads the site.
- The resolver caches the result temporarily, so future visits to the same site are faster.
Before you change DNS
Changing your DNS means replacing your ISP's resolver with one run by a third-party provider. Instead of sending DNS requests to your ISP, your device will send them to the new provider’s servers.
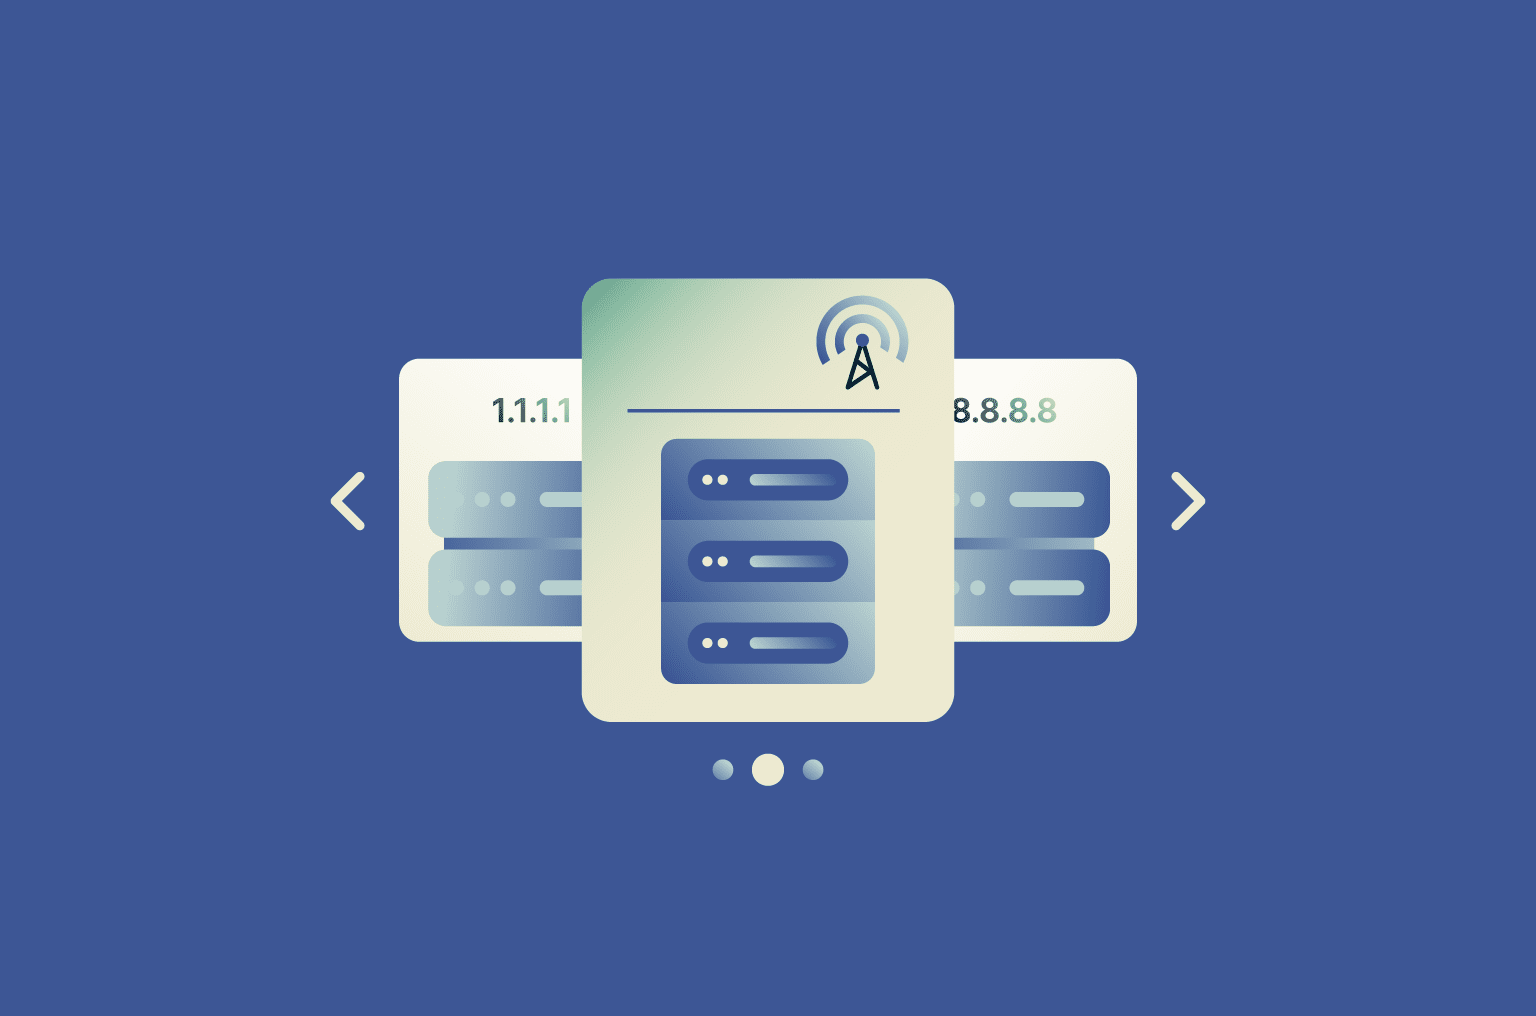
Choose your new DNS server first
Before touching any settings on your device, you need to pick a DNS provider. Each provider gives you a set of DNS server IP addresses that you'll enter into your device's network settings. That's how your device knows where to send its DNS requests.
Most DNS providers supply addresses for both Internet Protocol version 4 (IPv4) and IPv6 traffic. Typically, they offer at least two server addresses for IPv4, called a primary and a secondary server and, if they support IPv6, two additional addresses for IPv6.
Know the difference: IPv4 vs IPv6 DNS
IPv4 and IPv6 are two versions of the Internet Protocol (IP) and they use different address formats: IPv4 uses 32-bit addresses, while IPv6 uses 128-bit addresses. Because of this, each protocol has its own separate DNS resolution path, meaning your device queries a different resolver depending on the protocol in use.
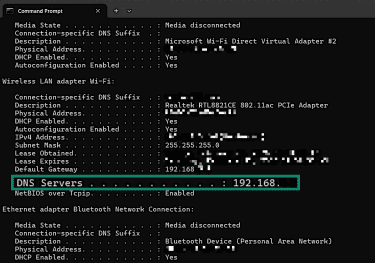
To check which IP protocols your device is using for DNS, you can look at your network details. On Windows, open Command Prompt and run ipconfig /all. Scroll to your active network adapter and look for the line labeled DNS Servers.
- An IPv4 address will appear as a short number separated by dots. For example, 192.168.1.1.
- An IPv6 address will appear as a longer string separated by colons, like 2001:db8::1.
Here’s an example of what the output looks like on Windows and what to search for:
On macOS, open Terminal and run scutil --dns. Then find the item labeled nameserver. Here’s an example of what that looks like: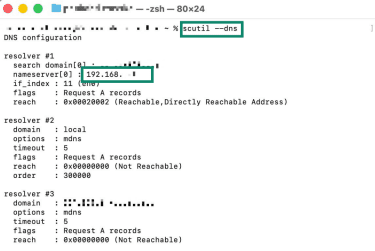
On Linux, you can run resolvectl status or systemd-resolve --status in Terminal, depending on the configuration. The output looks like this: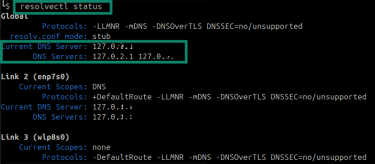
If you see both types of addresses listed, your device is using both IPv4 and IPv6 at the same time. In that case, you’ll have to make sure to enter both sets of DNS addresses your provider supplies: one for IPv4 and one for IPv6. If you only configure one, requests made over the other may bypass your chosen provider and fall back to your old settings.
When you may need admin access (and why)
DNS settings are part of your device's core network configuration, which is why most operating systems restrict who can change them.
Windows requires an account with administrator privileges to modify DNS through the Control Panel or the command line, while macOS only asks for the administrator password. On Linux, you’ll need root or superuser access to edit the system's network configuration files.
Mobile devices are the exception, where DNS changes are typically accessible through Wi-Fi settings without any special permissions, unless parental controls or a mobile device management policy is in place.
If you're on a work or school device, you may find that DNS settings are locked entirely. In that case, your IT department is the only route.
How to change DNS on different devices
You can change DNS at the device level (affecting only that device) or on your router (affecting every connected device). Below are clear instructions for each major platform.
How to change DNS on Windows 11
- Launch the Start menu, type in "Control Panel," and click on Control Panel.
- Select Network and Internet.
- Click Network and Sharing Center.

- Select Change adapter settings in the sidebar.
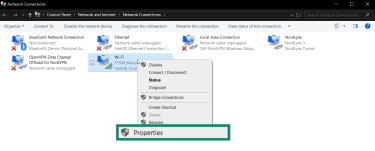
- Right-click the connection whose DNS you want to change, then select Properties.
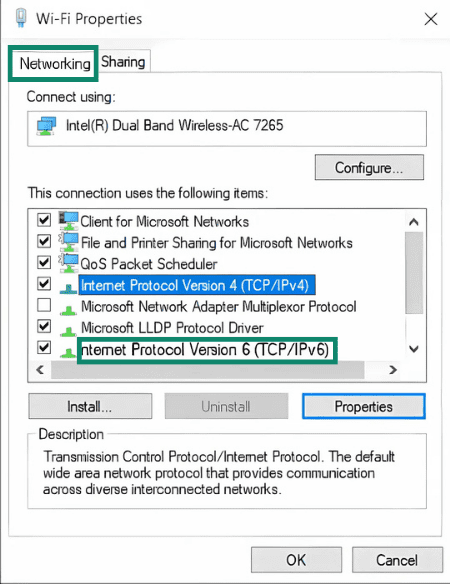
- Select the Networking tab. Under This connection uses the following items, select Internet Protocol Version 4 (TCP/IPv4), then click the Properties button.
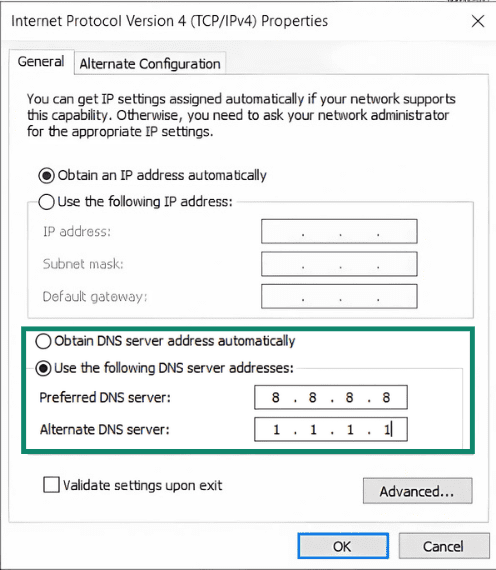
- Click Use the following DNS server addresses and enter your DNS provider’s preferred (primary) and alternative (secondary) DNS address. Click OK to confirm the change.
If Internet Protocol Version 6 (TCP/IPv6) is also checked in the list, repeat these steps for IPv6 after finishing IPv4.
How to change DNS on macOS
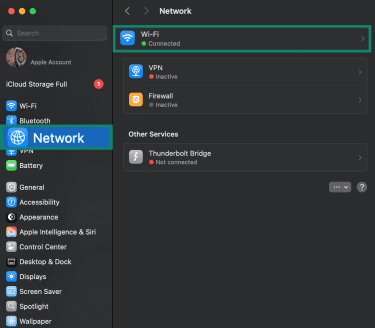
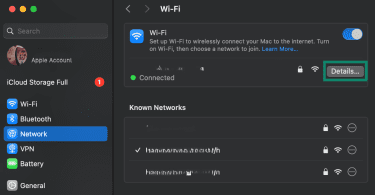
- Click the Apple icon in the top-left corner, then pick System Settings > Network. Select the connection type whose DNS settings you want to adjust (Wi-Fi or Ethernet).
- Click Details… next to the connected network’s name.
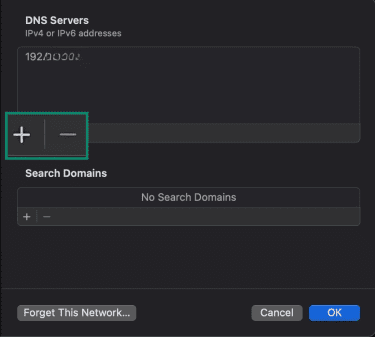
- Click DNS in the sidebar.
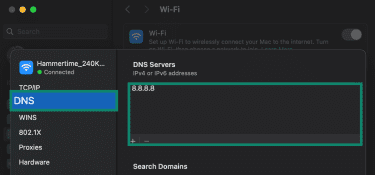
- Click the plus icon, add a new DNS address, and click OK.
How to change DNS on Linux
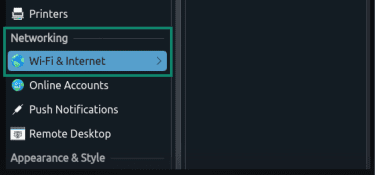
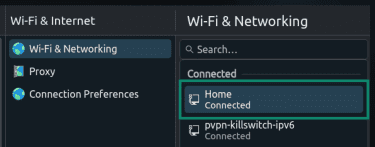
For this guide, we use KDE Plasma, but the process is very similar on GNOME:
- Open Settings and select Wi-Fi & Internet.
- Select your active connection (wired or wireless).
- In the IPv4 or IPv6 tab, find the DNS field and enter your chosen servers, separated by commas. For example: 1.1.1.1, 9.9.9.9 for IPv4.
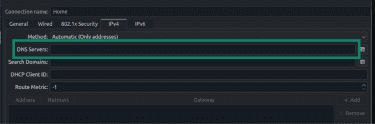
- Click Apply, then disconnect and reconnect to your network to apply the new DNS.
If you're running a server or prefer the terminal, there are two common approaches:
Using systemd-resolved
In Terminal, run sudo nano /etc/systemd/resolved.conf. Find the [Resolve] section and add this line: DNS= x.x.x.x.
Save the file, and then restart the service by running sudo systemctl restart systemd-resolved.
Editing /etc/resolv.conf directly
You can manually set the DNS servers your system uses by editing the resolver configuration file.
Open Terminal and run sudo nano /etc/resolv.conf. Inside the file, add or replace the nameserver lines with the DNS servers you want to use, like nameserver x.x.x.x. You can list multiple lines and the system will try them in that order.
Note that if your network is managed by systemd, NetworkManager, or another service, it may overwrite /etc/resolv.conf on reboot or when the network reconnects. So this method is reliable only if no one else is managing DNS on your system.
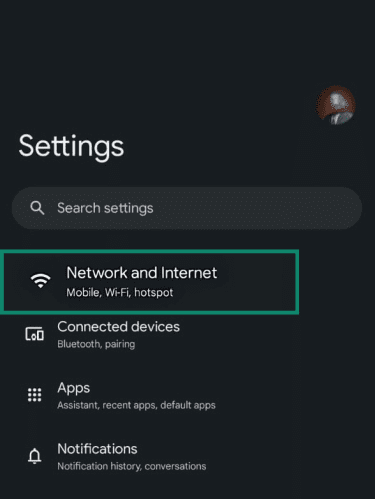
How to change DNS on Android
- Go to Settings, then tap Network and Internet.
- Select Private DNS.
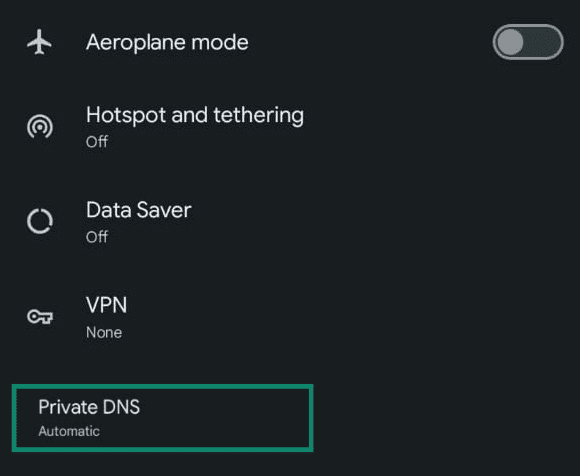
- Enter the new DNS provider hostname and tap Save.

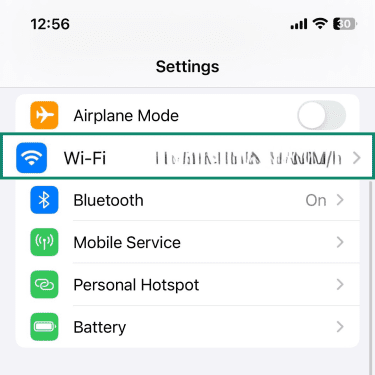
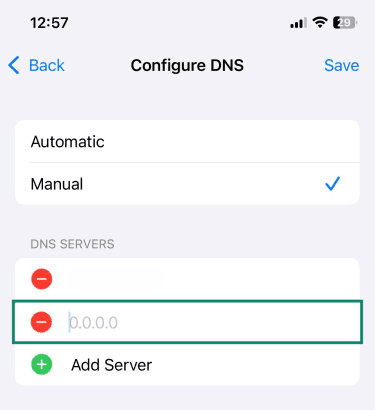
How to change DNS on iOS (iPhone & iPad)
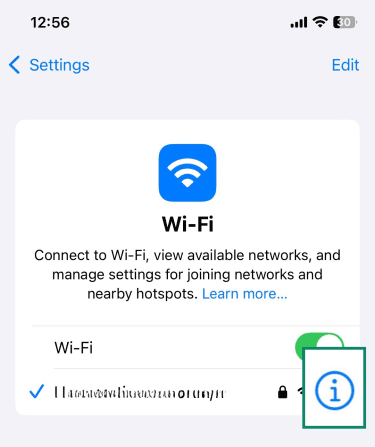
- Go to Settings and pick Wi-Fi.
- Tap the i icon next to the active Wi-Fi connection name.
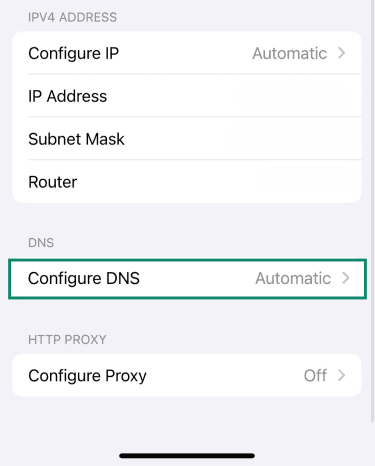
- Scroll down and tap Configure DNS.
- Switch to Manual, then tap on Add Server.
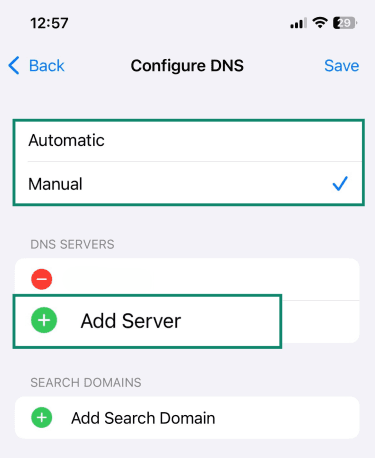
- Input the new DNS server address and tap Save.
How to change DNS on ChromeOS
- Open Settings and select Network in the sidebar.
- Click Wi‑Fi or Ethernet and choose your active network.
- Scroll down to the Name servers section. Select Google name servers to use Google’s 8.8.8.8 and 8.8.4.4, or choose Custom name servers to enter your own addresses.
- Type your chosen DNS servers and save. Keep in mind that each Wi‑Fi network needs to be configured individually.
How to change DNS on your router
Router interfaces differ depending on the brand and model, so the exact menu names may vary. In some cases, especially with ISP-provided routers, DNS settings may be hidden or locked. If you don’t see the options described below, check your router’s manual or your provider’s support documentation.
The general steps for changing DNS on your router are:
- Log in to your router’s admin console: Open a browser and enter your router’s IP address (commonly 192.168.0.1 or 192.168.1.1). Sign in using your administrator username and password. Default credentials are often printed on the router or listed in its manual.
- Find the DNS settings: Look in sections such as WAN, Internet, Network, or LAN. Find fields labeled Primary DNS and Secondary DNS.
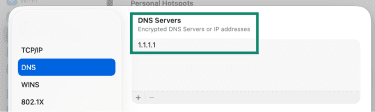
- Enter your new DNS addresses: Input the primary and secondary IPv4 addresses provided by your DNS service. If your router supports IPv6, enter the IPv6 DNS addresses as well.
- Save and reboot: Click Apply or Save, then restart the router if prompted. Once it reconnects, all devices on your network will use the new DNS settings.
Test your new DNS settings
After updating your DNS server, it’s a good idea to verify that everything is working the way you expect. The steps below help you make sure your device is actually using the new resolver and that your DNS requests aren’t being routed somewhere else behind the scenes.
Flush DNS cache (Windows, macOS, browsers)
If you test immediately after changing DNS, your device might still rely on cached DNS records. Clearing the DNS cache forces fresh lookups through the new DNS server.
Here are the commands for each operating system:
- Windows: Run ipconfig /flushdns in Command Prompt (open it as Administrator).
- macOS: Run sudo dscacheutil -flushcache; sudo killall -HUP mDNSResponder in Terminal.
- Linux: Run sudo systemctl restart systemd-resolved in Terminal, or sudo systemd-resolve --flush-caches, depending on your distribution.
How to confirm your DNS change worked
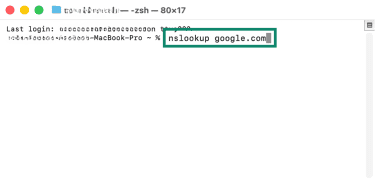
To check which DNS server your device is using, you can use the built-in command line on your device. The command is the same and the steps are similar, so we’ll use macOS’s Terminal for our example:
- Open Command Prompt (Windows) or Terminal (macOS/Linux) and run nslookup google.com.. Google is globally available and very rarely down, which makes it a safe domain to query when you just want to test DNS resolution.
- Look for the lines labeled Server and Address.
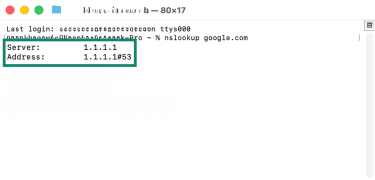
- Compare the Address shown to the DNS IP you configured.
Checking for DNS leaks
Finally, it’s a good idea to check for DNS leaks to make sure your DNS requests are actually going where you intend them to go.
To check, perform a DNS leak test.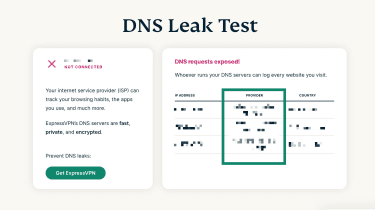
When the results appear, look at the Provider shown.
- If you set a custom DNS (like Google or Cloudflare), it should show that provider.
- If you didn’t change anything, it will usually show your ISP.
- If you’re using a virtual private network (VPN), you may see your VPN’s DNS.
If the provider listed is different from the one you expected, your DNS requests may not be going where you think they are.
Troubleshooting common DNS change issues
Encountering problems after switching DNS isn’t unusual. The good news is that most issues stem from simple misconfigurations or cache conflicts. The following subsections address the most common hiccups and offer practical fixes.
No internet after changing DNS
- Check your entries: A typo in the IP address (for example, 1.1.1.11 instead of 1.1.1.1) can break DNS resolution. Double‑check both primary and secondary addresses.
- Reconnect or restart: Restart your device or toggle Airplane Mode (if you use a laptop or mobile device) to force a new connection. Restarting your router can also resolve issues.
- Try another provider: Some networks block certain public DNS servers. Switching to a different DNS provider (e.g., Google Public DNS if Cloudflare doesn’t work) may restore connectivity.
- Switch back to automatic: On Windows and macOS, selecting Automatic DNS or removing custom entries reverts to your ISP’s default servers.
DNS not updating or reverting back
- Admin privileges: Ensure you save changes with administrative rights. On Windows, macOS, and Linux, run network commands as an administrator. You’ll be asked to save the changes by confirming your administrator password.
- Router settings: If you change DNS on your device but your router enforces its own DNS via Dynamic Host Configuration Protocol (DHCP), the router may override your settings. Update the router's DNS settings or disable DNS forwarding.
- VPN or security software: Some VPNs or antivirus programs use their own DNS servers for security. Check the VPN app settings or disable that feature.
Slow browsing or sites not loading
- Test multiple providers: Some servers may be slower for your region. Another provider might offer servers closer to your physical location, resulting in faster DNS resolving.
- Clear cache and flush DNS: Old cache entries may cause delays. Use the flushing instructions we provided above to force your device to use the new DNS settings.
- Check network issues: DNS isn’t the only cause of slow browsing; network congestion or router problems may be at fault. You can also try restarting your router, switching DNS servers again, clearing your cache, and updating your router's firmware.
“DNS server not responding” errors
- Verify server addresses: An incorrect IP address or misconfigured IPv4/IPv6 settings can cause a resolver to reject queries.
- Ping the DNS server: Use ping 1.1.1.1 (for example) to check if the server is reachable.
- Fallback to the secondary server: If the primary server is unreachable, ensure your device is configured with a secondary server. Public DNS services typically provide two addresses (e.g., 1.1.1.1 and 1.0.0.1).
- Disable firewalls or security software temporarily: Some firewalls block DNS queries; test by disabling them briefly (but re‑enable them afterwards).
Choosing the best public DNS
There isn’t a single “best” public DNS provider for everyone. The right choice depends on what you're trying to achieve, while keeping in mind that most providers make tradeoffs. Here are the key things to consider before deciding:
- Speed and latency: If fast browsing is your priority, look for providers with servers near your location to minimize response times. You can use DNS benchmarking tools to compare.
- Privacy policy: If privacy is your main concern, check what a provider logs and for how long. Some keep temporary logs for security purposes, while others commit to storing nothing at all.
- Filtering and security: If you want to block malicious sites or control what content is accessible on your network, look for providers that offer malware and phishing protection or category-based filtering for ads, trackers, and adult content. Keep in mind that filtering usually requires selecting a dedicated resolver address.
- Reliability: If you need a dependable connection, look for providers with multiple worldwide servers and a strong uptime record to avoid slowdowns or outages.
- Advanced DNS security features: If you want an extra layer of security and privacy, look for resolvers that support DNS-over-TLS (DoT) or DNS-over-HTTPS (DoH). Some providers also allow custom blocklists for more granular control.
Popular options explained
Some of the most popular DNS providers today are Cloudflare DNS, Google Public DNS, and Control D. All three options offer both IPv4 and IPv6 addresses, and they support encrypted DNS methods like DNS over HTTPS (DoH), DNS over TLS (DoT), and the newer method DNS over QUIC (DoQ) that protect DNS requests from being read or modified on the network path.
They also all validate Domain Name System Security Extensions (DNSSEC), which helps catch certain types of DNS tampering. The real differences come down to logging and privacy defaults, plus whether filtering is built in or kept separate. Here’s a closer look:
Cloudflare DNS
- IPv4: 1.1.1.1 and 1.0.0.1
- IPv6: 2606:4700:4700::1111 and 2606:4700:4700::1001
Cloudflare runs 1.1.1.1 as a public DNS resolver, in partnership with the Asia Pacific Network Information Centre (APNIC). It’s a well-known “set it once” option that works across most devices and routers, so it’s often used as a straightforward replacement for ISP DNS.
On privacy, Cloudflare says it doesn’t store a user’s source IP address in non-volatile storage, anonymizes IP addresses via truncation, and deletes the truncated IP within 25 hours.
It also says it deletes its public resolver logs within 25 hours. That means the service still needs some short-term operational data, but it’s designed around short retention rather than long-lived resolver logs.
Cloudflare keeps filtering separate from its standard resolver. If filtering is the goal, Cloudflare points users to “1.1.1.1 for Families,” which uses different resolver addresses and offers two default modes: malware blocking or malware and adult content blocking.
Google Public DNS
- IPv4: 8.8.8.8 and 8.8.4.4
- IPv6: 2001:4860:4860::8888 and 2001:4860:4860::8844
Google Public DNS is Google’s public resolver, built for predictable, standards-based DNS behavior. It’s commonly chosen for consistency and reliability, especially if the main goal is a stable public resolver rather than filtering features.
According to the company, the service keeps two types of logs. Temporary logs are the only ones that include both the client IP address and the DNS query, and Google says these are subject to deletion processes within 24 to 48 hours.
Google also says it keeps permanent logs that sample the temporary logs, remove the IP address, and replace it with a city or region-level location for aggregate analysis.
For filtering, Google’s approach is basically “no category filtering.” It says it’ll comply with enforceable court or government orders in certain jurisdictions, and in those cases, it blocks DNS resolution for specified domains and returns a “REFUSED” response code (optionally with an extended DNS error).
Control D
- IPv4: 76.76.2.0 and 76.76.10.0
- IPv6: 2606:1a40::0 and 2606:1a40:1::0
Control D is a Canada-based public DNS resolver with endpoints that can be used without an account. Instead of one default resolver that tries to fit everyone, it exposes multiple endpoints that map to different filtering modes, so it’s easier to pick “unfiltered” or a specific preset without extra setup.
Control D’s free DNS documentation says that free resolvers don’t store any logs. If you opt for the paid service and enable analytics, Control D says the most granular data is only stored when Full Analytics is selected and kept for a maximum of 3 days.
Its analytics documents also summarize that raw DNS query logs are stored for one month, while other statistical data is stored for a maximum of one year.
Filtering is separate from the unfiltered experience because it depends on which endpoint is chosen. That makes it easy to turn on things like ad or tracker blocking at the DNS level, but it also means stricter presets can sometimes block something a site needs to load, so it’s worth starting with lighter filtering if reliability is the top priority.
FAQ: Common questions about changing DNS
Is changing Domain Name System (DNS) to 8.8.8.8 safe?
Which is better, 1.1.1.1 or 8.8.8.8 for gaming?
Is 1.1.1.1 still the fastest DNS?
How do I know if my DNS change was successful?
What are the common issues after changing DNS?
Take the first step to protect yourself online. Try ExpressVPN risk-free.
Get ExpressVPN