Code integrity primer: GitHub commit signature verification via YubiKey


Editor’s note: This post is part of our series for cybersecurity professionals and hobbyists, written by Shawn T., a threat hunter on ExpressVPN’s cybersecurity team.
At ExpressVPN, we continuously look for ways to improve the security posture of our products, services, and delivery pipelines by ensuring our code repository is safe. As we continue to mature our capabilities, we will share our know-how and journey with the broader community and industry, as a company on the forefront of information security and privacy.
In this post, we will discuss our preference for YubiKey as a form of two-factor authentication and take a look at how to implement YubiKey as signature verification for GitHub code commits.
The importance of two-factor authentication
Instead of relying solely on a username and password combination, two-factor authentication adds another layer of security by requiring a second piece of information. This is usually in the form of a one-time code, which can be sent to you via SMS, email, an authenticator app or a hardware token.
There are three factors to consider when choosing authentication methods:
- Something you know (password, pin code)
- Something you have (security key, sim card)
- Something you are (fingerprint, voice recognition)
When two of these factors are required at the same time for authentication, it is referred to as two-factor authentication. For example, most modern smartphones support fingerprint biometric authentication (something you have) in addition to a password (something you know), which forms a common set of 2FA.
If your account is not protected by two-factor authentication, an attacker could gain access to your account if they were to successfully brute force your password or obtain it from a data breach of third-party services that disclosed user credentials. With 2FA enabled, the attacker would need to obtain another factor in addition to the password before they could gain access to your account.
Common two-factor authentication methods include:
- SMS text messages
- Authenticator apps
- Hardware tokens
These 2FA methods are widely used across a host of services to provide added security for authentication. In this article we’ll focus on hardware tokens in particular, as they can store private keys, which can uniquely identify you.
YubiKey: Our preferred method of 2FA
Hardware tokens have recently gained popularity as a means for users to secure their account credentials through the use of a secondary factor authentication.
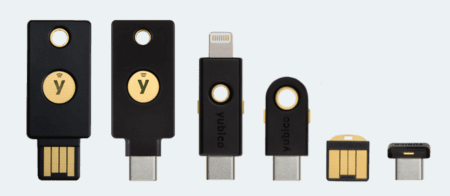
YubiKey is one of the more popular hardware tokens resembling a USB stick. Various services and applications support YubiKey as a form of authentication, such as Google, Microsoft, Dropbox, Amazon, and Facebook.
One advantage of using YubiKey is convenience. Instead of receiving an SMS code or opening an authenticator app to retrieve a code, all you need to do is plug the YubiKey into the device’s USB port to log in (some use NFC, so you can just place it on your phone, for instance). In some cases—as we do at ExpressVPN—you’ll be required to physically touch a button on the YubiKey; physical touch increases security by ensuring that any authentication must be carried out in person.
At ExpressVPN, YubiKey is the preferred method of 2FA for logging in to various apps and services. We chose YubiKey because of its broadly recognized reputation for being reliable, configurable, and hardened security hardware tokens. Their interoperability with many cloud providers and incorporation into our other identity and access-management capabilities make them a perfect fit for our security-minded organization.
In addition, we also require our developers to sign their Git commits with their YubiKeys, which allows us to do integrity validation across our code bases. This grants us an additional layer of protection against unauthorized access. For example, an attacker may be able to guess or steal a developer’s GitHub password if the password is weak; however, without the corresponding hardware key they would be severely restricted in causing damage.
Below, we will detail how YubiKey can be implemented on Github to ensure that all commits are signed and verified.
About GitHub commit signature verification
GitHub is a powerful tool that allows users to collaborate on code with anybody from anywhere. However, when dealing with a repository where multiple collaborators work on a shared piece of code, it is difficult to verify the user is who they are supposed to be when submitting code changes. To resolve this, GitHub introduced commit signature verification, where signed commits and tags help others to verify the integrity and origin of a piece of code.
If a commit or tag has a GPG or S/MIME signature that was successfully verified, it is marked as “Verified.” If a commit or tag has a signature that can't be verified by GitHub, it is marked as "Unverified." Otherwise, no verification status is displayed. By enabling vigilant mode, GitHub will show verification status for all commits.
Default statuses
| Status | Description |
| Verified | The commit is signed and the signature was successfully verified. |
| Unverified | The commit is signed but the signature could not be verified. |
| No verification status | The commit is not signed |
Statuses with vigilant mode enabled
| Status | Description |
| Verified | The commit is signed, the signature was successfully verified, and the committer is the only author who has enabled vigilant mode. |
| Partially verified | The commit is signed, and the signature was successfully verified, but the commit has an author who: a) is not the committer and b) has enabled vigilant mode. In this case, the commit signature doesn't guarantee the consent of the author, so the commit is only partially verified. |
| Unverified | Any of the following is true:
|
By default, vigilant mode is not enabled. For information on how to enable vigilant mode, see "Displaying verification statuses for all of your commits."
For example, if a repository accepts any commit without a verified tag, an attacker can simply change the git config to any name and make commits by running “git config user.name” and “git config user.email” with values that match the author of the repository. It is also simple to get the user.name and user.email from the web UI or by cloning the repository and running “git log” in the terminal or command prompt.
By using a YubiKey, we can reduce the possibility of malicious code being pushed into the repository while also confirming that the author performing the git operation is authenticated and authorized to perform this as well.
How to use GPG for commits signature verification
You can use GPG to sign commits with a GPG key that you can generate. We will be using YubiKey to generate the public key, which would need to be uploaded to GitHub. See https://github.com/settings/keys
Note: In an organization, it is advised that key generation, handling and distribution should be performed by the security or IT department.
- We’ll go over the steps required to configure your YubiKey and start signing commits on a macOS system. Although this is Mac-specific, the equivalent commands can easily be identified and performed on all other operating systems supporting GPG.
Prerequisite software
On macOS install the relevant dependencies and packages using brew in the terminal.
brew install gnupg2 pinentry-mac ykman yubikey-personalization
Prepare the configuration file for the pinentry application.
mkdir ~/.gnupg

touch ~/.gnupg/gpg-agent.conf
Identify where pinentry was installed.
which pinentry-mac
![]()
Edit the GPG config file ~/.gnupg/gpg-agent.conf with the following values, including the pinentry location.
default-cache -ttl 600

max-cache-ttl 7200

pinentry-program /usr/local/bin/pinentry-mac

enable-ssh-support
Configure YubiKey
Make sure that YubiKey is plugged in.
Configuring the YubiKey touch policy using ykman.
ykman openpgp keys set-touch SIG on

ykman openpgp keys set-touch ENC on

kman openpgp keys set-touch AUT on
Next check that GPG can detect the YubiKey.
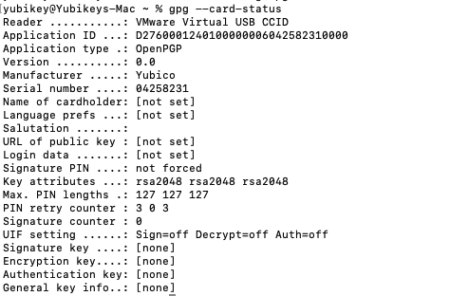
gpg –card-status
In the output of gpg –card-status, the “Reader” should display Yubico YubiKey <model> if your system successfully detects it. However, as we are running this on VMware virtual machine, the output shows VMware Virtual USB CCID.
Initiate the configuration.
gpg –card-edit
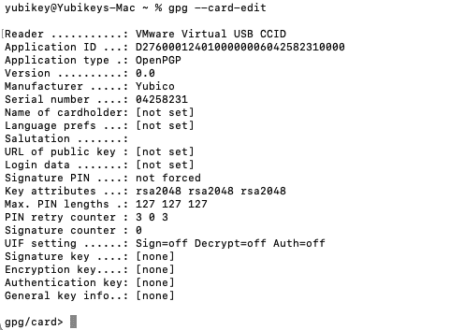
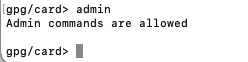
Verify you have admin permissions.
gpg/card> admin
Generating GPG on yubikey
Generating the GPG keys.
gpg/card> generate
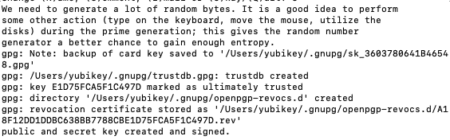
Type “Y” to make backup of the encryption key.
![]()
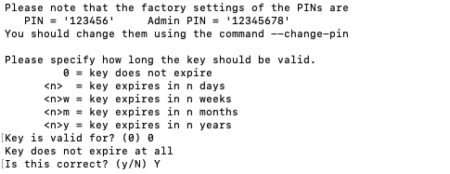
A prompt will appear. The default pin is 123456 and the admin PIN is 12345678, we highly recommend changing these. We will highlight how to perform this below.
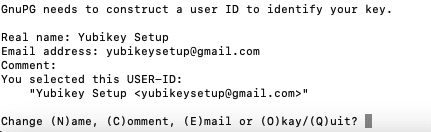
GnuPG will require some information—name and email address.The email address should match your GitHub email that you will be using.
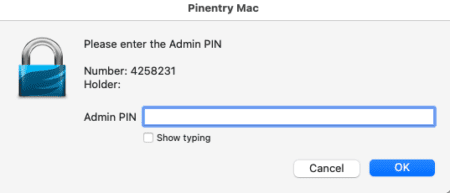
Type “O” to continue and provide your admin pin.
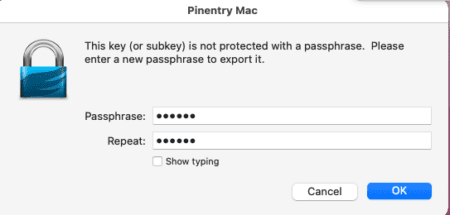
Another prompt will appear to create a passphrase to export the key.
If everything is correct, the following message will be displayed.
Changing the pin
gpg/card> passwd
Verify if the key has successfully been configured
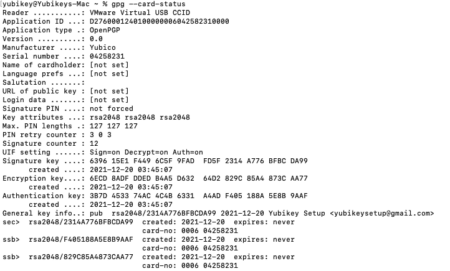
gpg –card-status
Exporting the public key from the YubiKey
To export the public key, we will need to get the fingerprint from the command above. Use the gpg –armor command to output an encrypted file with extension .asc instead of .gpg. The subkey fingerprint required to perform this can be found under the “General key info” section from the command above.
Example: rsa2048/2314A776BFBCDA99, the fingerprint will be 2314A776BFBCDA99
gpg –armor –export 2314A776BFBCDA99 > 2314A776BFBCDA99.asc
You will need to copy this public key to any computer you want to use for git commit signing.
Import public key onto machine
gpg –import < 2314A776BFBCDA99.asc
Set up the terminal to use the gpg-agent (Mac OS default zsh)
Open ~/.zshrc in a text editor and add the following line.
export SSH_AUTH_SOCK=`gpgconf –list-dirs agent-ssh-socket`

export GPG_TTY=$(tty)
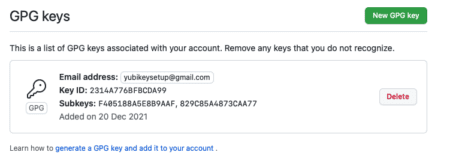
Upload the key to GitHub as a signing key
Head over to https://github.com/settings/keys and click New GPG key. Open the publickey that was generated (.asc) that was generated through the steps above and copy the content to save it.
Set up git config
Find your key fingerprint using the command “gpg -k”

GitHub email can be retrieved from https://github.com/settings/emails
git config –global user.signingKey <fingerprint>

git config –global commit-gpgSign true

git config –global user.email <github email>
Sign commits
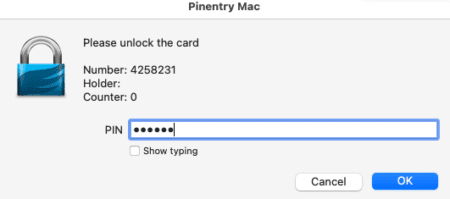
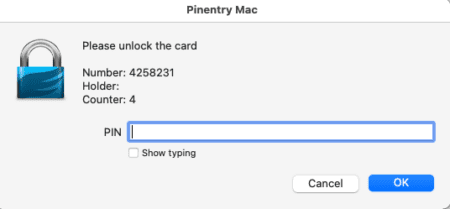
You are not fully set up to sign commits. You can test this is working as intended by committing a test change to a repository as shown below.
![]()
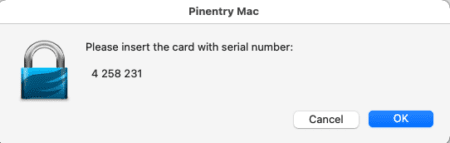
If you were successful, a pop-up to enter your pin should appear.
If your YubiKey is not inserted, you may receive a prompt to insert the corresponding hardware token.
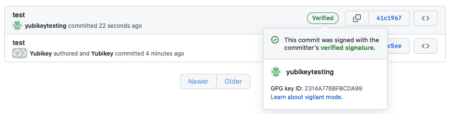
After you have completed this and pushed the code to GitHub, a “verified” logo will be shown in the git commits section.
Final thoughts
Congratulations, you have now successfully increased your CI/CD security posture significantly!
In the past few years we have observed multiple examples of supply-chain poisoning that included upstream repository poisoning from compromised developer accounts. The chance of your repository being targeted in a similar fashion by attackers aimed at uploading malicious code is substantially reduced due to your new incorporation of hardware token-based 2FA. The usage of YubiKeys provides an additional security layer that provides us with additional confidence that the person authenticating is who they claim to be.
Explore the web with greater privacy
Get ExpressVPNSign up today for a chance to win FIFA World Cup 2026™ tickets.