How to fix “self-assigned IP address” error on Mac


If your Mac says it’s connected to Wi-Fi but nothing’s loading, the problem might be a self-assigned IP address. This means your computer tried to join the network but didn’t get a valid IP address from the router, so it can’t actually connect to the internet. It’s a common issue, and it’s usually easy to fix.
In this guide, we’ll show you what exactly can trigger this error and how to fix it with detailed step-by-step instructions.
What is a self-assigned IP address on Mac?
A self-assigned IP address is an address your Mac gives itself when it can’t get one from the router. To do this, your Mac uses a built-in system called Automatic Private IP Addressing (APIPA), which automatically assigns the IP address.
This self-assigned IP address allows your Mac to communicate with other devices, like another computer or a printer, on the same local network segment (the same broadcast domain). These addresses usually start with 169.254 and are known as link-local addresses.
Why does my Mac show “self-assigned IP”?
Your Mac shows this message when something interrupts the process of getting an IP address from the router. Normally, your router handles this automatically through a system called Dynamic Host Configuration Protocol (DHCP), which gives each device a unique IP address so they can communicate with each other.
If that process is interrupted because of a signal issue, a misconfiguration, or the router not responding, your Mac doesn’t receive a valid address and ends up assigning itself a link-local IP address instead.
The role of DHCP in assigning IP addresses
DHCP is the system that automatically assigns IP addresses and network settings to every device, including your Mac, on a network. It’s what allows your Mac, phone, and other devices to join the network and communicate without you having to set anything up manually.
In most homes and small offices, the router takes on this role of a DHCP server, meaning once a device joins the network, it instantly assigns it a local IP address, all while making sure it doesn’t overlap with another device’s IP address on that same network.
Why a valid IP address matters for connectivity
Every device on a network needs a valid IP address to communicate with other devices on the same network and with the router, which lets it go online. It’s how your Mac identifies itself and finds other devices, whether that’s your router, a printer, or a website on the internet. Without a proper address, the device doesn’t know where to send data or where to expect replies from.
Why a self-assigned IP address doesn’t work for connectivity
A self-assigned IP address comes from a special reserved range (169.254.x.x) that’s only meant for local use. These are non-routable IP addresses, and they never leave your device’s immediate network segment; they exist so your computer can stay active on its own interface.
Because they’re link-local addresses that can’t be routed, your router will drop any traffic using them instead of forwarding it beyond your local network. Your Mac might look connected, but it can’t reach the internet or most of your network, and nothing outside that local link can reach it.
Common causes of self-assigned IP address errors
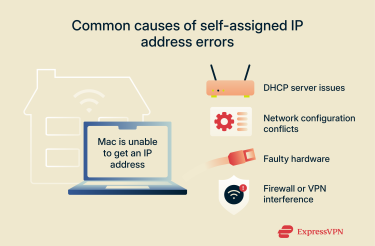 Several factors can trigger a “self-assigned IP address” error on Mac. In most cases, the issue comes from the router’s DHCP service, a configuration conflict on your Mac, or a hardware fault. Each affects how your device connects to the network in a different way.
Issues with the DHCP server
Most “self-assigned IP address” errors start with the router, which acts as a DHCP server in most home networks. When that process is interrupted, the connection fails before it even begins. Similar network connection issues can also appear as an IP configuration failure error.
Temporary freeze or overload
Routers can get stuck after running for long periods or when handling too many devices at once. This can cause the DHCP server to stop responding.
Limited address pool
Every router keeps a small range of addresses it can assign, known as the DHCP scope. If that pool runs out because too many devices are connected or leases last too long, the router simply has nothing left to give.
Disabled DHCP setting
It’s rare, but occasionally the DHCP function can accidentally be turned off in the router’s settings, often after a firmware update or configuration change. Without it, the router can’t assign new addresses, and your Mac ends up without one it can use.
Conflicting DHCP sources
If two routers, or a router and a range extender, both try to hand out IP addresses, devices can receive conflicting information. When that happens, your Mac rejects the mismatch and defaults to a self-assigned address instead.
Network configuration conflicts
A self-assigned IP address error can sometimes originate from your Mac’s own configuration. When network settings are outdated, misconfigured, or in conflict with another device, your Mac may fail to obtain a valid address despite the router functioning correctly.
Corrupted network preferences
Your Mac stores information about every network it connects to, and over time, those files can become outdated or damaged. When that happens, they can interfere with new connections or prevent the system from negotiating a valid address.
IP address conflicts
If two devices try to use the same IP address, such as when you assign your Mac a static address that the router already assigned to another device, the network rejects the duplicate to prevent errors, and your Mac assigns itself an address instead.
Incorrect service order
When multiple connections are active, like Wi-Fi and Ethernet at the same time, your Mac follows a set order to decide which one to use first. If it prioritizes the wrong interface or a non-working adapter, the connection can fail and trigger a self-assigned IP address.
Router or hardware problems
Hardware issues, like bad cables, weak Wi-Fi, or a failing router, can interrupt your Mac’s connection and lead to a self-assigned IP error.
Faulty cables or ports
A worn Ethernet cable or a defective port on the router or your Mac can interrupt the link completely. When the line drops, your Mac loses contact and switches to a local address to stay connected.
Overheating or aging hardware
Routers and adapters can slow down or drop connections when they overheat or start to fail. Older equipment, in particular, may struggle to maintain stable communication, leading to your Mac losing its connection with the router during the DHCP process. When it can’t renew or confirm its assigned address, macOS falls back to a self-assigned IP address.
Outdated router firmware
Firmware updates keep your router stable and compatible with new systems. If the firmware’s outdated, your router may struggle to communicate reliably with modern versions of macOS, resulting in dropped connections and failed IP assignments.
Wi-Fi interference
Signal congestion, distance, or physical barriers like walls can weaken the wireless connection between your Mac and the router. When the signal drops or becomes unstable, your Mac may lose contact with the router long enough to miss a DHCP renewal.
Firewall or VPN interference
Firewalls and virtual private networks (VPNs) keep your data private, but sometimes they interrupt the very connection they’re meant to protect. When security tools filter or reroute network traffic too aggressively, your Mac may lose the signal it needs to get a valid IP address.
Firewall blocking
A strict firewall rule can mistake your router’s response for suspicious traffic and silently block it. When that happens, your Mac never gets the confirmation it needs to join the network and instead assigns itself a temporary address.
VPN conflicts
A VPN adds its own virtual network layer to your Mac, which it uses to route all network traffic through an encrypted tunnel. If parts of that setup stay active after you disconnect, like a custom Domain Name System (DNS) route or a static IP configuration, your Mac may try to send DHCP traffic through the VPN instead of to the router. When the router never receives the request, your Mac gives itself a self-assigned IP.
Persistent network extensions
Some VPN or security apps use network extensions that manage how traffic flows through your Mac. Occasionally, disabling or uninstalling these extensions doesn't fully release control of the network interface. This issue prevents your Mac from properly communicating with the router to renew its IP address.
Step-by-step fixes for a self-assigned IP address on Mac
The following steps will help you reset your Mac’s connection to the router and clear out old data so it can get a proper IP address from your router.
Restart your Mac and router
Restarting both your Mac and your router is the quickest way to clear temporary network glitches. It refreshes the connection and helps both devices start clean.
To restart your Mac and router:
- Unplug your modem and router: Disconnect them from power completely. If you have a combined modem/router unit, just unplug that one.
- Wait about a minute: This gives the devices time to shut down fully and clear any temporary data.
- Plug the modem back in first: Wait until its lights stop flashing and it’s fully online. Then reconnect the router and give it a few minutes to boot up.
- Restart your Mac: Once everything’s back online, reconnect to Wi-Fi and check whether your Mac now has a valid IP address.
Renew the DHCP lease
Renewing the DHCP lease forces your Mac to drop its current network settings and request a new IP address from the router. This can resolve issues caused by expired leases, address conflicts, or configuration errors that stop your Mac from connecting normally.
Here are the steps you need to take to renew your Mac’s DHCP lease:
- Go to System Settings, choose Network, and select Wi-Fi (or Ethernet if you’re using a wired connection).
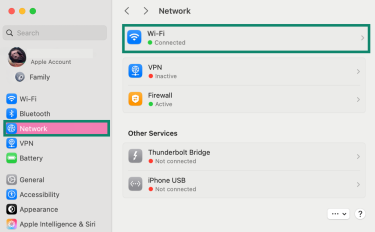
- Click on your active connection and select Details.

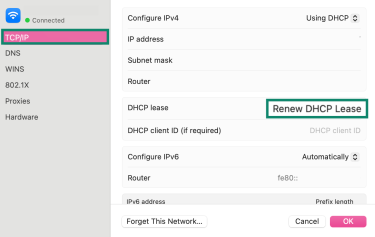
- Open the TCP/IP tab, select Renew DHCP Lease, and click OK to confirm.
Check and adjust network settings
Checking these settings ensures your Mac is requesting an address correctly and not using a configuration that forces it to assign one to itself.
Use automatic IP configuration
Switching to automatic configuration (DHCP) forces your Mac to request a valid address from the network.
To make sure your Mac is using DHCP, follow these steps:
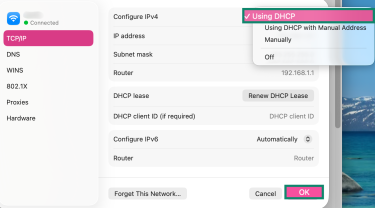
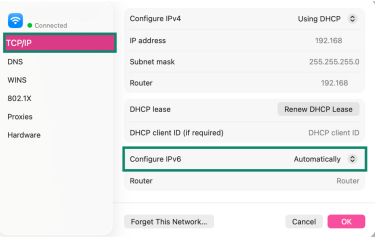
- In the TCP/IP tab, check Configure IPv4.

- Click the dropdown next to Configure IPv4 and make sure it’s set to Using DHCP. Then click OK.
Configure IPv4 manually if needed
If your Mac can’t get an IP address automatically because the router’s DHCP service isn’t responding, setting one manually lets you connect in the meantime. This is best as a temporary fix while you restart or reconfigure your router to restore normal DHCP service.
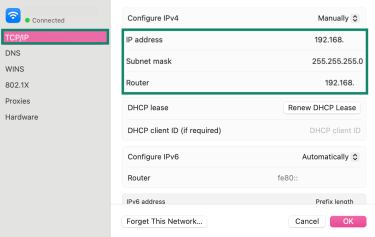
- In the TCP/IP tab, change Configure IPv4 to Manually.
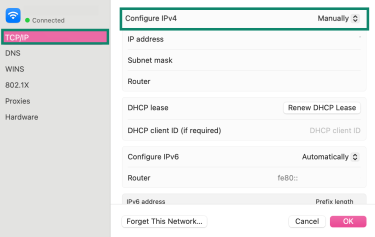
- Fill in the following fields: IP address, subnet mask, and router. Then click OK to save the settings and check your connection.
Tip: To choose a safe static IP address, run netstat -nr | grep default in Terminal. The number next to default is your router’s address (for example, 192.168.1.1). Pick an IP address in the same range, such as 192.168.1.200. You can check if it’s free with ping 192.168.1.200. If you don’t get a reply, the address is likely available.
Next, run ifconfig and find your active network interface (such as en0 for Wi-Fi). Note the subnet mask value, which is usually 255.255.255.0 for home networks.
Review advanced settings
If your Mac still shows a self-assigned IP, there might be a hidden network conflict. Checking a few advanced settings can help clear it up.
Adjust IPv6 settings
IPv6 can occasionally confuse the connection process if it’s misconfigured or if your router doesn’t handle it properly. Limiting IPv6 to local use can stabilize your network connection.
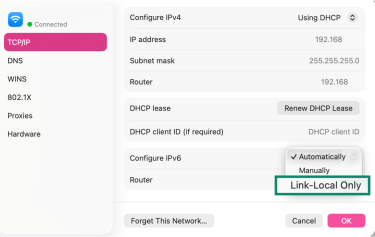
In your network settings, you can set the IPv6 settings to link-local within the same TCP/IP settings tab as above (you can find it following steps 1–3 here). Here’s how:
- In the TCP/IP tab, locate Configure IPv6.
- Open the drop-down option and choose Link-Local Only, then click OK to save your changes.
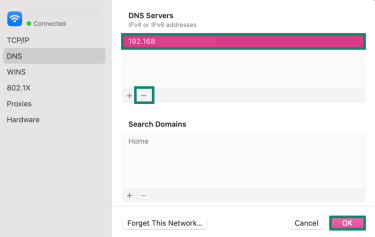
Clean up DNS entries
Old or manually added DNS entries can conflict with your router’s settings and slow down or block connections. Cleaning them up ensures your Mac uses the correct DNS automatically.
Here’s how to clean the DNS entries on your Mac:
- Open your active network connection’s details (following steps 1–2 here), then open DNS. Look for any grayed-out or manually entered DNS servers.
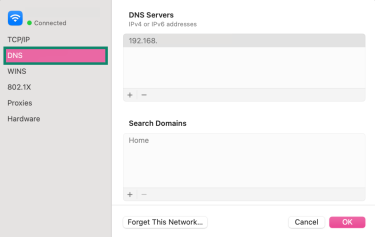
- Remove them by using the minus (-) button. Click OK to save your changes.
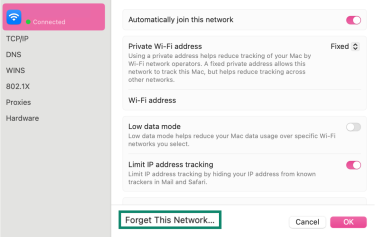
Forget and reconnect to Wi-Fi
Refreshing your Wi-Fi connection clears out old connection data stored in your network profile and forces macOS to rebuild a clean configuration.
To forget your current Wi-Fi and reconnect to it, follow these steps:
- In Wi-Fi settings, click Details next to your active network, and choose Forget This Network.
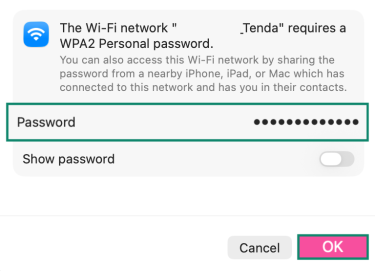
- Go back to your Wi-Fi settings, find your network in the list and click Connect.
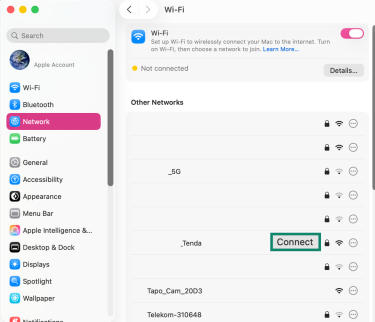
- Enter the password for the network and click OK to reconnect.
Reset firewall settings
Resetting the firewall restores default permissions, which can clear any settings that are too strict that could potentially block essential network traffic, like DHCP server communication.
Follow these steps to reset your firewall settings:
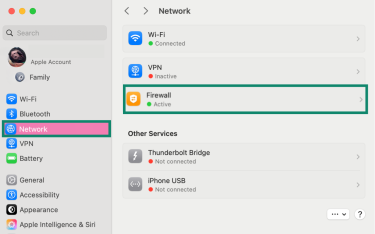
- In Network settings, click Firewall in the sidebar to view its options.
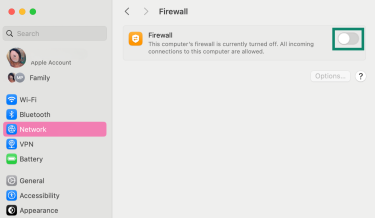
- Switch the toggle to the off position, then reconnect to your Wi-Fi. If your Mac gets a valid IP address and goes online, the firewall is likely blocking the connection.
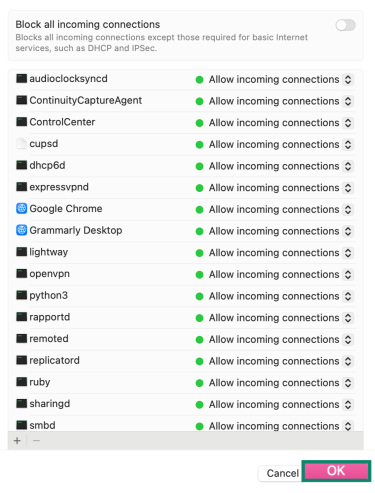
- Switch the firewall toggle to the on position again, then click Options.
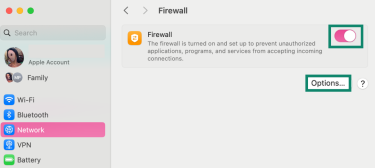
- Make sure essential system services aren’t being blocked. If any essential apps or processes show as blocked, switch them to Allow incoming connections, then click OK to confirm your changes.
Set service order in macOS
When your Mac has more than one way to connect to the internet, like Wi-Fi and Ethernet, it decides which one to use first. If the wrong connection is at the top of that list, your Mac might try it and fail before switching to the one that actually works.
Set the service order to make sure it always connects through your most reliable network first.
- In Network settings, click the three-dot menu at the bottom, and choose Set Service Order from the menu.

- When the Service Order window opens, drag your preferred connection (for example, Wi-Fi) to the top of the list, then click OK to save.
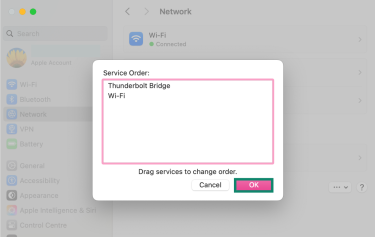
Note: This option appears only when more than one network connection (for example, Wi-Fi and Ethernet) is active.
Check for conflicting IP addresses
You can check for possible IP conflicts in your router’s admin panel.
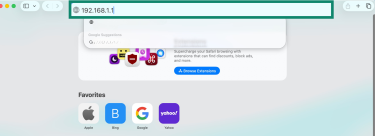
- Open a browser and enter your router’s IP address (commonly 192.168.0.1 or 192.168.1.1) to open its settings page.
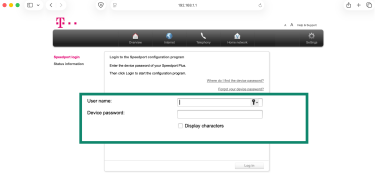
- Sign into your account with your router’s admin credentials.
- Go to Devices, Device List, or DHCP Client List (the name varies by router brand).
- Look for duplicate IP addresses. If two devices share the same address, restart one of them or set it to use DHCP so the router assigns a new one automatically.
Disable VPN (if applicable)
Some VPNs modify your network routes or DNS settings in ways that can block your Mac from communicating with the router. Disconnecting the VPN lets you test whether it’s causing the self-assigned IP issue.
To check:
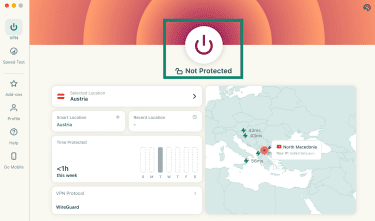
- Open your VPN app and click the power button to disconnect.
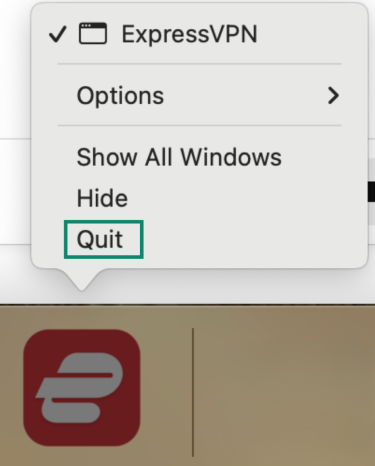
- Right-click (or control-click) the VPN app icon in the menu bar and choose Quit.
- Once the VPN app is fully closed, renew your IP address to refresh your network connection to clear any leftover VPN network settings and ask your router for a fresh connection.
If your Mac reconnects normally afterward, the VPN likely changed or interfered with your network configuration. In that case, try reinstalling or reconfiguring the VPN client to prevent it from happening again.
Preventing future self-assigned IP issues
Once your connection is back to normal, it helps to keep your network running smoothly so the problem doesn’t return. A few simple habits, like keeping software updated and checking your hardware, can go a long way toward avoiding connection errors.
Keep macOS updated
Keeping macOS up to date ensures it includes the latest fixes for Wi-Fi performance, network stability, and DHCP connections.
It’s also worth checking your router’s firmware. Manufacturers regularly release updates that improve security and fix bugs that can affect how your devices connect. A quick update on both your Mac and your router can help prevent most connection errors before they start.
Use reliable routers and hardware
Replacing your old router with a newer model or a mesh system can make your connection more stable and consistent.
It also helps to check your cables. Damaged or low-quality Ethernet cables can cause your Mac to drop its connection without warning. Use good-quality ones and make sure all ports are clean and secure.
Best practices for network configuration
Keeping your network simple and organized helps your Mac stay connected without interruption. A few small habits can make a big difference.
- Let your router handle IP addresses automatically instead of setting them manually. This avoids mistakes and prevents devices from using the same address.
- Use only one active connection at a time, either Wi-Fi or Ethernet. Turning off the one you’re not using keeps your Mac from switching between them and losing the connection.
- Restart your router and modem every so often, just like you would any other device. A quick reboot clears out small glitches and helps maintain a stable network.
- Remove any old VPN apps or security tools you no longer need. Outdated software can interfere with how your Mac connects and cause unexpected network problems.
FAQ: Common questions about the self-assigned IP address error on Mac
How to fix the 169.254 self-assigned IP on Mac?
There are several ways to fix a 169.254 self-assigned IP on your Mac, and it depends on what’s causing it. You can start by restarting your Mac and router to fix any temporary glitches and then move onto renewing your Dynamic Host Configuration Protocol (DHCP) lease in case your Mac’s DHCP settings are stuck. If it only happens on one network, forget that Wi-Fi and reconnect, and if you’re using VPN or firewall software, disable them temporarily in case they’re blocking DHCP. If nothing else works, reset your router’s DHCP settings or delete and re-add the network service on your Mac.
What are the signs of a self-assigned IP problem?
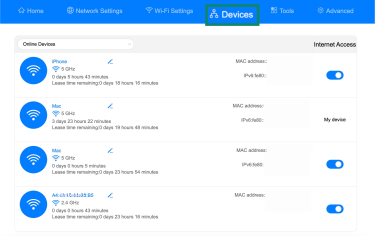
The first sign of a “self-assigned IP address” error is usually that your Mac shows it’s connected to Wi-Fi, but you still can’t get online. When you check your network settings, you’ll notice a 169.254.x.x address listed under your Wi-Fi or Ethernet connection along with a “self-assigned IP address” warning. This means your Mac connected to the router but didn’t get a valid IP address, so it can’t actually reach the internet.
Can VPNs or firewalls cause this issue?
Yes. A strict firewall or leftover VPN settings can block your Mac from getting a valid address. Resetting the firewall or reinstalling your VPN client, such as ExpressVPN, can help restore normal connections.
How do I get a static IP address on Mac?
You can assign a static IP on your Mac by setting it manually in System Settings > Network > Details > TCP/IP. Change Configure IPv4 to Manually, then enter an IP address, subnet mask (255.255.255.0), and your router’s address. If you need a permanent static IP from your internet provider, you’ll need to request it directly from them.
Take the first step to protect yourself online. Try ExpressVPN risk-free.
Get ExpressVPN