Bu kılavuz size ExpressVPN uygulaması ile antivirüs veya çevrimiçi güvenlik uygulamaları çalıştırırken DNS sızıntılarını nasıl çözeceğinizi gösterecek.
ExpressVPN’e bağlı olduğunuzda, aygıtınız ExpressVPN’in güvenli DNS sunucularını kullanarak DNS sorgularını çalıştırır.
ExpressVPN uygulamasını Norton 360 ve Avast gibi bir antivirüs veya çevrimiçi güvenlik uygulaması ile birlikte kullanıyorsanız, antivirüs veya çevrimiçi güvenlik uygulaması ExpressVPN uygulaması ile çakışabilir ve aygıtınıza ExpressVPN’in DNS sunucularını kullanmamasını söyleyebilir. Bu, DNS sızıntılarına yol açabilir.
Bu sorunu çözmek için aşağıdaki adımları izleyin. Her adımdan sonra, sorunun çözülüp çözülmediğini görmek için sızıntı testini yapın. Sorun çözülürse, kalan adımları atlayabilirsiniz.
Devam etmeden önce, ExpressVPN Windows uygulamasının en son sürümünü kullandığınızdan emin olun.
Git…
1. Antivirüs veya çevrimiçi güvenlik uygulamanızın tarayıcı uzantısını ve DNS veya web filtreleme özelliğini devre dışı bırakın
2. DNS’nin Otomatik olarak ayarlandığından emin olun
3. ExpressVPN uygulama ayarlarınızı onaylayın
1. Antivirüs veya çevrimiçi güvenlik uygulamanızın tarayıcı uzantısını ve DNS veya web filtreleme özelliğini devre dışı bırakın
Antivirüs veya çevrimiçi güvenlik uygulamanızla ilişkili ve ExpressVPN uygulamanızla etkileşime girebilecek herhangi bir tarayıcı uzantısını devre dışı bırakın. (Bu, antivirüs veya çevrimiçi güvenlik uygulamanızın performansını etkilemez.) Ayrıca, cihazınızın yalnızca ExpressVPN’in DNS sunucularını kullanabilmesi için antivirüs veya çevrimiçi güvenlik uygulamanızın DNS veya web filtreleme özelliğini devre dışı bırakın.
Farklı antivirüs veya çevrimiçi güvenlik ürünlerinin DNS veya web filtreleme özelliği için farklı adları vardır. Özel talimatlar için antivirüs veya çevrimiçi güvenlik uygulaması sağlayıcınızla iletişime geçin.
Yardıma ihtiyacınız mı var? Hemen yardım almak için ExpressVPN Destek Ekibi ile iletişime geçin.
2. DNS’nin Otomatik olarak ayarlandığından emin olun
- Windows Çalıştır komutunu açın.
- ncpa.cpl yazın ve Tamam‘a tıklayın.
- Ağ Bağlantıları penceresinde, etkin internet bağlantınıza sağ tıklayın.
- Özellikler‘i seçin.
- Internet Protokolü Sürüm 4 (TCP/IPv4) veya Internet Protokolü Sürüm 4 (TCP/IPv6) (hangisi işaretlendiyse) çift tıklayın.
- DNS sunucu adresini otomatik olarak al‘ı seçin.
- Tamam seçeneğine tıklayın.
Yardıma ihtiyacınız mı var? Hemen yardım almak için ExpressVPN Destek Ekibi ile iletişime geçin.
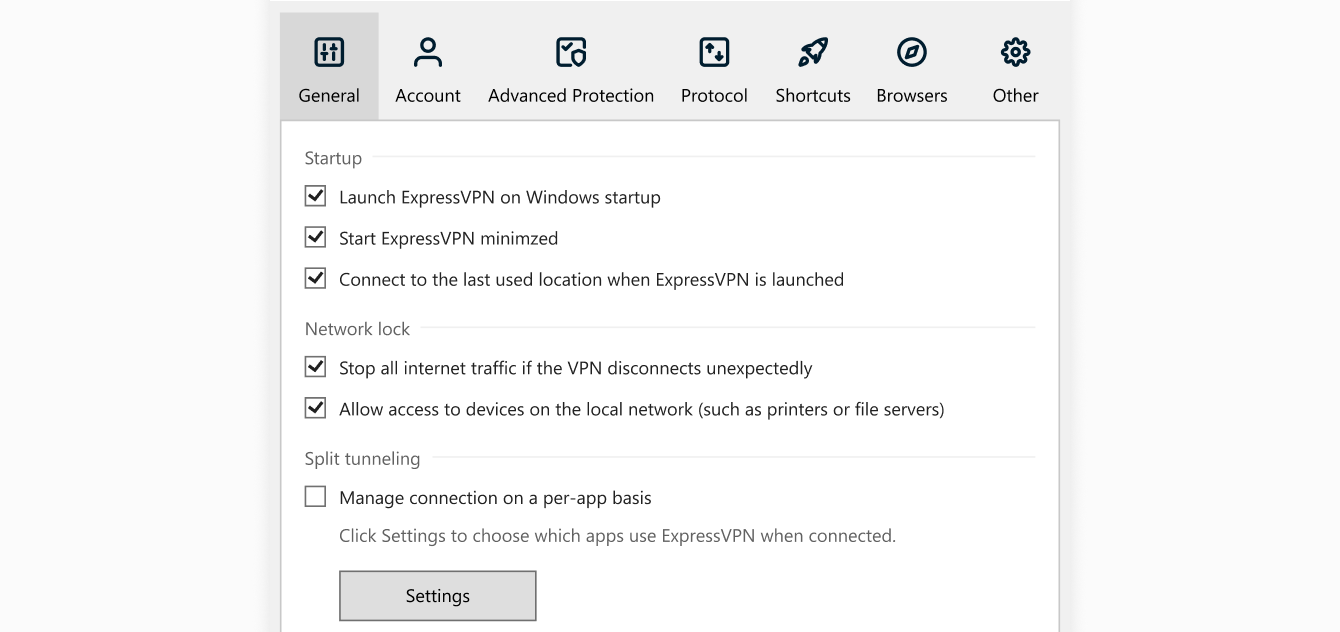
3. ExpressVPN uygulama ayarlarınızı onaylayın
- ExpressVPN uygulamasında,

 > Seçenekler > Genel tıklayın.
 - Network Lock için iki kutunun işaretlendiğinden emin olun.


- Uygulama bazında bağlantıyı yönet seçeneğinin işaretlenmediğinden emin olun.
- Tamam seçeneğine tıklayın.
Yardıma ihtiyacınız mı var? Hemen yardım almak için ExpressVPN Destek Ekibi ile iletişime geçin.