


Need a DNS for your Smart TV?
Try ExpressVPN's DNS Now
One ExpressVPN account. All devices.
Get Apps for FreeThis tutorial will show you how to configure ExpressVPN on your pfSense with OpenVPN.
Not all ExpressVPN locations may be available for manually configured connections.
Note: The following steps were tested on pfSense 2.4.5 and are intended for users with a basic home network setup (192.168.1.0/24): Internet > Modem > pfSense > Router/Access Points.
Jump to…
1. Find your ExpressVPN account credentials
2. Set up the VPN on pfSense
3. Route WAN through the VPN tunnel
4. Confirm connection success
1. Find your ExpressVPN account credentials
Go to the ExpressVPN+ setup page. If prompted, enter your ExpressVPN email and click Send Code.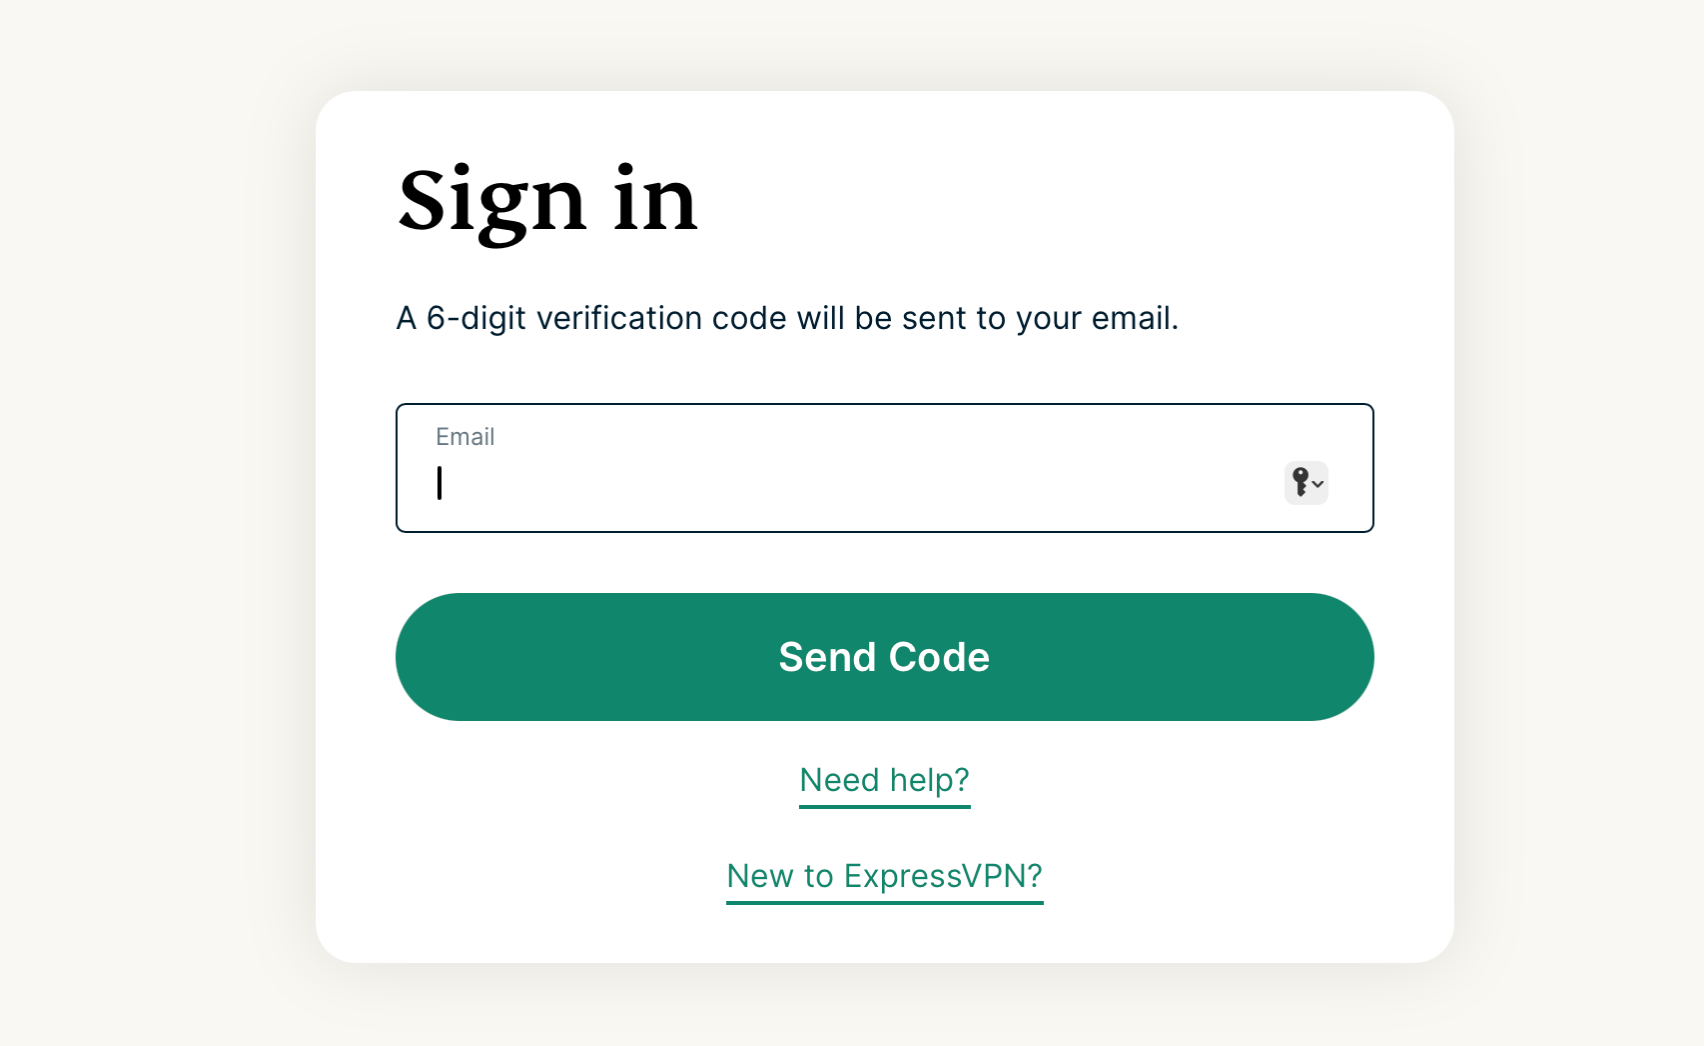 Enter the verification code that is sent to your email.
Click Advanced setup under Applications.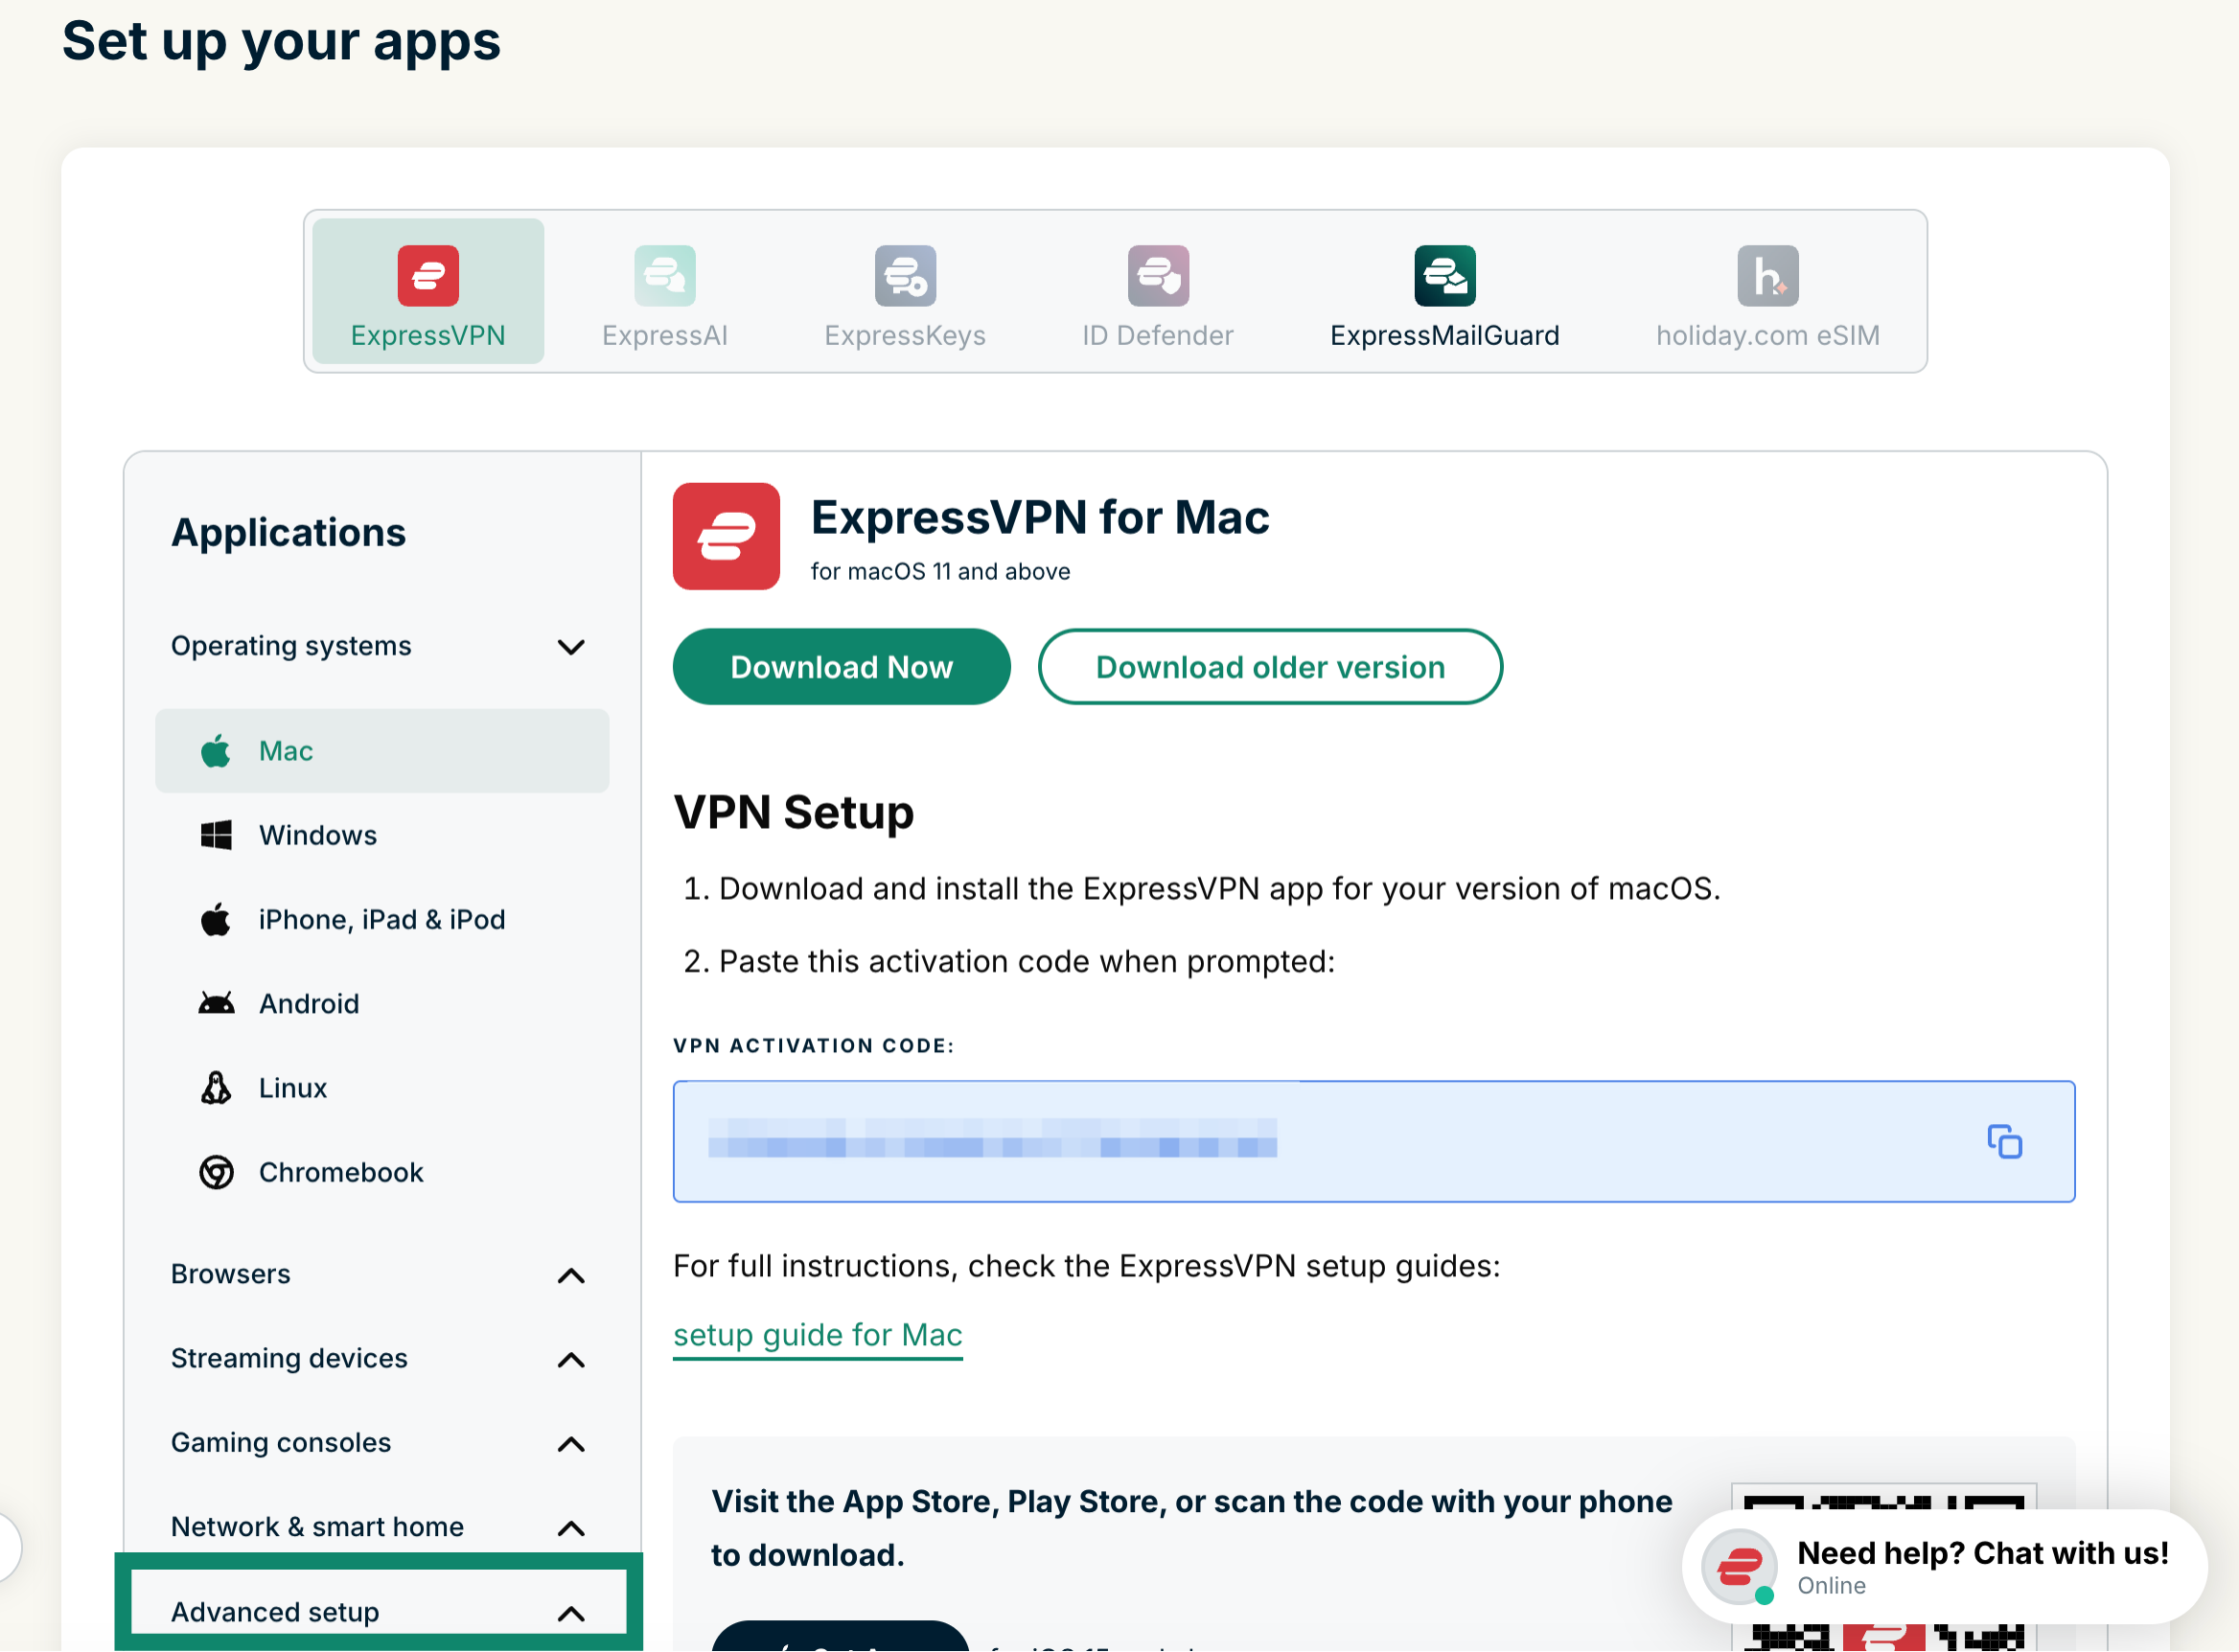 Click Manual Configuration.
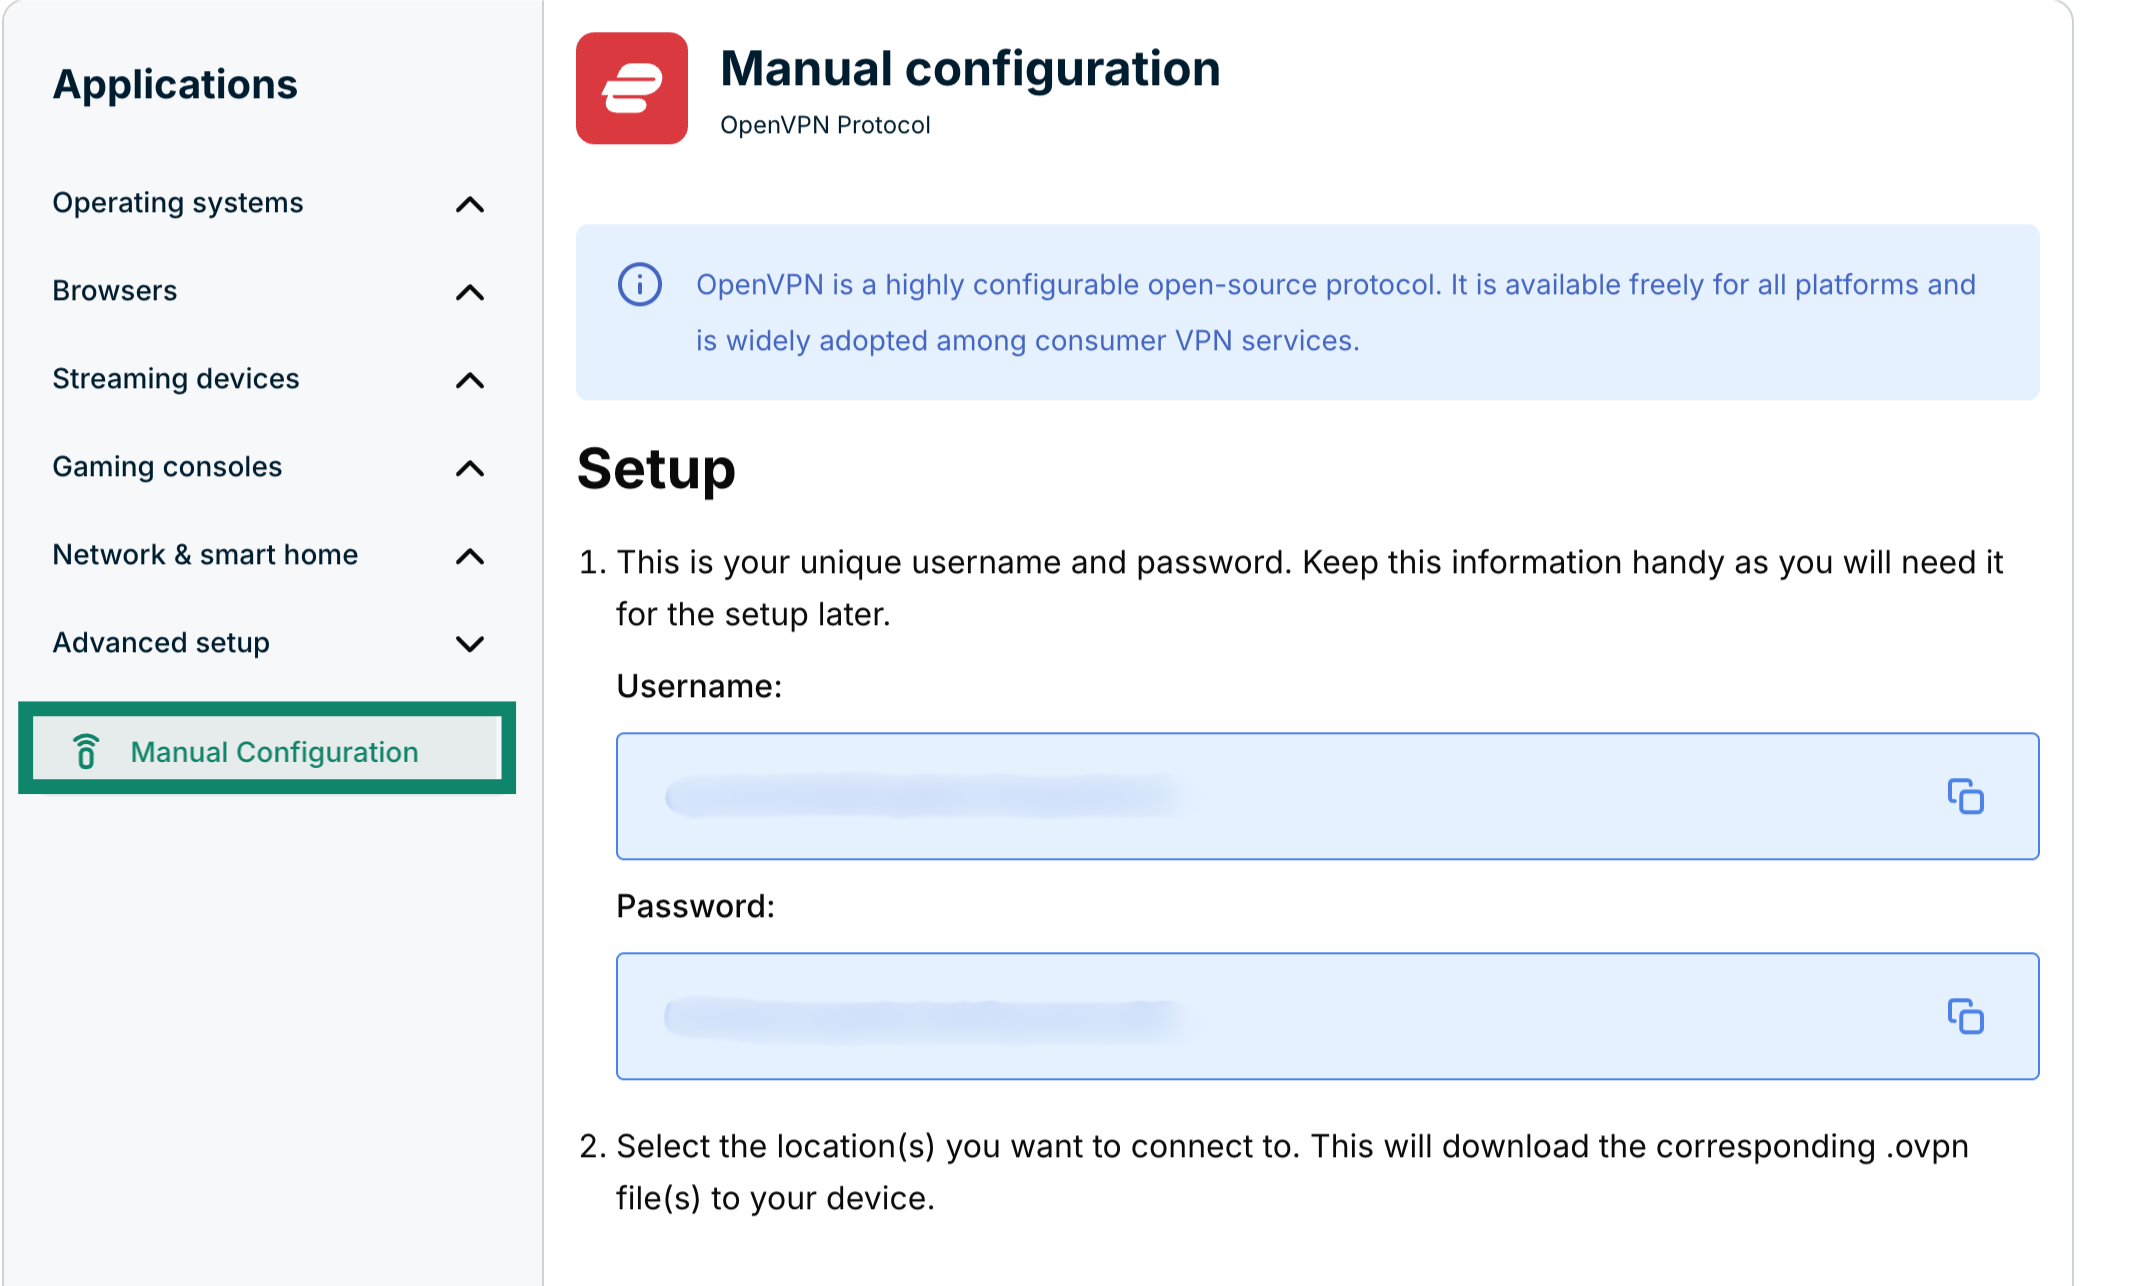 You’ll see your username and password on the right side under Setup in step 1.
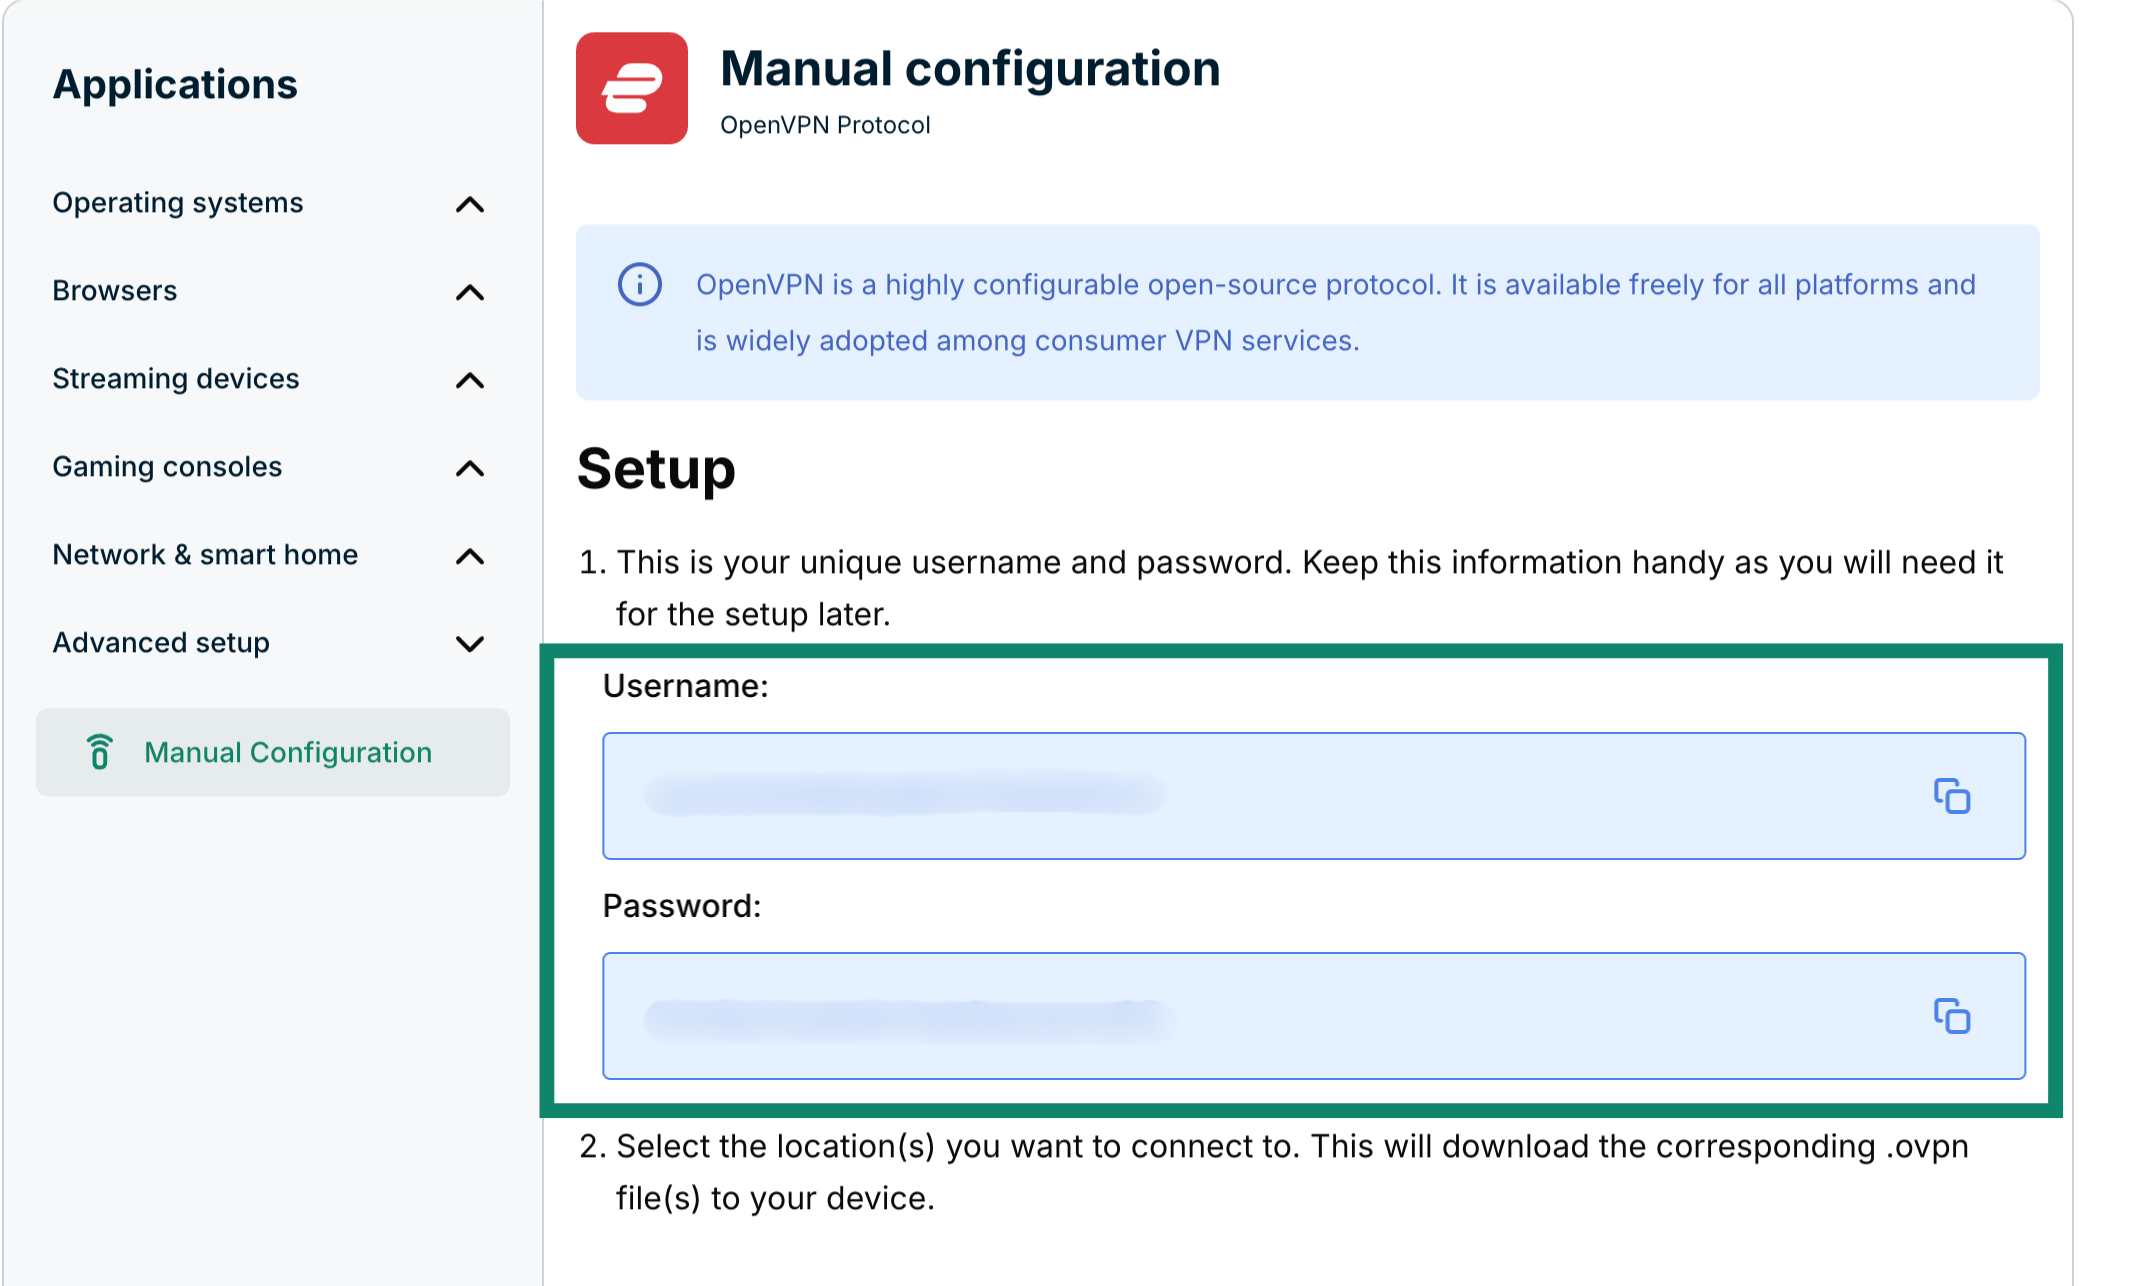
Scroll down to step 2 to see the available regions. Click a region to open a dropdown menu and see the available locations.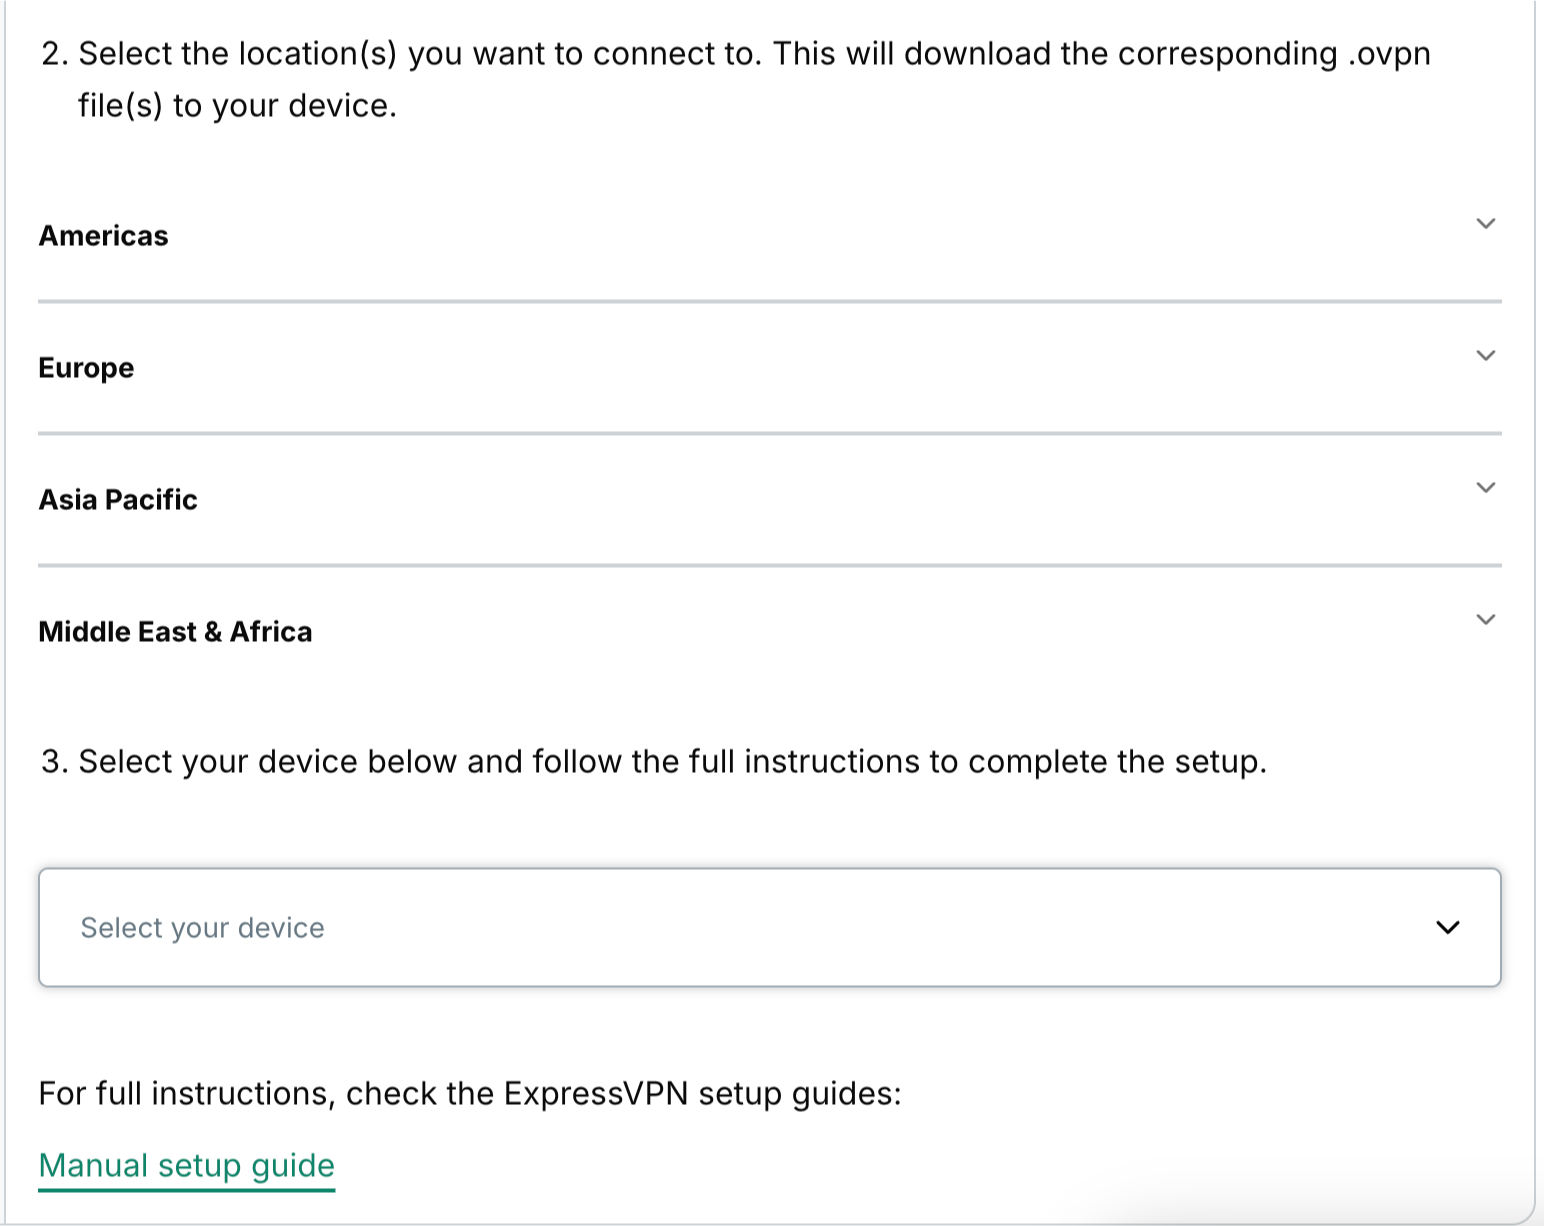 Click the location(s) you want in order to download the .ovpn file(s).
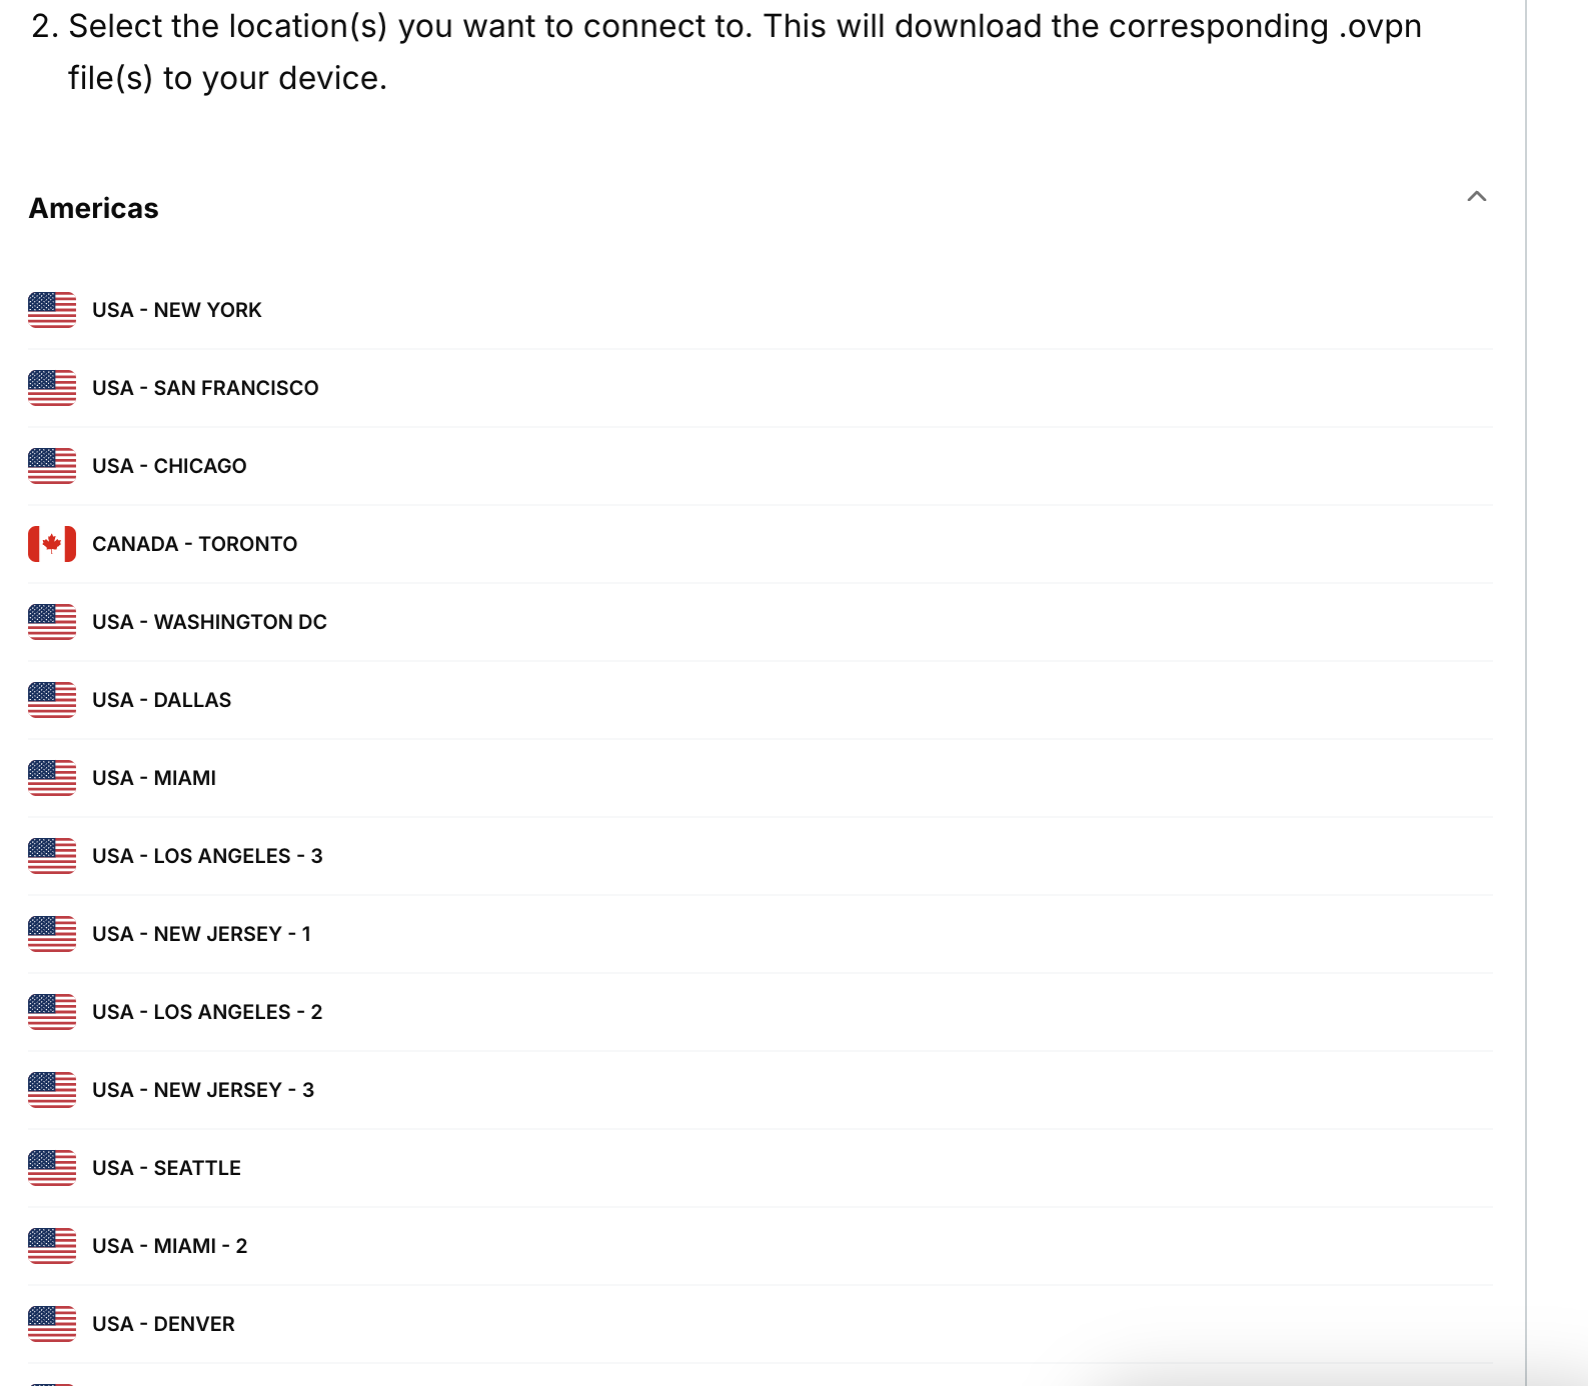 Keep this browser window open. You will need this information for the setup later.
Need help? Contact the ExpressVPN Support Team for immediate assistance.
2. Set up the VPN on pfSense
Sign in to your pfSense web interface. (The default username and password are admin and pfsense.) Click SIGN IN.
In the top navigation bar, click System > Cert. Manager.
In the CA tab, click ![]()
![]() Add. Enter the following information:
Add. Enter the following information:
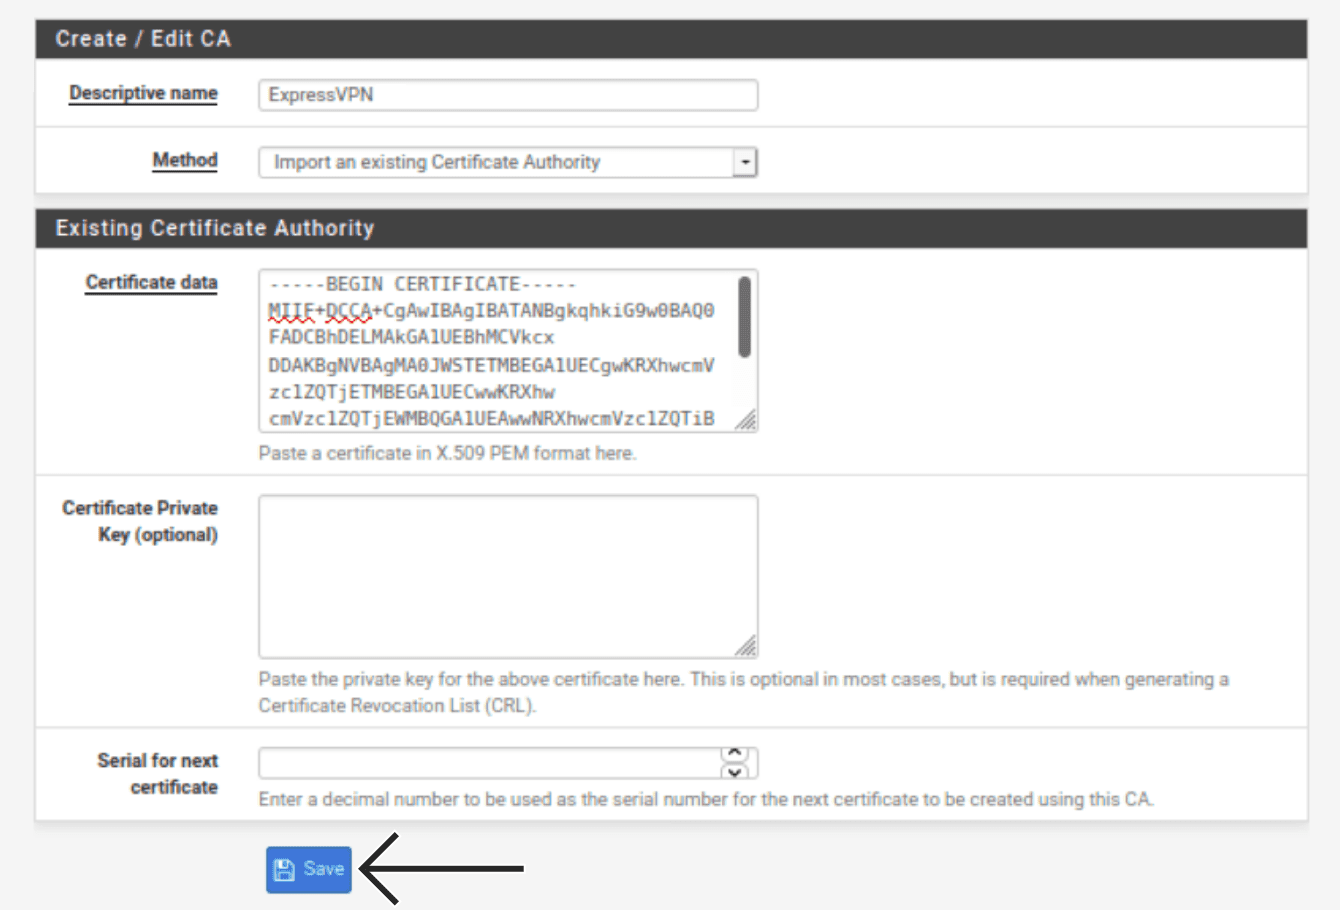
Create/ Edit CA
- Descriptive name: Enter any name that will help you recognize your VPN connection. For example: ExpressVPN.
- Method: Select Import an existing Certificate Authority.
Existing Certificate Authority
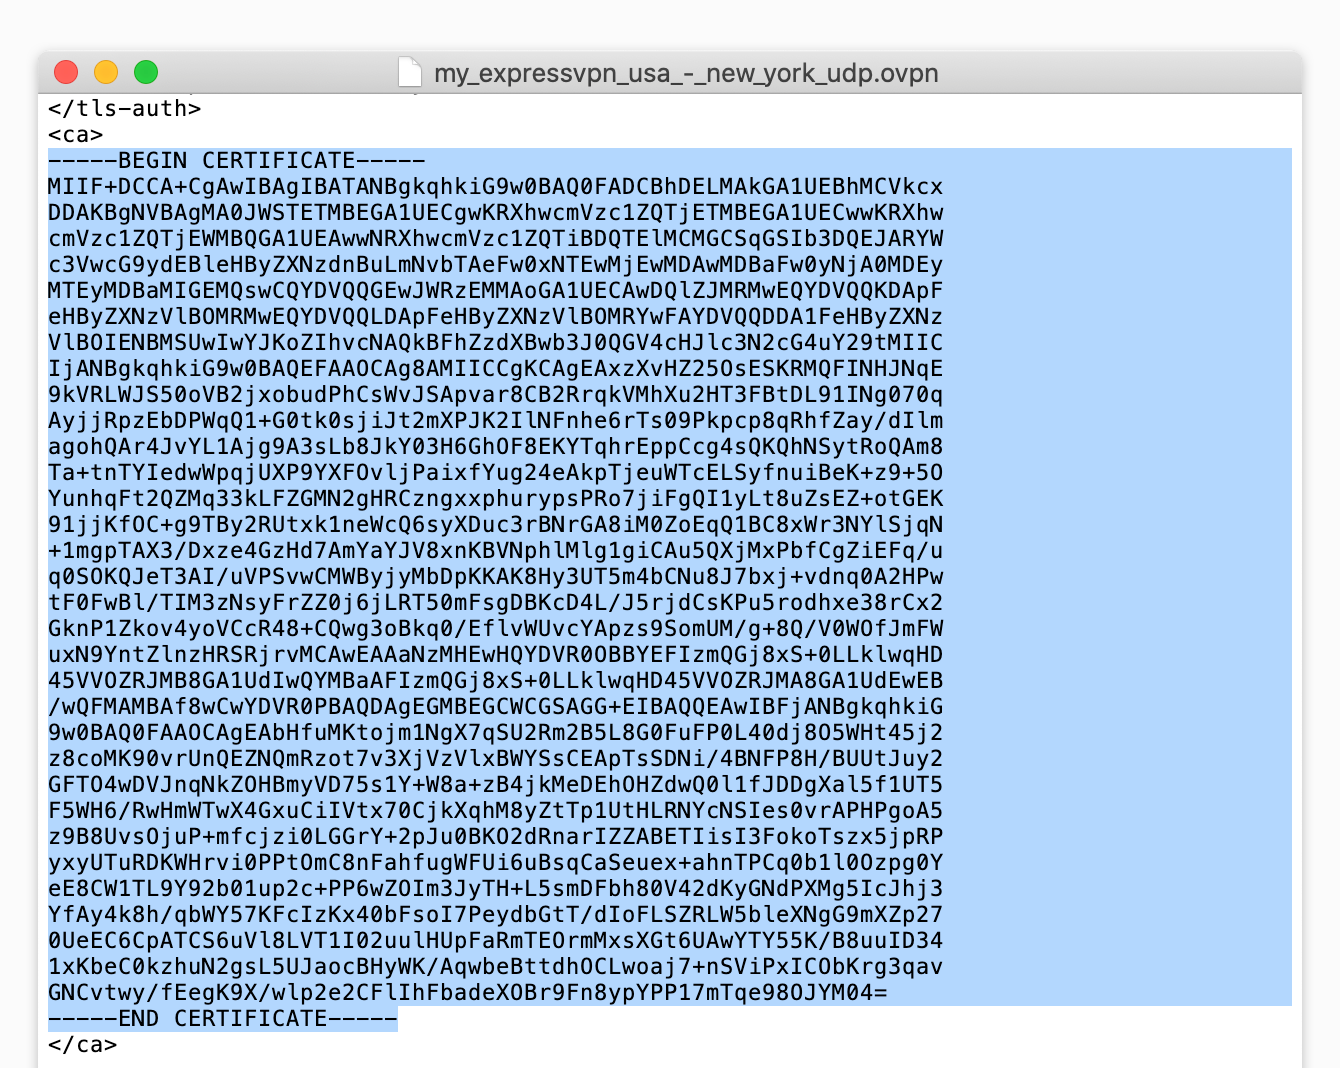
- Certificate data: Right-click the .ovpn config file and open it with any text editor. Copy the text between the <ca> and </ca> tags, and paste it in this field.


- Certificate Private Key (optional): Leave blank.
- Serial for next certificate: Leave blank.
Click Save.
Click Certificates. Click ![]()
![]() Add/ Sign. Enter the following information:
Add/ Sign. Enter the following information:
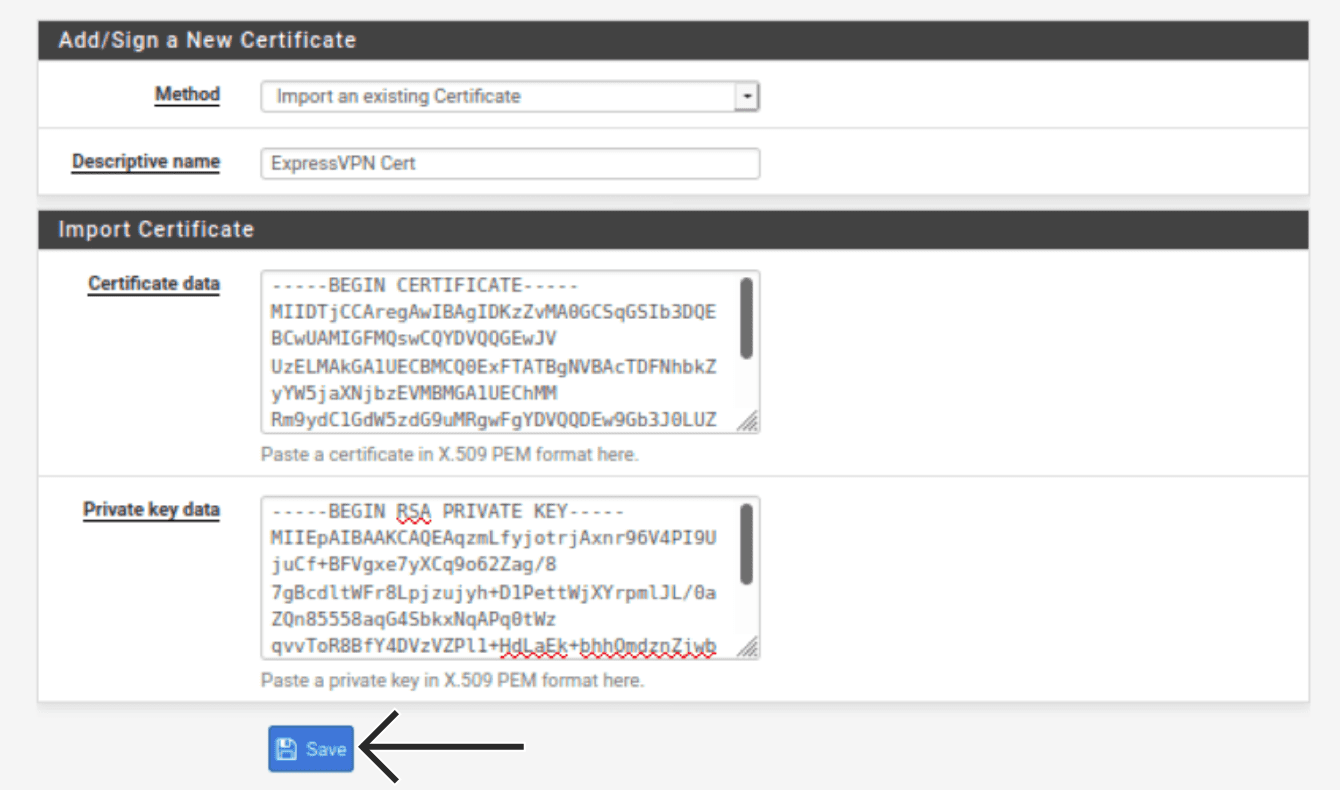
Add/ Sign a New Certificate
- Method: Select Import an existing Certificate.
- Descriptive name: Enter any name. For example: ExpressVPN Cert.
Import Certificate
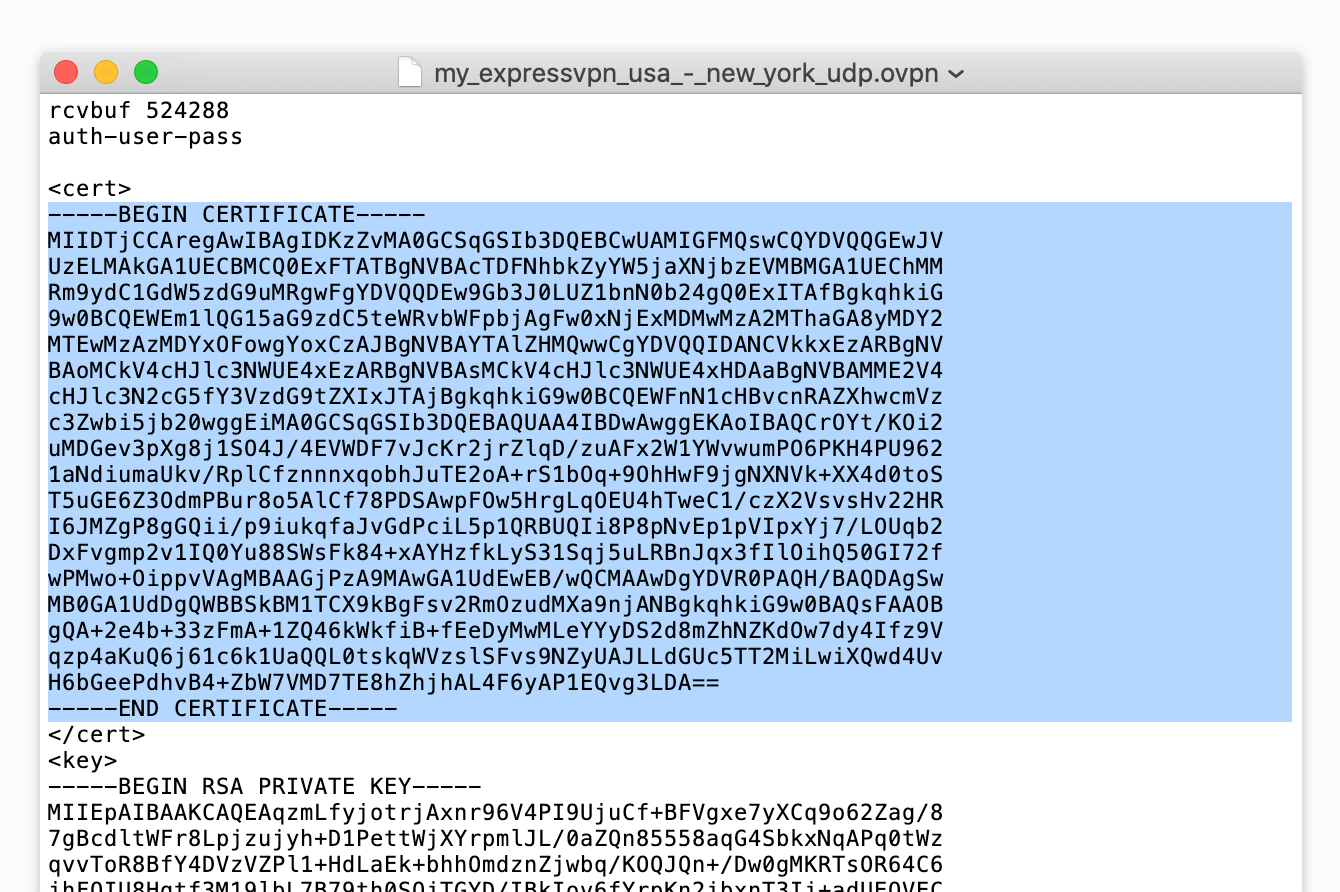
- Certificate data: In the text editor you opened earlier, copy the text between the <cert> and </cert> tags, and paste it in this field.


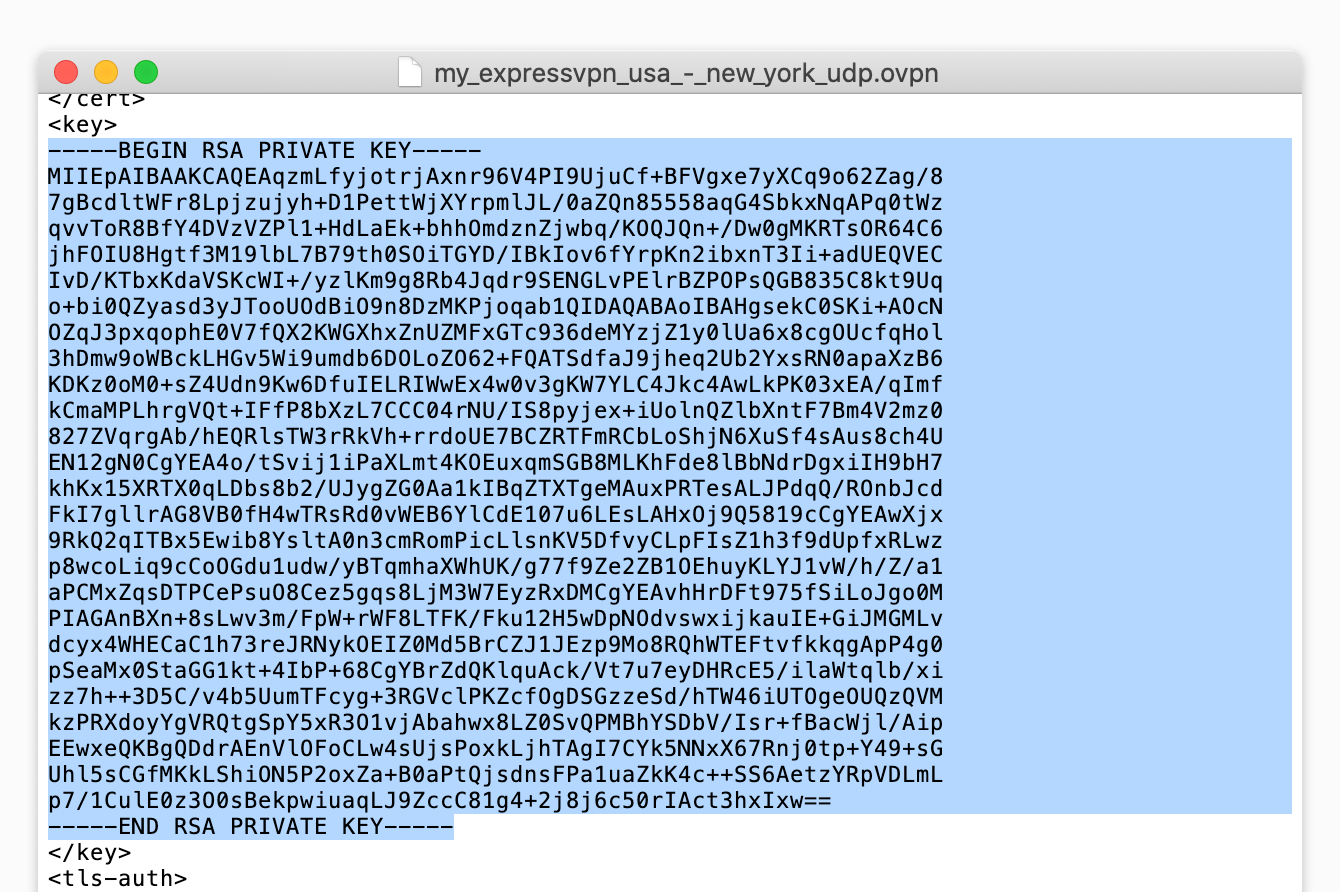
- Private key data: In the text editor you opened earlier, copy the text between the <key> and </key> tags, and paste it in this field.

Click Save.
In the top navigation bar, click VPN > OpenVPN.
Click Clients, then click ![]()
![]() Add. Enter the following information:
Add. Enter the following information:
General Information
- Disabled: Leave unchecked.
- Server mode: Select Peer to Peer (SSL/TLS).
- Protocol: Select UDP on IPv4 only.
- Device mode: Select tun – Layer 3 Tunnel Mode.
- Interface: Select WAN.
- Local port: Leave blank.
- Server host or address: In the text editor you opened earlier, copy any server address listed between the word “remote” and the 4-digital port number. Paste it in this field.
- Server port: Enter the number (after the server address) you found above.
- Proxy host or address: Leave blank.
- Proxy port: Leave blank.
- Proxy Authentication: Select none.
- Description: Enter any name that will help you recognize your VPN connection. For example: ExpressVPN NY.

User Authentication Settings
- Username: Enter the username you found earlier.
- Password: Enter the password you found earlier twice.
Cryptographic Settings
- TLS Configuration: Check this box.
- Automatically generate a TLS key: Uncheck this box.
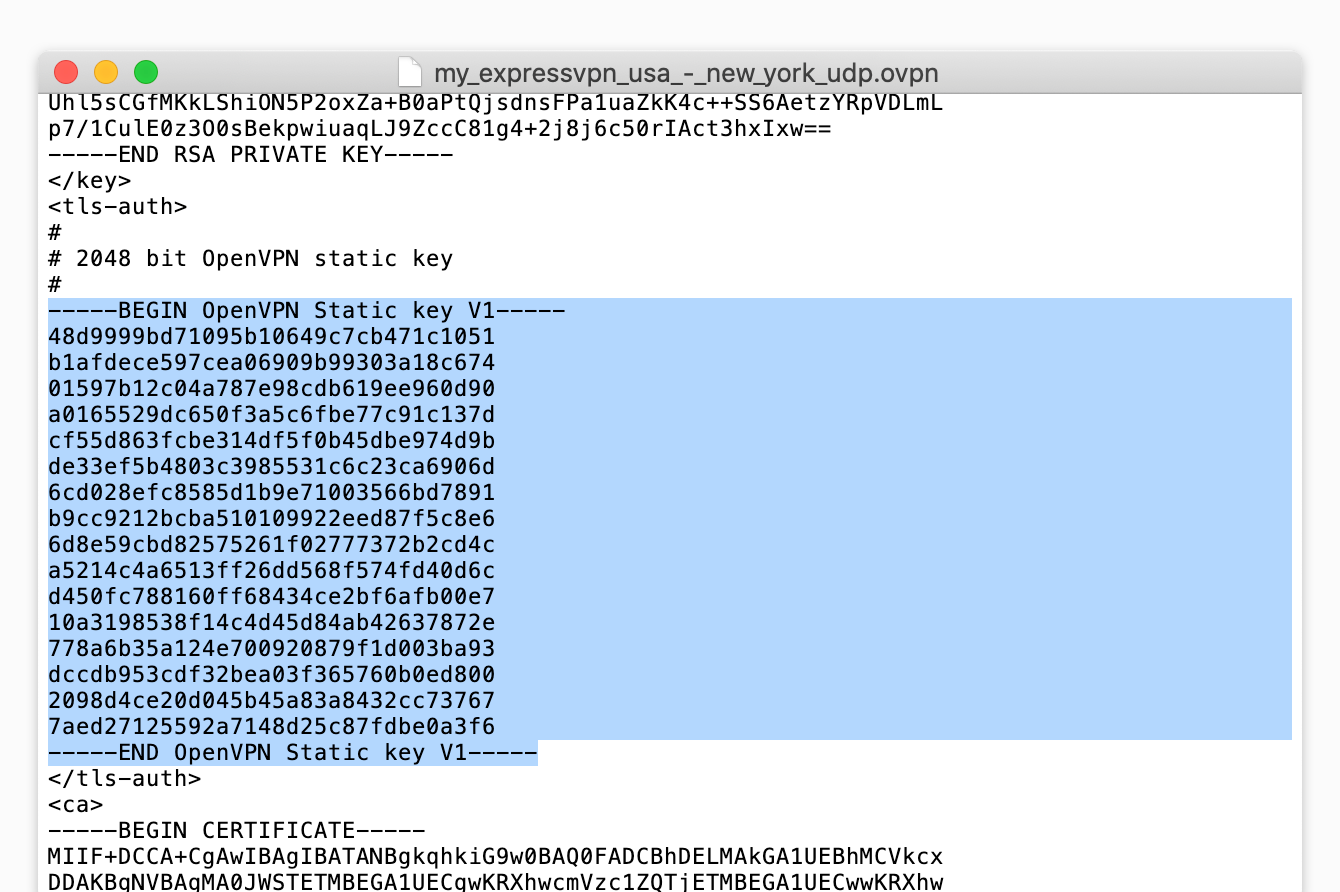
- TLS Key: In the text editor you opened earlier, copy the texts between the <tls-auth> and </tls-auth> tags, and paste it in this field.

- TLS Key Usage Mode: Select TLS Authentication.
- Peer Certificate Authority: Select the entry (e.g., ExpressVPN) you created earlier.
- Client Certificate: Select the entry (e.g., ExpressVPN Cert) you created earlier.
- Encryption Algorithm: In the text editor you opened earlier, look for the word “cipher.” Select the algorithm shown after “cipher” in the dropdown menu. For example: AES-256-GCM.
- Enable NCP: Uncheck this box.
- NCP Algorithms: Leave blank.
- Auth digest algorithm: In the text editor you opened earlier, look for the word “auth.” Select the algorithm shown after “auth” in the dropdown menu. For example: SHA512.
- Hardware Crypto: Unless you know that your device supports hardware cryptography, select No Hardware Crypto Acceleration.

Tunnel Settings
- IPv4 Tunnel Network: Leave blank.
- IPv6 Tunnel Network: Leave blank.
- IPv4 Remote network(s): Leave blank.
- IPv6 Remote network(s): Leave blank.
- Limit outgoing bandwidth: Leave blank.
- Compression: Select Refuse any non-stub compression (Most secure)
- Topology: Leave this as is.
- Type-of-Service: Leave unchecked.
- Don’t pull routes: Check this box.
- Don’t add/remove routes: Leave unchecked.
Advanced Configuration
- Custom options: Copy and paste the following:
fast-io;persist-key;persist-tun;remote-random;pull;comp-lzo no;tls-client;verify-x509-name Server name-prefix;remote-cert-tls server;key-direction 1;route-method exe;route-delay 2;tun-mtu 1500;fragment 1300;mssfix 1450;verb 3;sndbuf 524288;rcvbuf 524288 - UDP Fast I/O: Check this box.
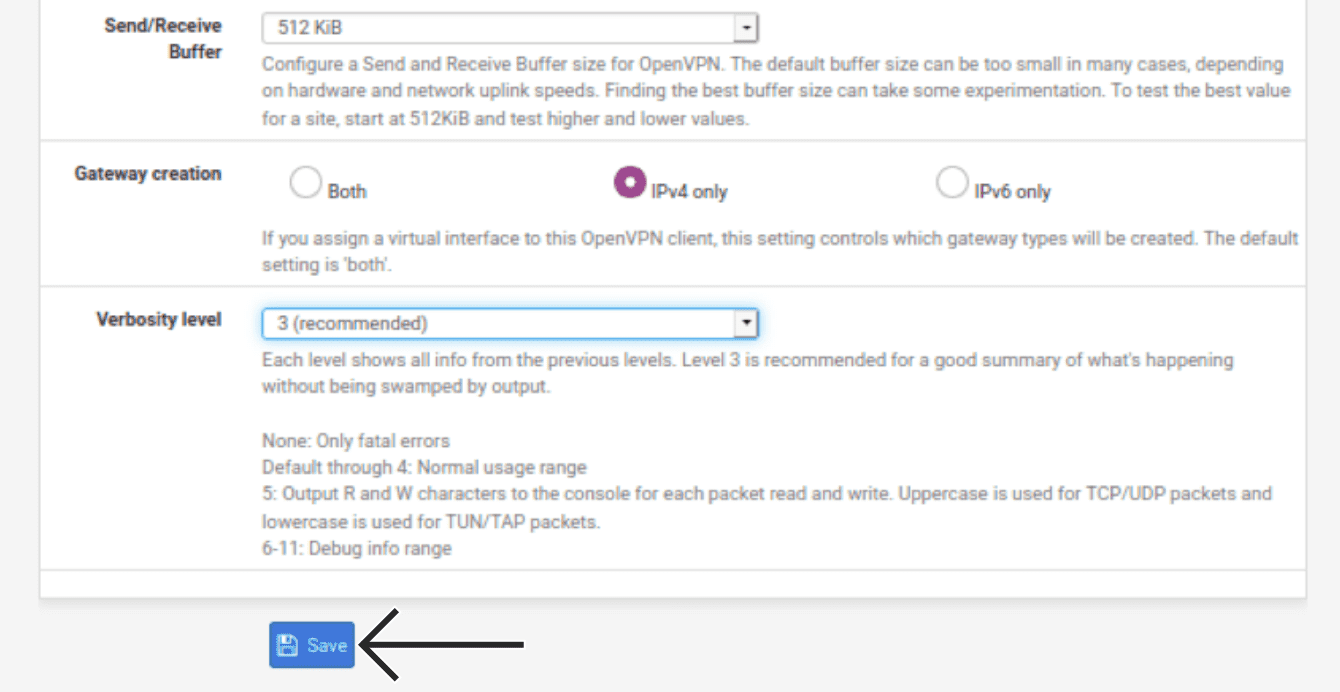
- Send/ Receive Buffer: Select 512 KiB.
- Gateway Creation: Select IPv4 only.
- Verbosity level: Select 3 (recommended).
Click Save.
Need help? Contact the ExpressVPN Support Team for immediate assistance.
3. Route WAN through the VPN tunnel
After the tunnel is online, you need to route your WAN traffic through the tunnel.
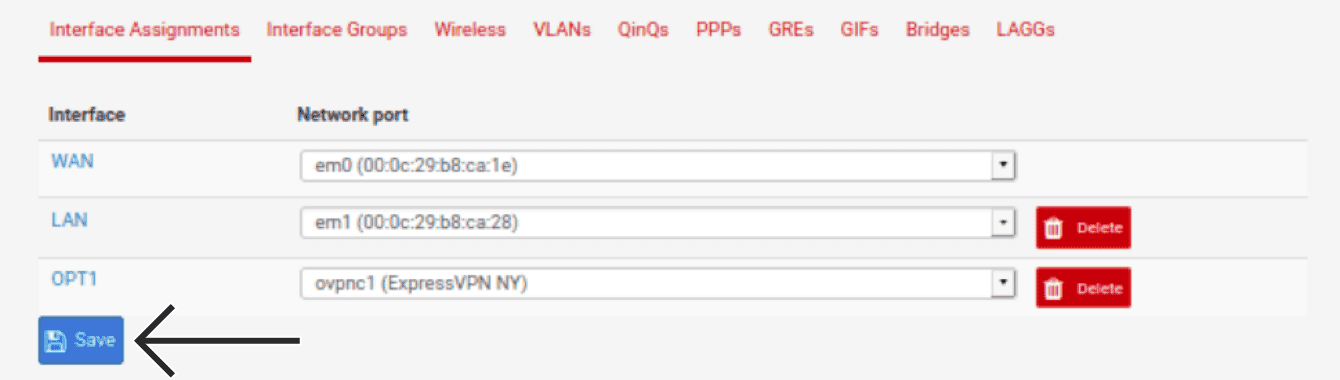
In the top navigation bar, click Interfaces > Assignments.
Click ![]()
![]() Add. A new interface will be created. For OPT1, select ovpnc1. Click Save.
Add. A new interface will be created. For OPT1, select ovpnc1. Click Save.
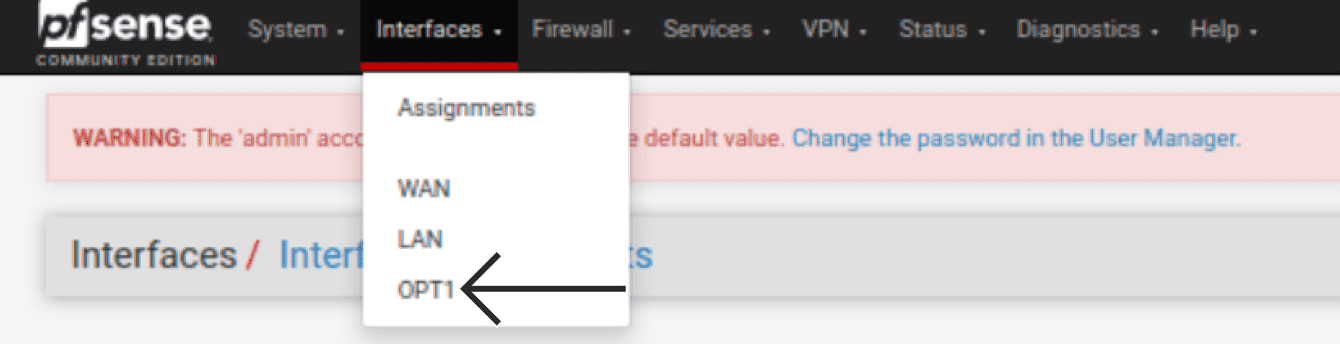
In the top navigation bar, click Interfaces > OPT1.
Enter the following information:
General Configuration
- Enable: Check this box.
- Description: Enter any name that is meaningful to you. For example: ExpressVPN.
- MAC Address: Leave blank.
- MTU: Leave blank.
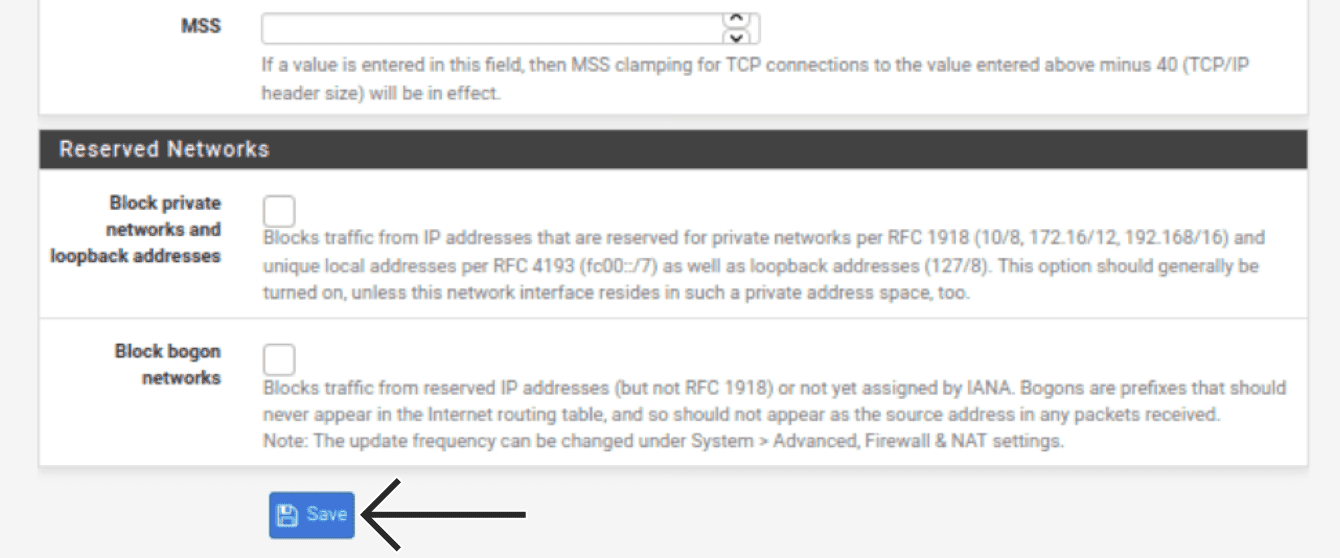
- MSS: Leave this blank.
Reserved Networks
- Block private networks and loopback addresses: Leave unchecked.
- Block bogon networks: Leave unchecked.
Click Save.
Click Apply Changes.
In the top navigation bar, click Firewall > Aliases.
Click ![]()
![]() Add.
Add.
Provide your home network with an “Alias” that allows a friendly name to reference your network. Enter the following information:
Properties
- Name: Enter a meaningful name. For example: Local_Subnets.
- Description: Enter something meaningful to you. For example: Home network.
- Type: Select Network(s).
Network(s)
- Network or FQDN: Enter 192.168.1.0, and select 24.
Click Save.

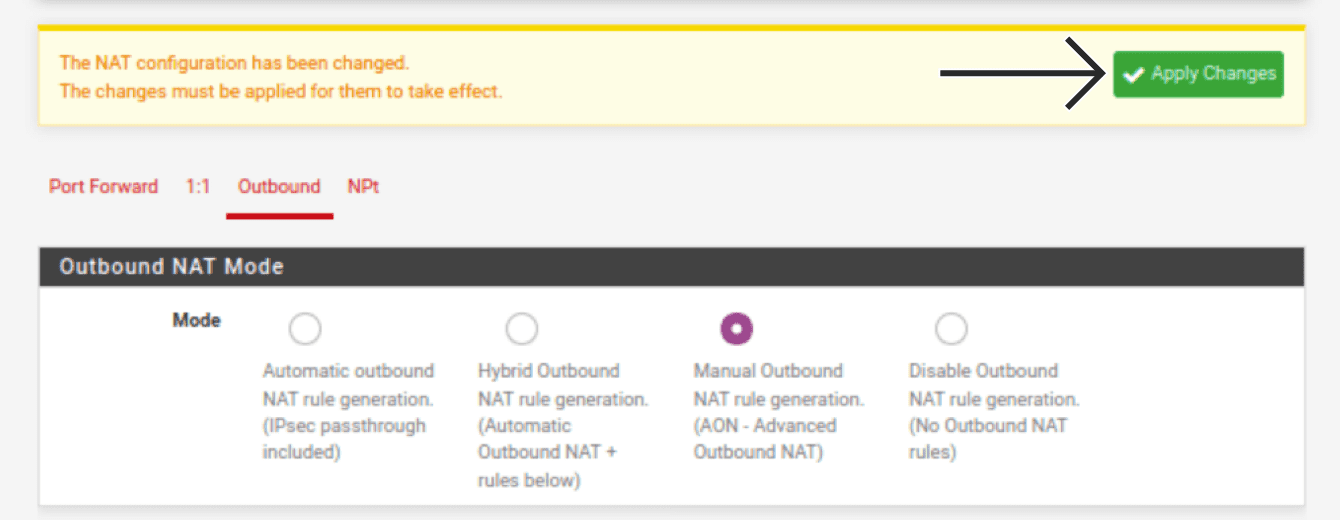
In the top navigation bar, click Firewall > NAT > Outbound.
For Mode, select Manual Outbound NAT rule generation. Click Save > Apply Changes.
Your traffic needs a destination when it leaves your network. Scroll down to Mappings, you will need to modify your existing WAN connections to use your new ExpressVPN virtual interface.
For the first WAN connection entry, click ![]()
![]() .
.
![]()
![]()
For Interface, select EXPRESSVPN.

Click Save.
Repeat the above steps for the other WAN entries.
Once all the new rules are added, click Apply Changes at the top.
Now, create a rule to redirect all local traffic through the OpenVPN gateway you just created. In the top navigation bar, click Firewall > Rules.
Click LAN. Click Add on the far left.
Enter the following information:
Edit Firewall Rule
- Action: Select Pass.
- Disabled: Leave unchecked.
- Interface: Select LAN.
- Address: Select IPv4.
- Protocol: Select Any.
Source
- Source: Select Single host or alias and enter the name of the alias you created for your network earlier. For example: Local_subnets.
Destination
- Destination: Select any.
Extra Options
- Log: Leave unchecked.
- Description: Enter something meaningful to you. For example: LAN traffic to ExpressVPN.
Click Display Advanced.
Advanced Options
- Gateway: Select EXPRESSVPN.

Click Save > Apply Changes.
Need help? Contact the ExpressVPN Support Team for immediate assistance.
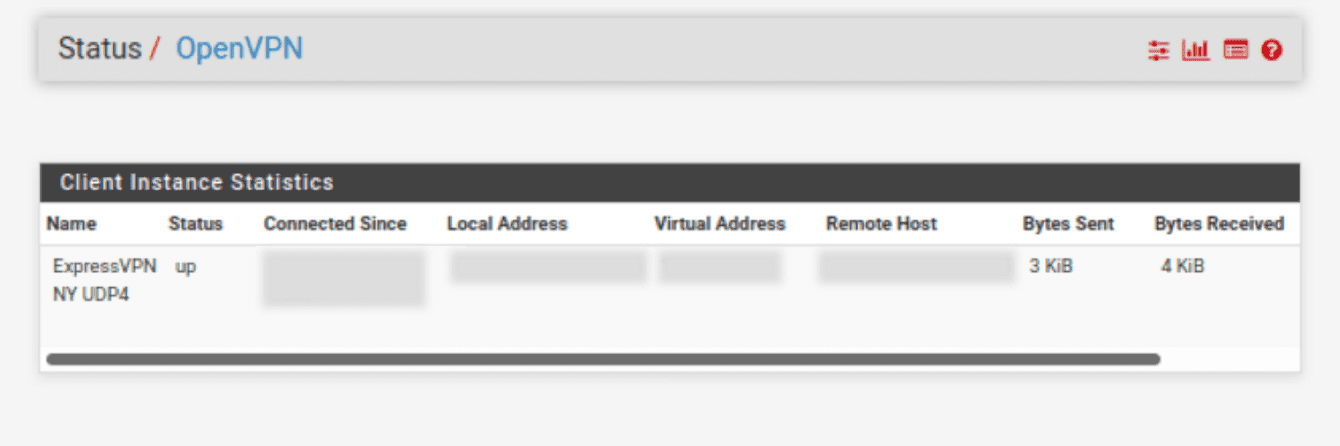
4. Confirm connection success
You should now be able to confirm that your OpenVPN connection is successful. In the top navigation bar, click Status > OpenVPN.
If your VPN tunnel is online, the Status should read “up.”
You can also use ExpressVPN’s IP Address Checker to verify you are connected to the VPN. The displayed IP address should correlate to the location you are connected to via OpenVPN. If not, under Service, click the pause icon and then the start icon to restart the VPN.
Need help? Contact the ExpressVPN Support Team for immediate assistance.