
고객님의 기기용 VPN이나 DNS가 필요하신가요?
지금 ExpressVPN에 가입하세요ExpressVPN 계정 하나로 모든 기기에서 이용
무료로 앱 이용하기이 튜토리얼은 DNS 설정을 변경하여 PlayStation 4, PlayStation 3에 MediaStreamer를 설정하는 방법을 설명합니다.
MediaStreamer는 스트리밍 경험을 개선하기 위해 설계된 DNS 서비스입니다. 기기가 자체적으로 VPN을 지원하지 않는 경우, MediaStreamer는 스트리밍을 위한 훌륭한 대안이 됩니다.
MediaStreamer를 원활하게 사용하려면 고객님의 IP 주소를 ExpressVPN 웹사이트에 등록해야 합니다. 이를 통해 ExpressVPN이 고객님의 IP 주소를 인식하여 MediaStreamer에 대한 액세스 권한을 고객님의 기기에 부여할 수 있습니다. 아니면 DDNS 호스트명을 얻어 ExpressVPN 웹사이트에 호스트명을 등록하세요.
참고: MediaStreamer는 VPN이 아니며 VPN의 개인 정보 보호 및 보안 혜택을 제공하지 않습니다. MediaStreamer로는 위치를 변경할 수 없습니다.
아직 가입하지 않으셨나요? Playstation용 ExpressVPN을 사용해야 하는 이유를 확인하세요.
원하시는 섹션으로 이동하세요…
1. ExpressVPN 웹사이트에 IP 주소 등록하기
2. MediaStreamer IP 주소 얻기
3. PlayStation에 DNS 서버 구성하기
PlayStation 4에서 DNS 설정 복구하기
1. ExpressVPN 웹사이트에 IP 주소 등록하기
ExpressVPN DNS 설정 페이지로 이동하세요. 로그인 입력창이 뜨면 ExpressVPN 자격 증명 정보를 입력한 다음 로그인을 클릭하세요.
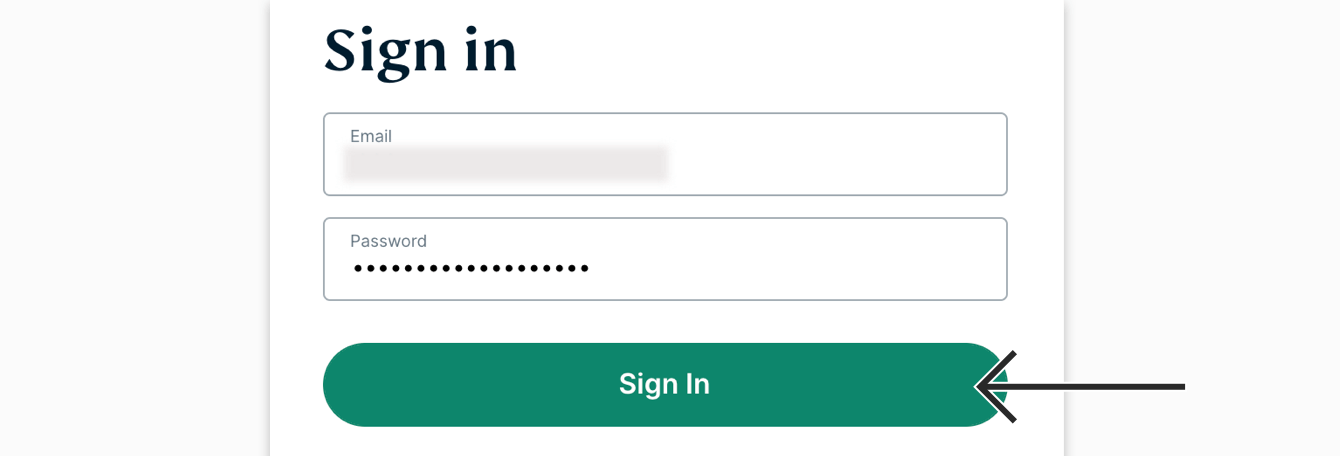
이메일로 전송된 인증 코드를 입력하세요.
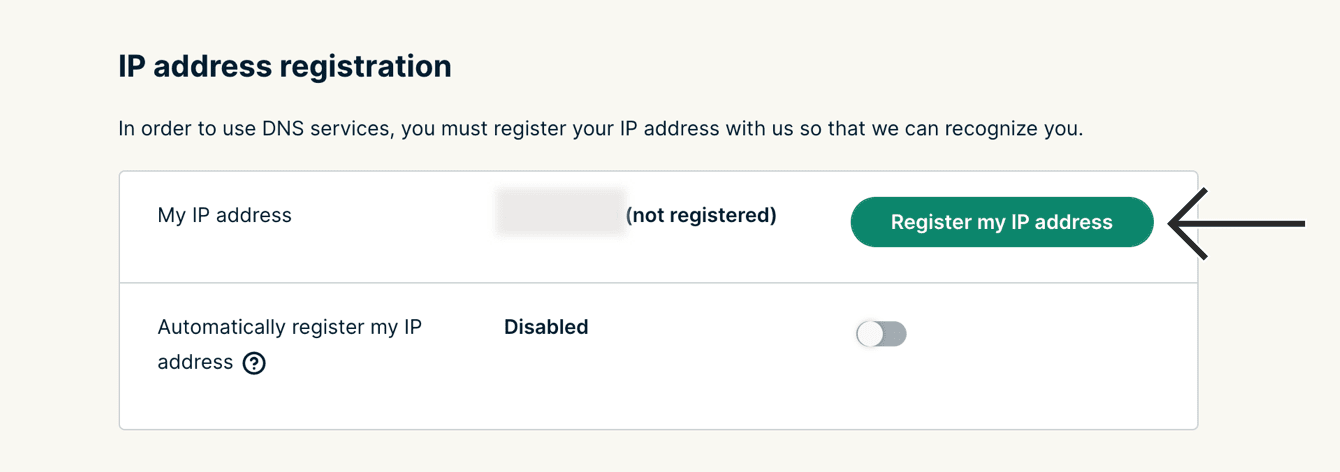
IP 주소 등록에서 내 IP 주소 등록을 클릭하세요. IP 주소 옆에 이미 “등록됨”이라고 표시되는 경우, 이 옵션을 다시 선택할 필요가 없습니다.
내 IP 주소 자동 등록을 켜세요. 이 옵션은 IP 주소 변경을 자동으로 추적하므로 사용할 것을 권장합니다.
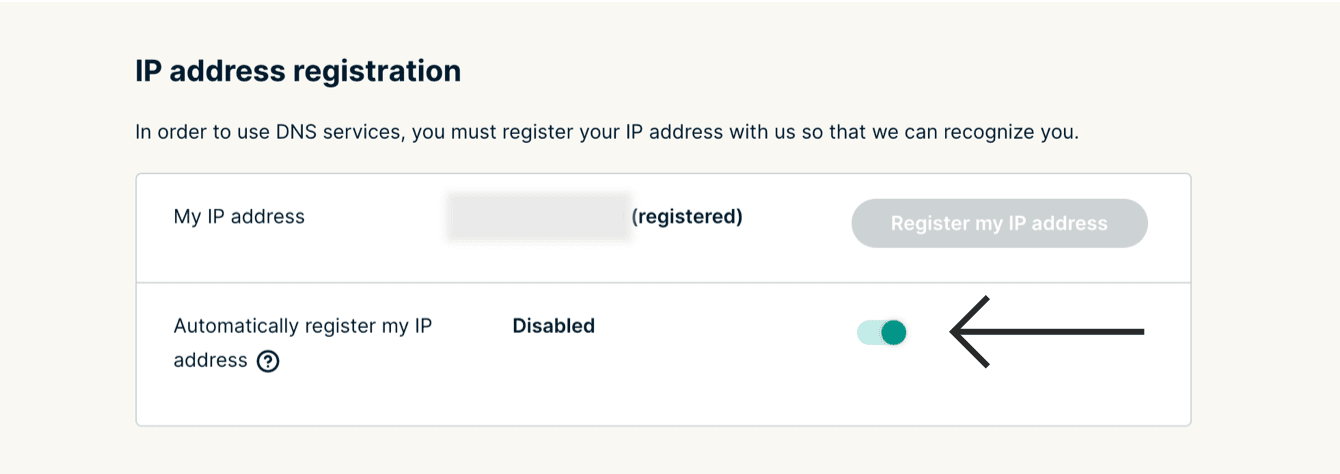
내 IP 주소 자동 등록을 활성화했다면, 주기적으로 기기에서 ExpressVPN 앱을 사용하거나 ExpressVPN 계정에 로그인하여 IP 주소를 최신으로 유지할 수 있습니다. 아니면, PlayStation과 같은 네트워크에 연결한 상태에서 (기기에서) ExpressVPN 앱을 사용할 수 있습니다. 이러한 작업은 네트워크의 기기에 MediaStreamer에 대한 지속적인 액세스 권한을 부여합니다.
도움이 필요하신가요? ExpressVPN 지원팀에 연락하여 즉시 도움을 받으세요.
2. MediaStreamer IP 주소 얻기
ExpressVPN 설치 페이지로 이동하세요. 로그인 입력창이 뜨면 ExpressVPN 자격 증명 정보를 입력하고 로그인을 클릭하세요.
이메일로 전송된 인증 코드를 입력하세요.
오른쪽에서 MediaStreamer DNS 서버 IP 주소를 찾을 수 있을 것입니다.

이 브라우저 창을 열어두세요. 나중에 설정을 위해 이 정보가 필요합니다.
도움이 필요하신가요? ExpressVPN 지원팀에 연락하여 즉시 도움을 받으세요.
3. PlayStation에 DNS 서버 구성하기
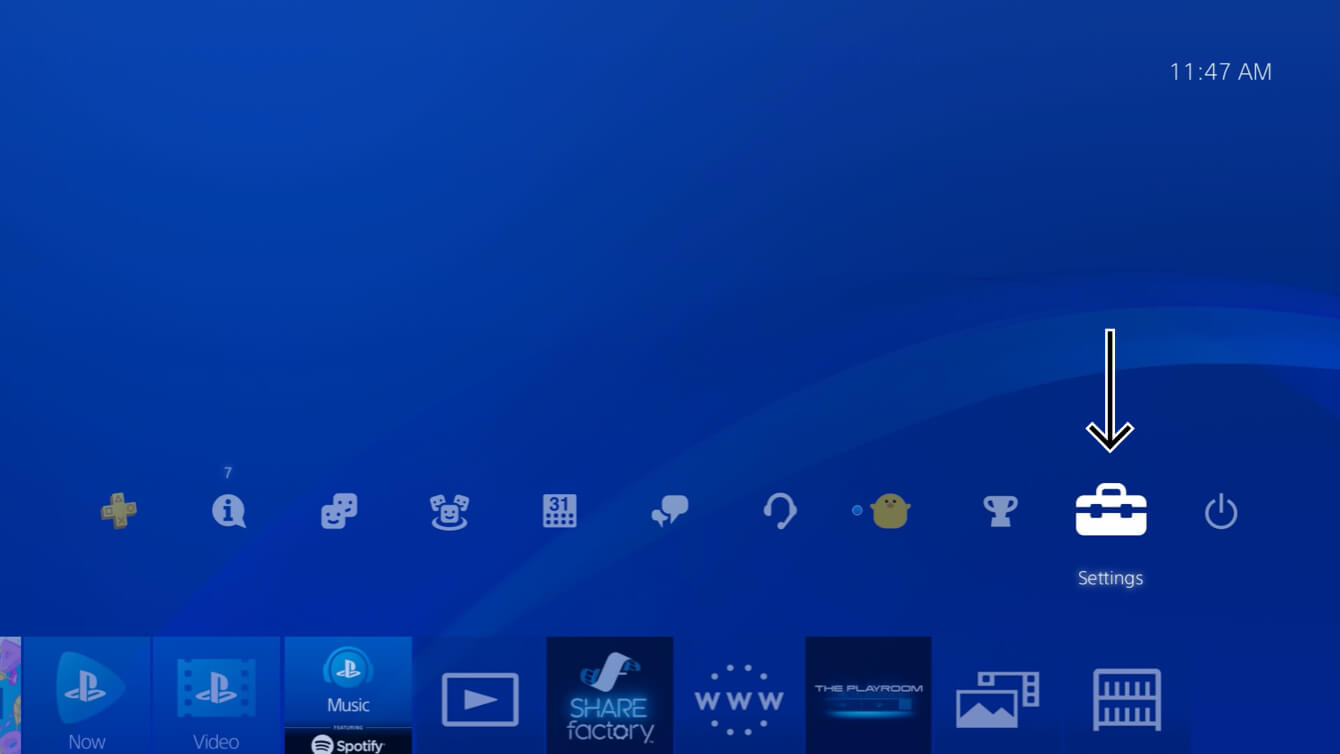
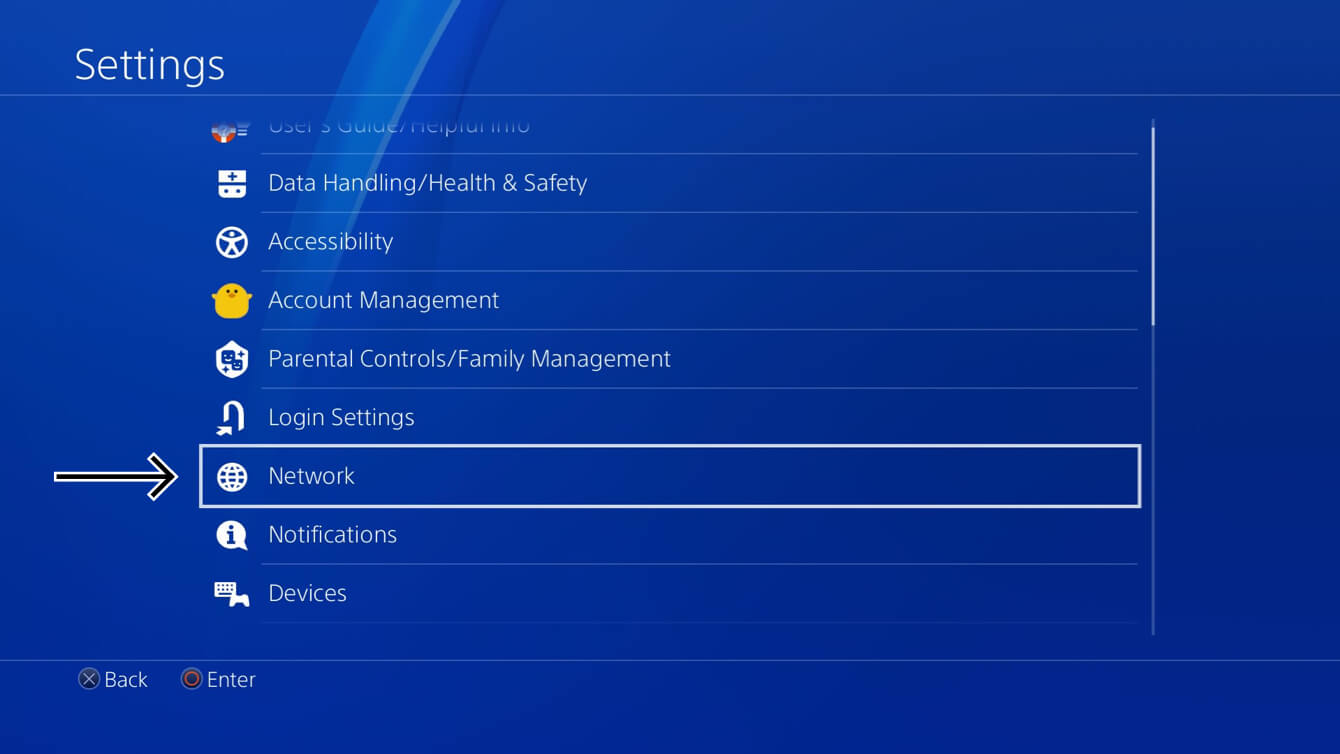
설정을 여세요.
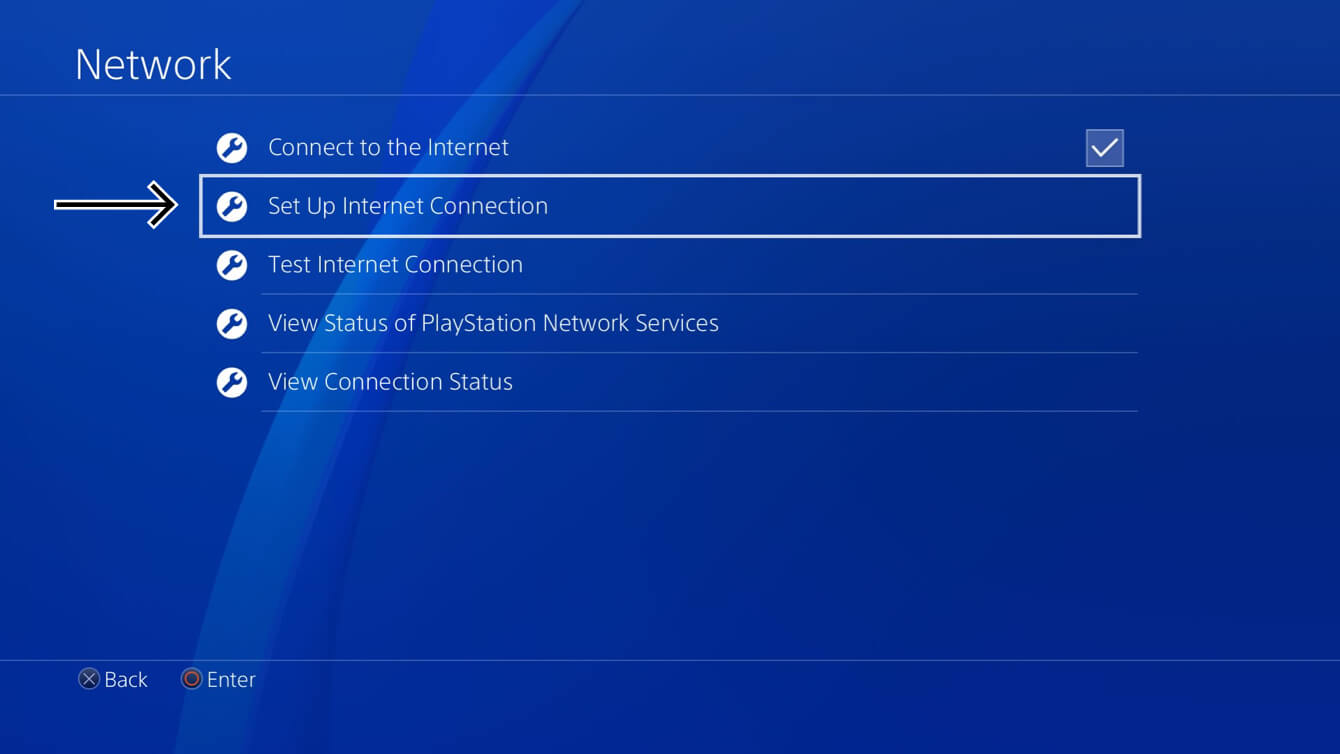
네트워크를 선택하세요.
인터넷 연결 설정을 선택하세요.
어떻게 네트워크에 연결하시겠습니까?에 대해 PlayStation 4가 인터넷에 연결된 방식에 따라 와이파이 사용 또는 LAN 케이블 사용을 선택하세요.
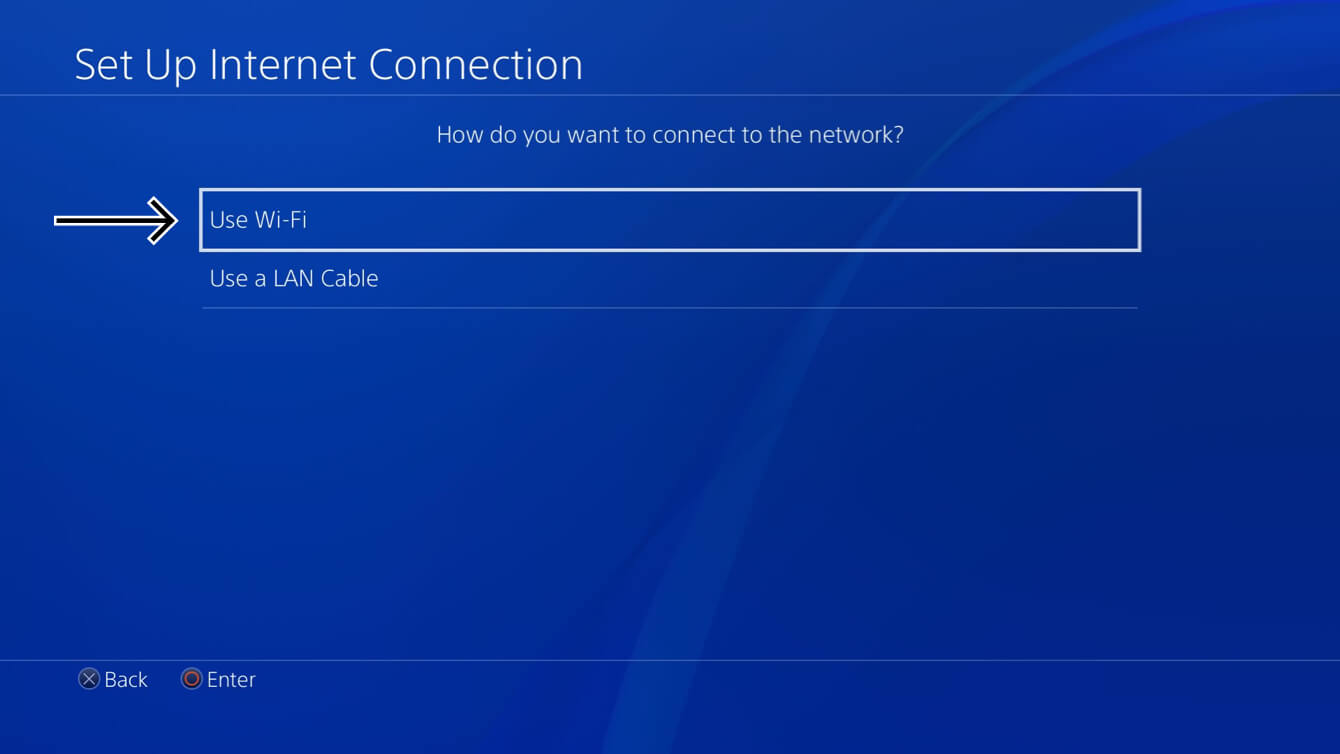
메시지가 나타나면 기존 와이파이 설정을 사용하기 위해 네를 클릭하세요.
어떻게 인터넷 연결을 설정하시겠습니까?에 대해 사용자 지정을 선택하세요.
현재 와이파이 연결을 선택하고 비밀번호를 입력하세요.
IP 주소 설정에 대해 자동을 선택하세요.
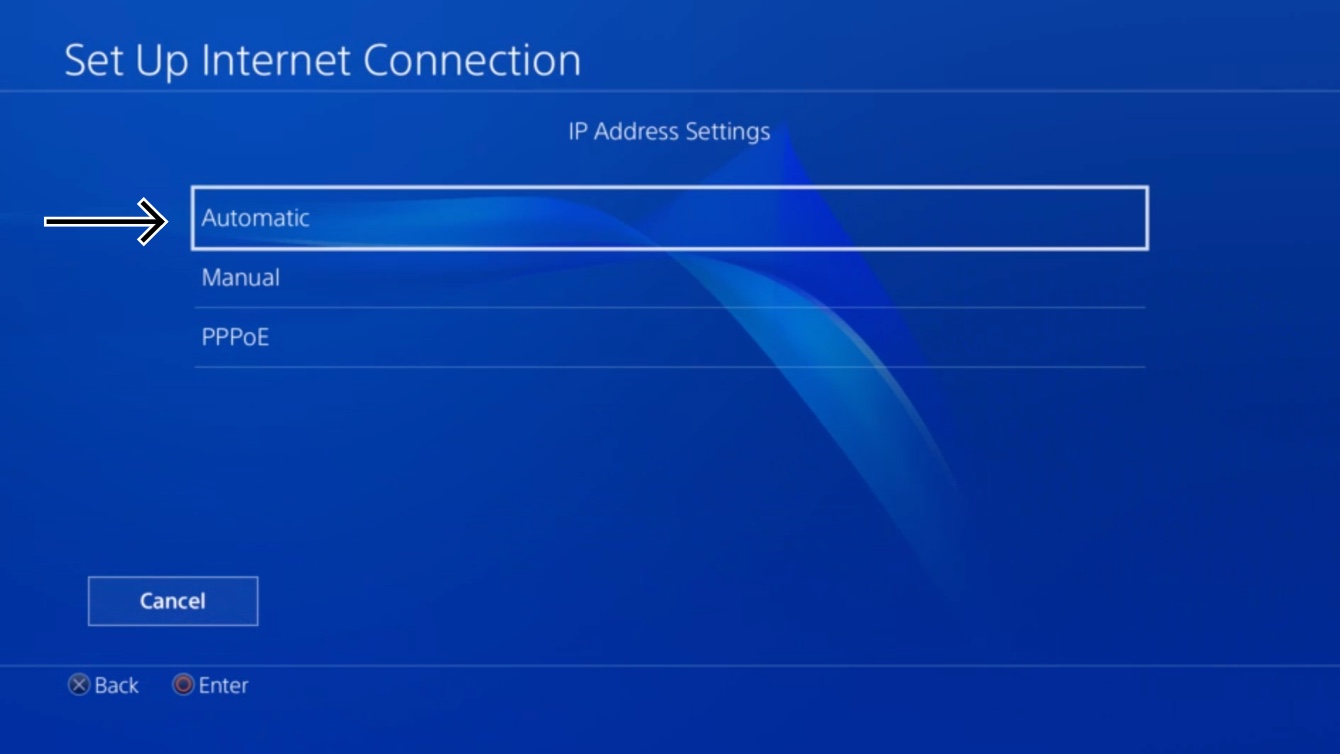
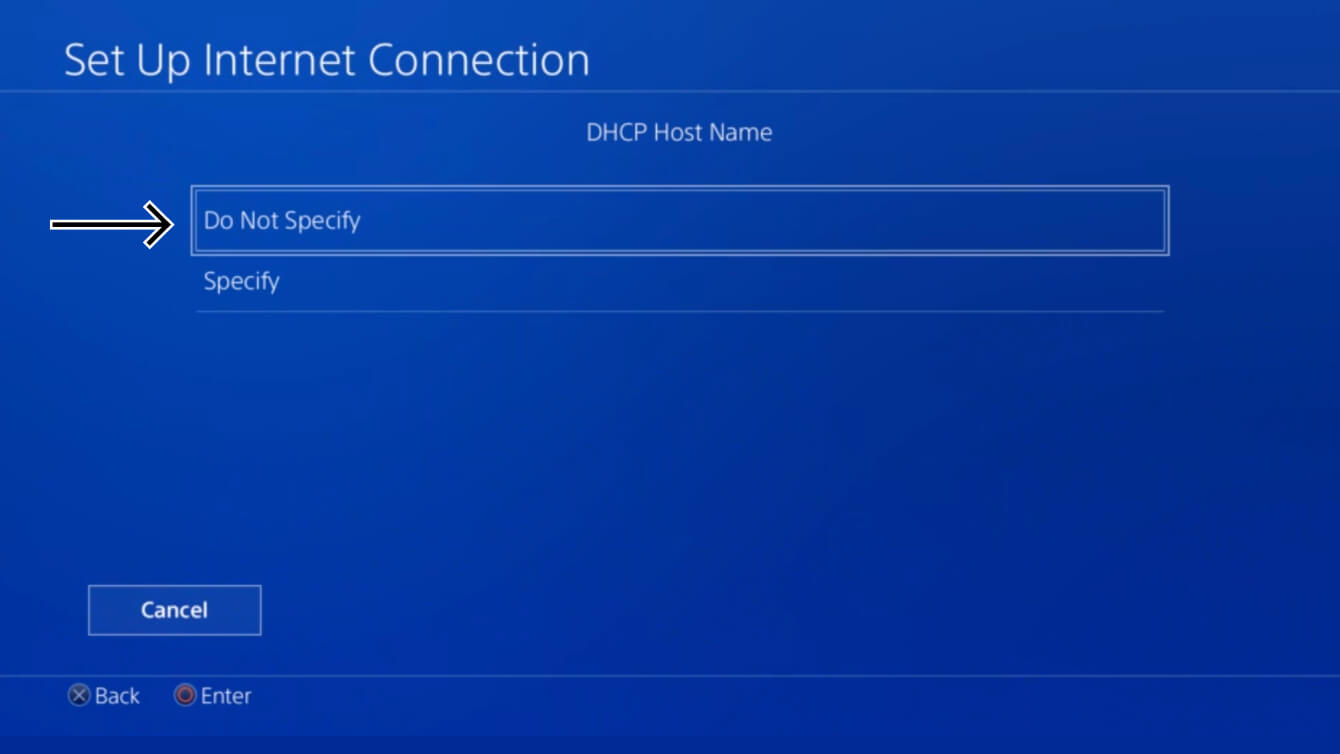
DHCP 호스트명에 대해 지정하지 않음을 선택하세요.
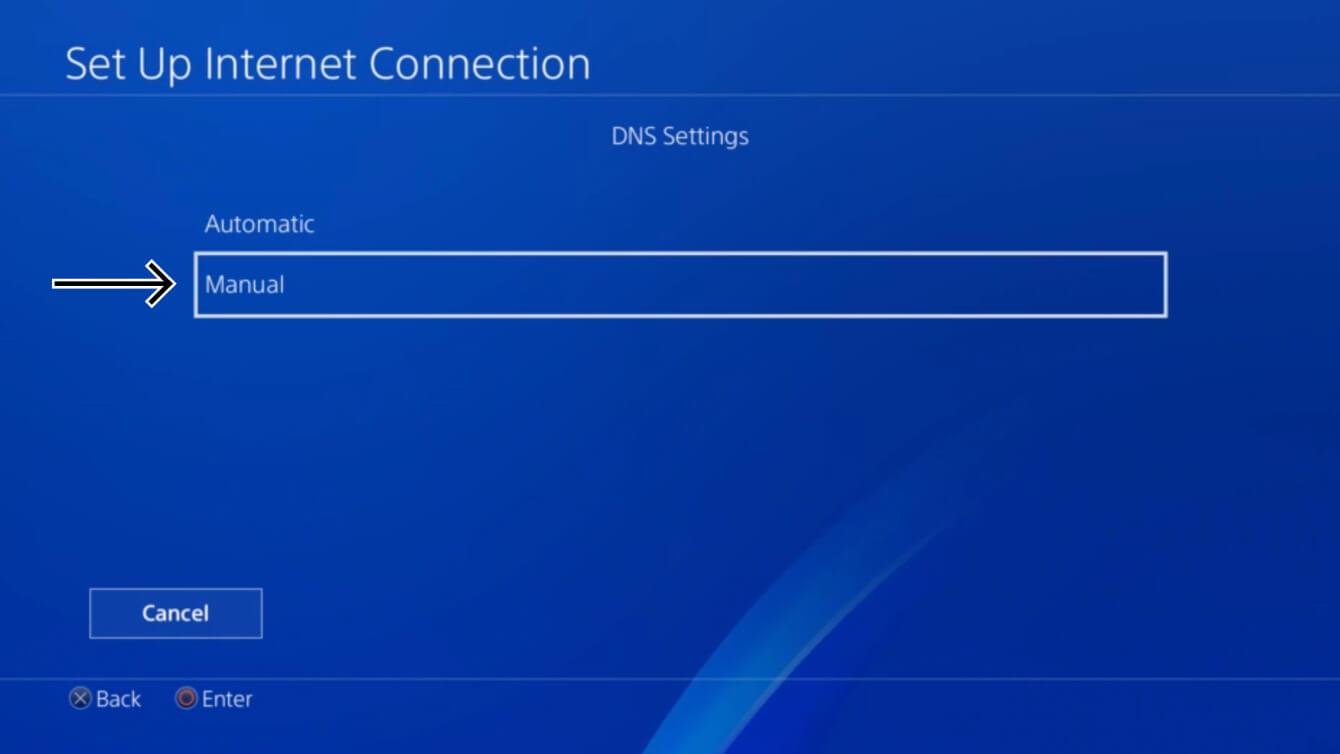
DNS 설정에 대해 수동을 선택하세요.
기본 DNS을 선택하세요.
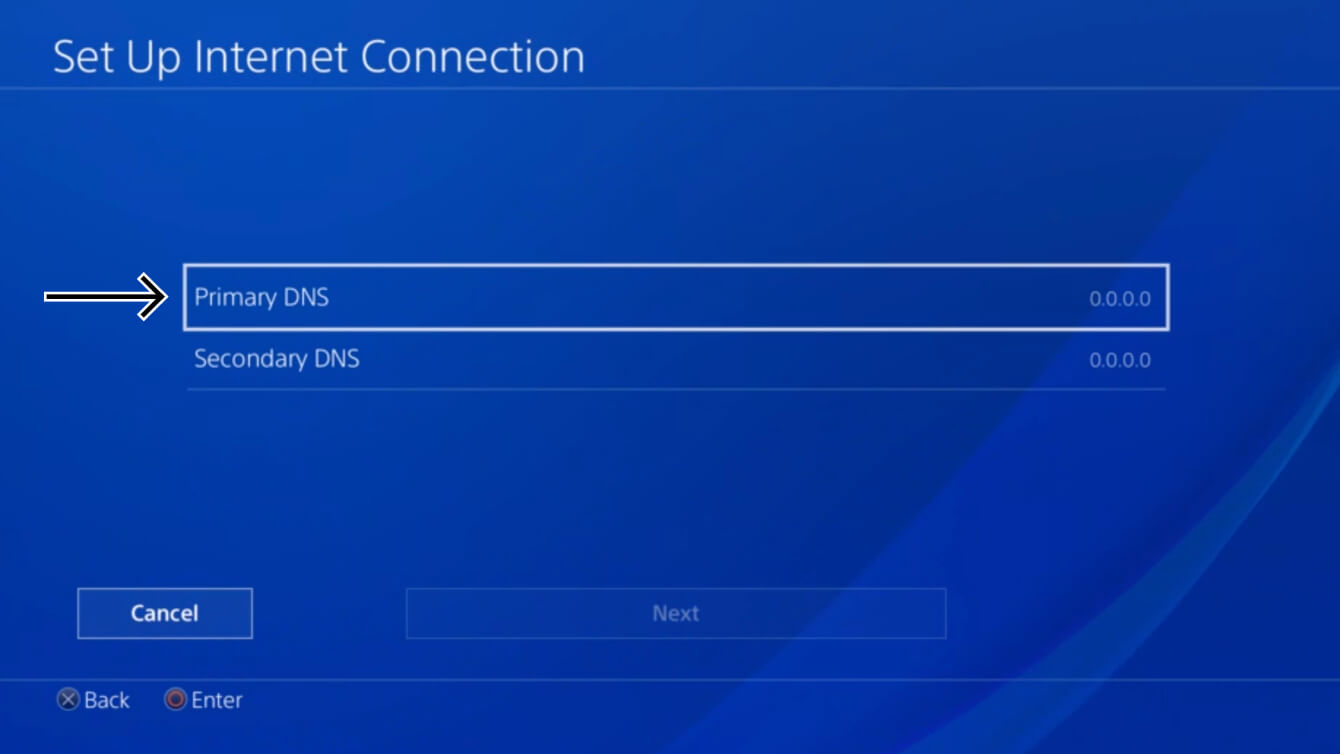
전에 찾은 MediaStreamer DNS 서버 IP 주소를 입력하세요. 완료를 선택하세요.
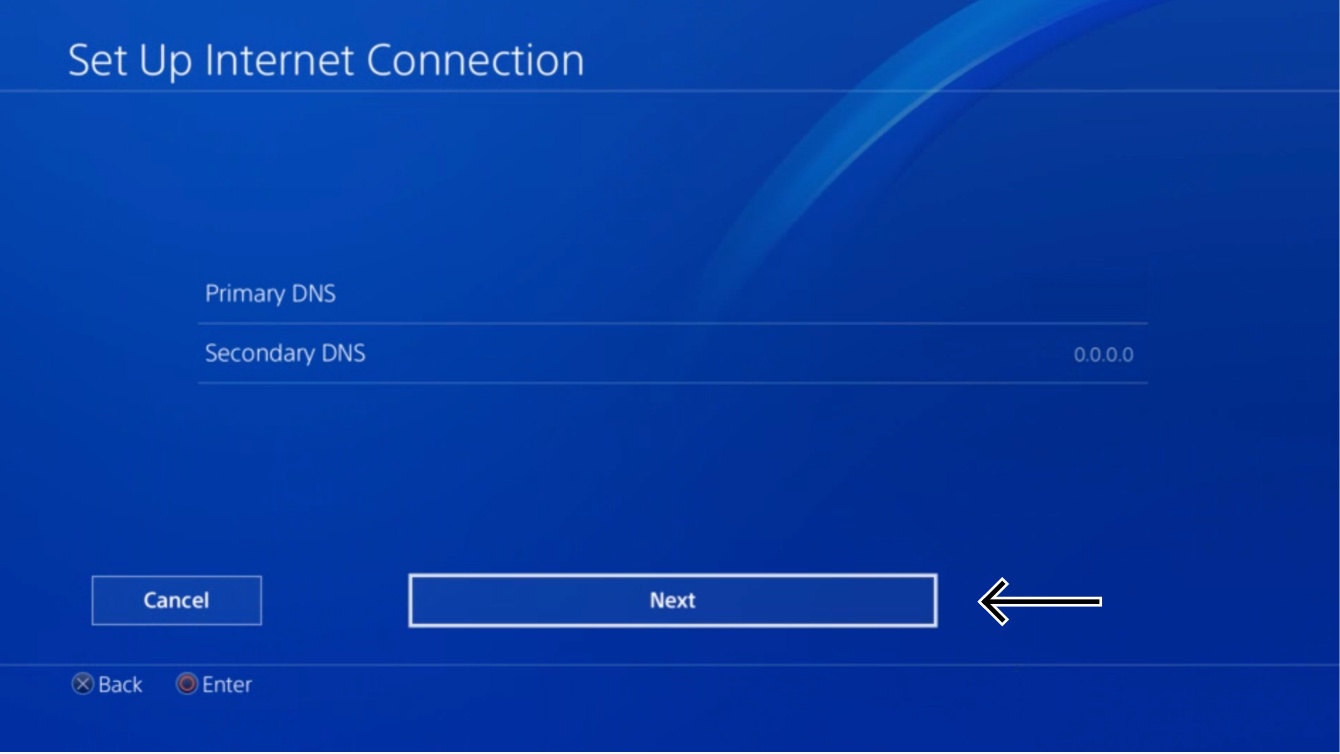
보조 DNS는 그대로 두세요. 다음을 선택하세요.
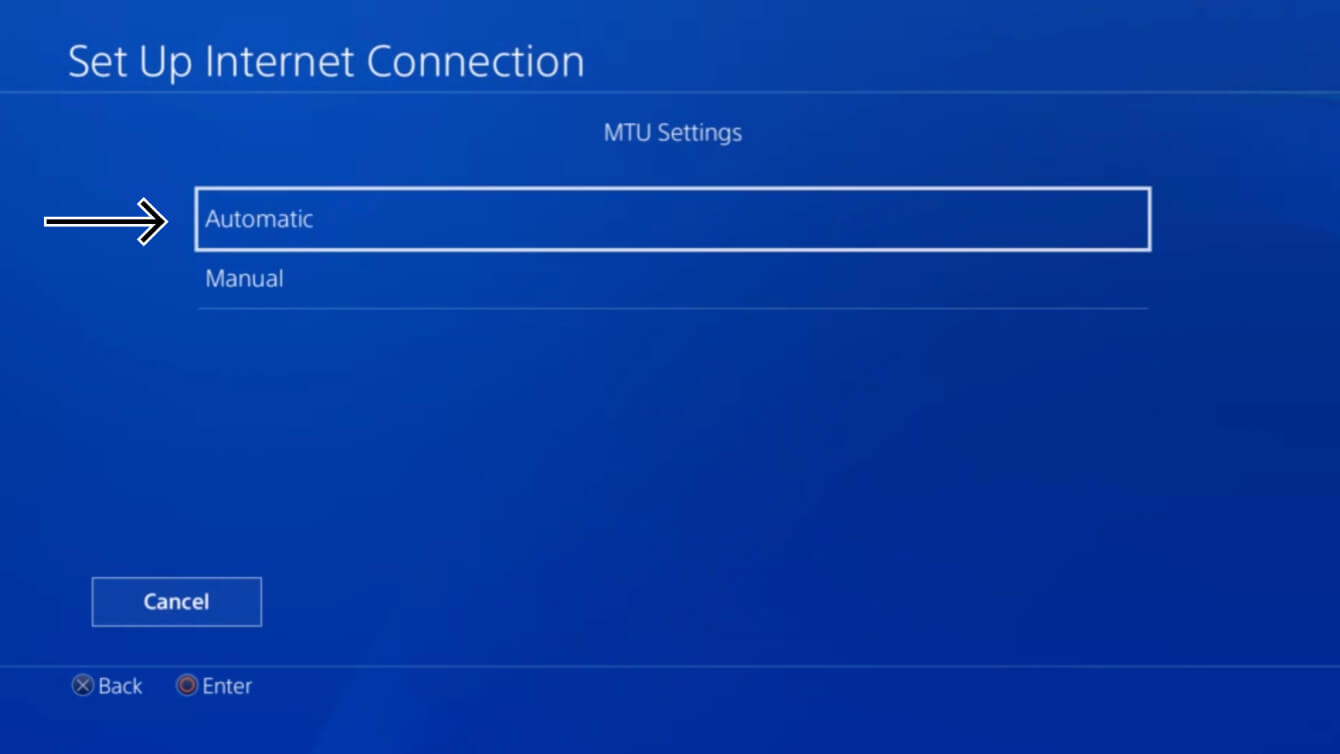
MTU 설정에 대해 자동을 선택하세요.
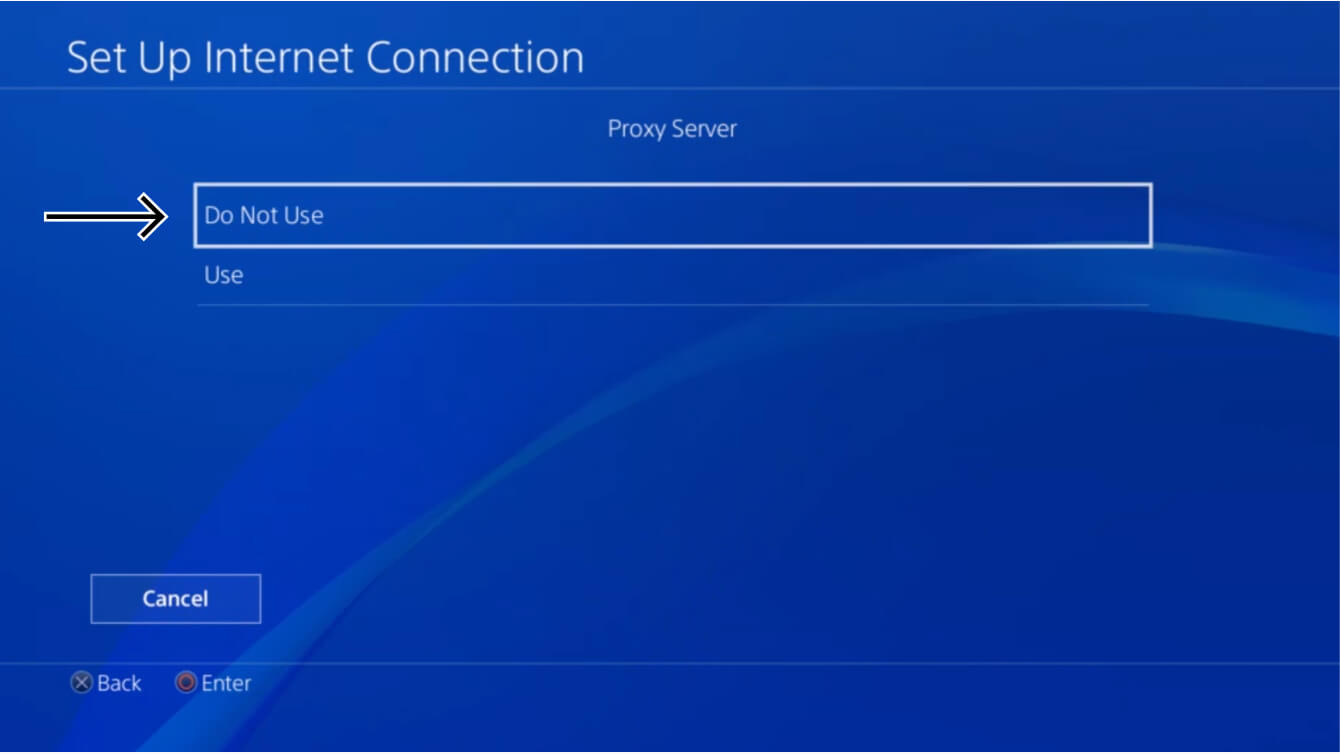
프록시 서버에 대해 사용 안함을 선택하세요.
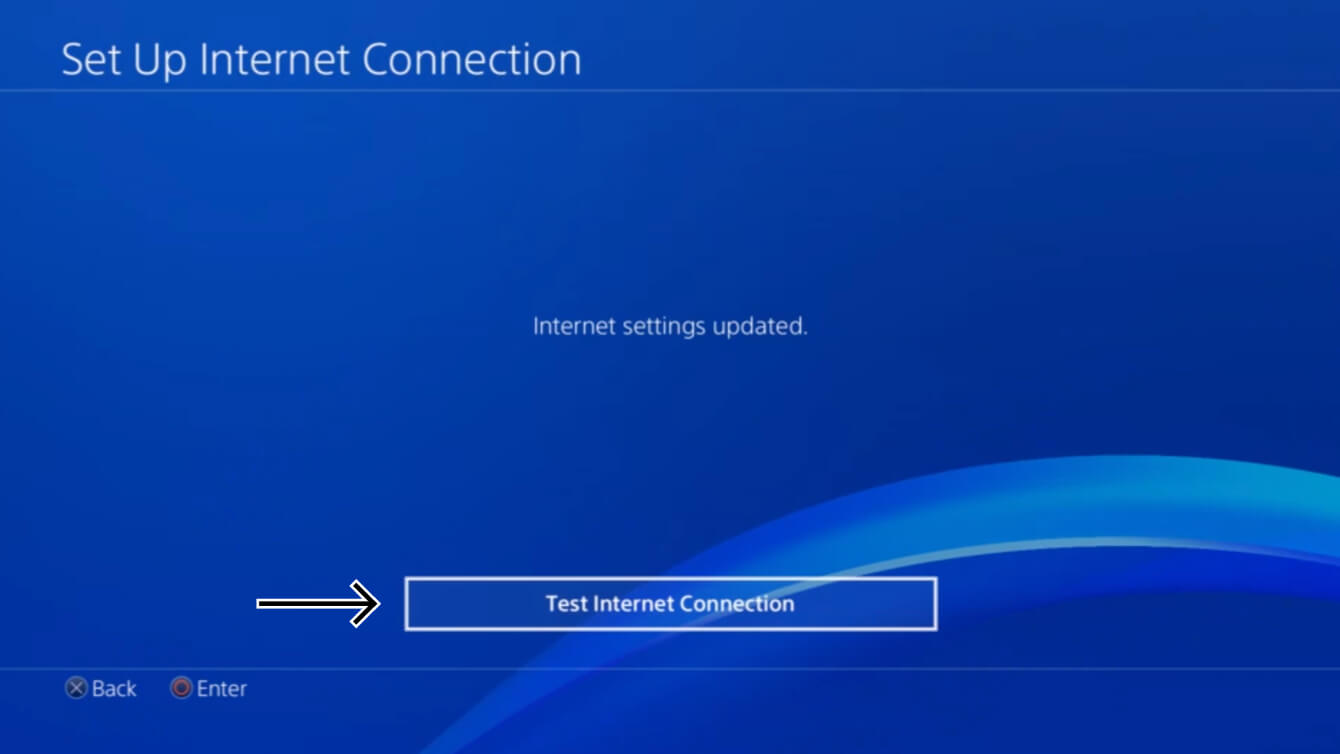
인터넷 설정이 업데이트되었습니다에서 인터넷 연결 테스트를 선택하세요.
DNS 변경 사항을 적용하기 위해 PlayStation 4를 다시 시작하세요.
MediaStreamer 프로세스를 완료하셨습니다. 이제 PlayStation 4에서 MediaStreamer에 액세스하실 수 있습니다.
PlayStation 3에서, 설정 > 네트워크 설정으로 이동하세요.
인터넷 연결 설정을 선택하세요.
“인터넷 연결 설정 조정”이 나타납니다. 확인을 선택하세요.
설정 방법 선택에 대해 사용자 지정을 선택하세요.
연결 방법 선택에 대해 연결 방법을 선택하세요:
- 유선 연결을 사용하시는 경우, 유선 연결을 선택하세요. 이더넷 케이블을 플러그인하세요.
- 무선 연결을 사용하시는 경우, 무선 연결을 선택하세요. 무선 인터넷 연결을 처음 설정하시는 경우 무선 자격 증명을 입력하세요.
네트워크 기기 운영 모드 선택에 대해 수동 설정을 선택하세요.
속도 및 듀플렉스에 대해 자동 감지를 선택하세요.
IP 주소 설정에 대해 자동을 선택하세요.
DHCP 호스트명 설정에 대해 설정 안함을 선택하세요.
DNS 설정에 대해 수동을 선택하세요.
컨트롤러에서 O 버튼을 눌러 DNS 설정을 변경하세요. 기본 DNS에 대해 전에 찾은 MediaStreamer DNS 서버 IP 주소를 입력하세요. 보조 DNS에 대해 0.0.0.0를 입력하세요.
MTU 설정에 대해 자동을 선택하세요.
프록시 서버에 대해 사용 안함을 선택하세요.
UPnP에 대해 활성화를 선택하세요.
마지막으로 (O) 버튼을 눌러 설정을 저장하세요.
MediaStreamer 프로세스를 완료하셨습니다. 이제 PlayStation 3에서 MediaStreamer에 액세스하실 수 있습니다.
도움이 필요하신가요? ExpressVPN 지원팀에 연락하여 즉시 도움을 받으세요.
PlayStation 4에서 DNS 설정 복구하기
PlayStation 4에서, 설정 > 네트워크 > 인터넷 연결 설정으로 이동하세요. 인터넷 연결 방식을 선택한 뒤 사용자 지정을 선택하세요. 다음 옵션을 선택하세요:
- IP 주소 설정: 자동을 선택하세요.
- DHCP 호스트명: 지정 안함을 선택하세요.
- DNS 설정: 자동을 선택하세요.
- MTU 설정: 자동을 선택하세요.
- 프록시 서버: 사용 안함을 선택하세요.
“인터넷 설정이 업데이트되었습니다”라고 표시됩니다. 이제 DNS 설정이 복구되었습니다.
도움이 필요하신가요? ExpressVPN 지원팀에 연락하여 즉시 도움을 받으세요.