This article explains how to connect an ExpressVPN Aircove router or a router running ExpressVPN to the internet.
To connect your home to the internet, you generally need a modem. This device is usually provided by your internet service provider (ISP). A modem connects your home to the internet, while a router typically connects all your home’s devices to the modem.
Standard setup
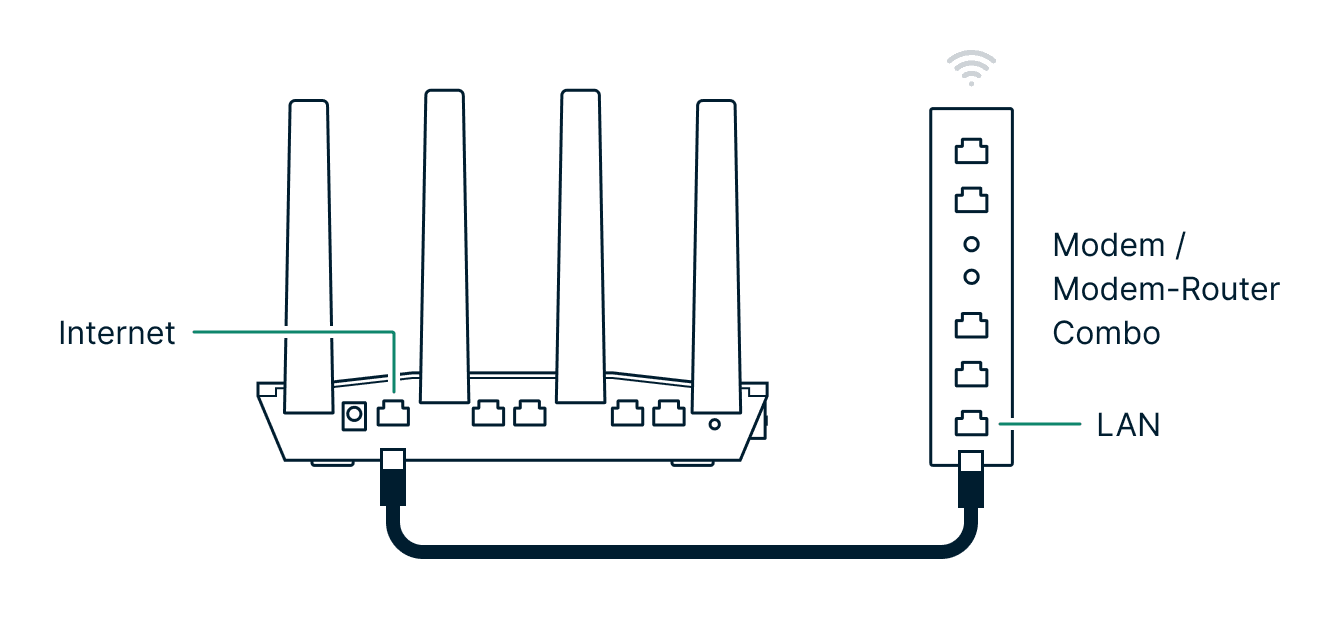
Connect an Ethernet cable from the “Internet” port of your ExpressVPN router to an available LAN port on your modem or existing router.
Need help with a different kind of setup?
Can’t connect directly to the modem or want to use your ExpressVPN router in a different setup? These instructions below cover most of our supported configurations:
- Modem-router combo
- Wired house or apartment
- Wi-Fi Link (connect via another Wi-Fi network)
- Ethernet switch
- Mesh network
- Wi-Fi range extenders
- Multiple ExpressVPN routers
Modem-router combo
Some ISPs combine the functions of a modem and router in one device. If you only have one device that provides internet access and all other devices connect to it for internet access, you likely have a combo.
In this configuration, continue with setup as normal (see the standard setup diagram above).
Wired house or apartment
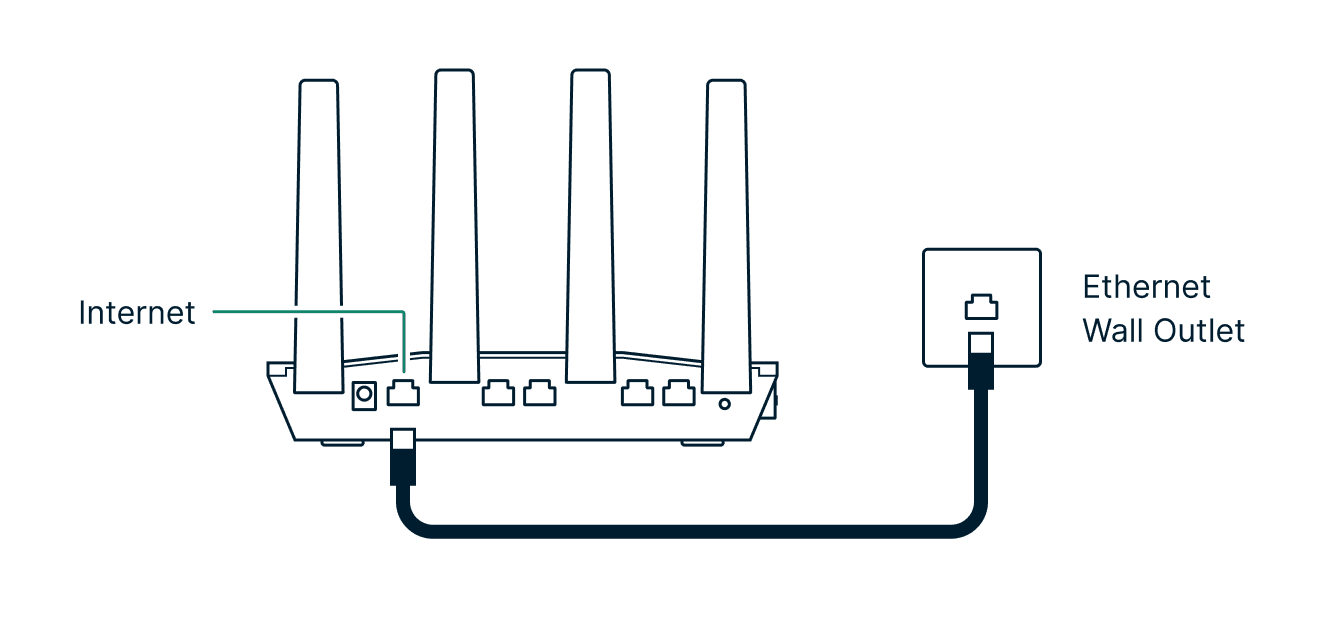
A wired house or apartment has Ethernet ports throughout the building that provide internet access. These ports are all connected to the modem.
Connect your ExpressVPN router’s internet port to the Ethernet wall outlet.
Wi-Fi Link

An Aircove Go can use another Wi-Fi network to get internet access. Here’s a video that walks you through the steps:
You will first need to power on the Aircove Go and connect a device to it (like a laptop or smartphone). On the connected device, use a web browser to go to expressvpnrouter.com. You can refer to the Aircove setup instructions for how to connect a device to Aircove.
Note: Wi-Fi Link was introduced in AircoveOS v4.7.1 and is automatically installed when Aircove Go first connects to the internet and you are signed in to an ExpressVPN account.
On the Aircove Go dashboard, select the cloud icon in the top-right corner to go to internet settings. If your Aircove Go has no internet access, the cloud icon will be red with a strike-through.
Alternatively, you can go to the Aircove’s internet settings through the menu sidebar: Select the icon consisting of three lines in the top left of the dashboard. Then, select Network Settings and then Internet Settings.
Under internet settings, select Wi-Fi Link and your Aircove Go will scan for available Wi-Fi networks nearby.
Select the Wi-Fi network you want your Aircove Go to connect to and enter the Wi-Fi network’s login credentials (if needed). Aircove Go will now connect to the Wi-Fi network.
Note: If the Aircove Go is connected to the internet via both Ethernet and Wi-Fi, it will prioritize the Ethernet connection as it’s generally faster and more reliable.
Your connection speed is likely to be slower using Wi-Fi Link as data has to be transmitted over the air through two Wi-Fi connections.
Captive portal login

If you’re using a public Wi-Fi network that has a captive portal (e.g., in a hotel or cafe you may need to log in through a web page to use the location’s Wi-Fi), Aircove Go will prompt you to go to the portal and log in. Enter the required details on the captive portal to get internet access.
If the captive portal login screen doesn’t appear, try visiting http://captive.apple.com/hotspot-detect.html in your browser to force it to open.
If the captive portal has a timer and requires you to log in again after a certain period, you may need to disconnect and reconnect to the VPN to get the captive portal login screen to appear.
Ethernet switch

An Ethernet switch allows more devices to be wired directly to the internet. To connect your ExpressVPN router to an Ethernet switch:
- Make sure your switch is connected to your modem or other internet source.
- Connect your ExpressVPN router’s Internet port to any LAN port on the switch.
Mesh network
A mesh network provides better Wi-Fi coverage in larger homes. It does so by delivering the Wi-Fi signal through multiple mesh nodes distributed throughout the building.
Method 1: Connect the ExpressVPN router to a mesh node

This configuration only protects devices connected to the ExpressVPN router’s LAN ports or Wi-Fi; the rest of the mesh network will not be protected. To use this configuration, connect the ExpressVPN router’s internet port to a LAN port on any of the mesh router nodes.
Method 2: Connect the ExpressVPN router between the ISP modem/router and mesh network

This configuration provides VPN protection for the entire mesh network. To connect the ExpressVPN router between your ISP modem-router and mesh router:
- Connect the internet port on the ExpressVPN router to a LAN port on your ISP modem-router.
- Connect any LAN port on the ExpressVPN router to the WAN or internet port on your mesh router.
However, devices connected to the mesh network will not be able to take advantage of Device Groups unless the mesh router is placed in bridge mode (see the instructions from your mesh router manufacturer). If you have difficulty accessing the ExpressVPN router dashboard in this configuration, see these troubleshooting steps.
Popular mesh routers include Asus ZenWiFi, Eero, Google Nest Wi-Fi, Netgear Orbi, and TP-Link Deco.
Wi-Fi range extenders

If you have a large home, Wi-Fi extenders can extend the range of your wireless signal to cover any dead zones. Plug one near the edge of your ExpressVPN router’s wireless range and pair it with the network, and it’ll start rebroadcasting the signal farther out into your home. In most cases, you will be able to use the same Wi-Fi name (SSID) and password as your ExpressVPN router.
Popular Wi-Fi range extenders include Asus RP-AX56, D-Link EaglePro AI, Linksys RE7310, Netgear EAX15, and TP-Link RE603X.
Multiple ExpressVPN routers

If you want to connect two or more ExpressVPN routers together, you will need to ensure each has a unique IP address. Otherwise, their IP addresses will conflict, preventing them from connecting to the internet.
To connect multiple ExpressVPN routers, please follow these steps:
- Connect the primary router’s LAN port to the secondary router’s “Internet” port using an Ethernet cable.
- Connect to the primary router via Wi-Fi or Ethernet cable
- On the primary router, go to the Dashboard and place the secondary router into a “No VPN” Device Group
- Connect to the secondary router via Wi-Fi or Ethernet cable
- On the secondary router, go to the Local Network Settings
- Under Router IP setup, change the IP address to something unique from the other routers on the network. A couple of guidelines:
- Only change the third block of the address (E.g. 192.168.132.1 ).
- Select a value of up to 255.
- E.g. 192.168.132.1 → 192.168.133.1
- Click Save
- Under DHCP server on Local Network Settings, confirm that the First & Last client IP addresses have updated to match the subnet of the Router IP address:
- E.g. First client IP address: 192.168.132.10 → 192.168.133.10
- E.g. Last client IP address: 192.168.132.219 → 192.168.133.219
Frequently Asked Questions
Will the ExpressVPN router work with my ISP’s modem or router?
If your internet service provider’s modem or router has a spare LAN Ethernet port, you will be able to connect your ExpressVPN router to it.
For your ExpressVPN router to work with your ISP’s modem or router, it must support DHCP, Static IP, or PPPoE. Your ISP should be able to tell you what your modem or router-modem combo supports.
What are Static IP, DHCP and PPPoE?
DHCP, Static IP, and PPPoE are different ways to connect to networks like your internet service provider (ISP).
- DHCP (most common) works by automatically assigning an IP address to your device.
- Static IP works by manually inputting an IP address, subnet mask, and default gateway provided by your ISP.
- PPPoE works by connecting to your ISP using a username and password provided by them.
What should I do if my ExpressVPN router doesn’t detect my internet connection?
You may encounter issues connecting your ExpressVPN router to the internet, especially if you are using an ISP-supplied modem-router setup. Try the following methods to resolve the issue.
Connect the ExpressVPN router to a different LAN port on your primary modem or router
Some setups only allow internet connectivity over certain LAN ports on your primary modem or router. Try to connect your ExpressVPN router to other LAN ports on the modem or router until one of the LAN ports works.
Put the ExpressVPN router into the ISP modem-router “DMZ”
A “DMZ” (demilitarized zone) is a router function that allows you to open all external ports for a specific IP from the router’s local network.
Putting the ExpressVPN router in the “DMZ” (demilitarized zone) of the ISP modem-router, if supported, may allow the ExpressVPN router to operate normally. Aircove has its own firewall and is safe to be placed in the DMZ.
You will need to know the IP or MAC address of your ExpressVPN router to place it in the DMZ:
- IP address can be found in the Internet Settings screen of the Dashboard
- MAC address can be found on the bottom label of your ExpressVPN router
How to do this will depend on the model of modem-router supplied by your ISP. Try searching for “How to configure the DMZ on a <modem-router model name>” or contact your ISP for support.
How to set up the DMZ
- Connect to your ISP modem-router via Wi-Fi or Ethernet
- Locate your ISP modem-router’s settings page
- Find the DMZ settings (if supported)
- Enable the DMZ and type in the IP or MAC address you’ve previously noted from the ExpressVPN router
- Save the settings and reboot the ISP modem-router
Instructions for select ISPs
- How to configure the DMZ on a Comcast Xfinity Wireless Gateway
- How to configure the DMZ on a CenturyLink modem
- How to configure the DMZ on a Verizon Fios Gateway
- How to configure the DMZ on a T-Mobile Home Internet Wi-Fi Gateway
- How to configure the DMZ on a Google Fibre router
- How to configure DMZplus on an AT&T Wi-Fi Gateway
- How to configure the DMZ on an Arris Surfboard SBG6580 router
Put the ISP modem-router into “bridge mode”
Bridging together two routers means that the secondary router becomes an extension of the primary router, allowing them to coexist.
Putting the ISP modem-router into “bridge mode” (also known as “bridging”, “transparent bridging” or “modem only” mode), if supported, may allow the ExpressVPN router to operate normally.
How to do this will depend on the model of modem-router supplied by your ISP. Try searching for “How to put <modem-router model name> into bridge mode” or contact your ISP for support.
How to enable bridge mode
- Connect to your ISP modem-router via Wi-Fi or Ethernet.
- Locate your ISP modem-router’s settings page.
- Find the router mode settings (if supported).
- Enable bridge mode.
- Save the settings and reboot the ISP modem-router.
Instructions for select ISPs
- How to enable bridge mode on a Comcast Xfinity Wireless Gateway
- How to enable transparent bridging on a CenturyLink modem
- How to enable Passthrough Mode on an AT&T Wi-Fi Gateway
- How to enable bridge mode on a Google Fibre router
- How to enable bridge mode on a Cox Internet Panoramic Wi-Fi Gateway
- How to enable bridge mode on an Arris Surfboard SBG6580 router
How can I change the router’s DNS servers?
The Domain Name System (DNS) is the phonebook of the internet. Humans access information online through domain names like bbc.com or expressvpn.com. Web browsers interact through Internet Protocol (IP) addresses. DNS translates domain names to IP addresses so browsers can load Internet resources like webpages.
When the VPN is connected, the router will use ExpressVPN’s private DNS servers.
When the VPN is disconnected, your DNS requests are sent to your ISP, who can use this information to track your activity online. Some providers may sell this data or use it to show you targeted ads.
ExpressVPN for routers allow you to use alternative DNS servers when the VPN is disconnected so that your DNS queries are never visible to your ISP. This can be enabled in Internet Settings; you will need the IP address(es) of your DNS provider (e.g. Quad9 or OpenDNS).

Note: Custom DNS will not hide your IP address or encrypt your web traffic. ExpressVPN is not responsible for how third-party DNS providers handle your DNS activity.